Battery Builder
R2026bDescription
Use the Battery Builder app to create Simscape™ battery models by interactively creating, modifying, and visualizing MATLAB® battery objects. You can use these MATLAB objects to define your own battery design specifications, visualize your battery in a 3-D plot, customize the modeling resolution during simulation, and generate a Simulink® library that contains your custom battery blocks. You can use these blocks to assist with virtual battery design and verification, develop battery control algorithms using Simulink, explore design sensitivities, and design thermal management strategies.
With the Battery Builder app, you can:
Import existing battery objects from your workspace or MAT file.
Create new
Cell,ParallelAssembly,Module,ModuleAssembly, andPackobjects. Each battery object has its own properties and parameters. For information about the properties of the battery objects, see theCell,ParallelAssembly,Module,ModuleAssembly, andPackdocumentation pages.Create and edit custom topologies for a particular battery cells arrangement. (since R2026b)
Generate a 3-D plot of the battery object, edit the plotting options, and export the plot to a file.
Inspect the hierarchy of a battery object and visualize all of its subcomponents.
Edit the properties of a battery object, such as geometrical data and thermal boundary conditions.
Export objects you create in the app to your workspace, a MAT file, or an STL file.
Create a Simscape battery model from an object.

Open the Battery Builder App
MATLAB Toolstrip: On the Apps tab, under Simscape, click the Battery Builder icon.
MATLAB command prompt: Enter
batteryBuilder.
Examples
To import the battery objects from your workspace or from a MAT file, under the Battery Builder tab, in the Battery Workspace section of the toolstrip, click Import. Then click Import from Workspace or Import from MAT-file.
Note
When you import an object, the app also automatically imports all its subcomponent battery objects.
To create a new battery object, under the Battery Builder tab, in the Editor section of the toolstrip, click New. Then click Cell, Parallel Assembly, Module, Module Assembly, or Pack to create the corresponding battery object and all its subcomponents with default property values.
The Editor panel on the left of the app now contains the new object and all its subcomponents. You can select this object, visualize it in the Selected Battery tab, edit its properties in the Properties panel on the right of the app, and send it to the Battery Workspace panel to store the object during the current app session.
Note
You can only have one battery object and its subcomponents in the Editor panel at the same time. To save the current battery object, export it or send it to the Battery Workspace panel.

To visualize a battery object, under the Battery Builder tab, in the Editor panel, select the object you want to visualize. The Selected Battery tab now displays a 3-D plot of the object.
For more visualization options, select the Battery Chart tab. In this tab, you can:
Edit multiple properties of the plot, such as the axes labels, axes direction, title of the plot, and lights.
Check the current simulation strategy and model resolution of the selected battery object. To visualize the simulation strategy in the plot, in the Simulation Strategy section of the toolstrip, check the Visible box.
Identify the index of a cell model block or specific subcomponent of the battery object. For more information, see Visualize Number of Cell Model Blocks and Subcomponents.
Export the 3-D plot of the object to a file, such as JPEG, PNG, or FIG. To export the plot, in the Export section of the toolstrip, click Export Chart.
To edit a battery object, select it in the left Editor panel of the app. The Properties panel on the right of the app now displays all the editable properties of the object.

To apply any changes, you must refresh the object by clicking Apply.
Each battery object has its own properties and parameters. For information about the
properties of the battery objects, see the Cell,
ParallelAssembly, Module,
ModuleAssembly, and Pack
documentation pages.
The Properties panel of the app contains the properties of the
ParallelAssembly, Module,
ModuleAssembly, and Pack objects in six sections.
Read-Only Properties — Data about the total mass, volume, energy, and capacity of the battery. You cannot modify these properties.
Identifier — Name of the object. Modify this property to modify the name of the object as it appears in the left Editor panel of the app.
Geometry — Geometrical information about the object, such as the position inside the chart and the stacking axis of the battery.
Properties — Structural information about the object, including the subcomponent object from which the parent object is created, how these children objects are stacked, and the gap between the objects.
Model Options — Modeling information about the object, such as options to enable non-cell resistances or a balancing strategy.
Thermal Model Options — Information that defines the thermal boundary conditions of the object.
When you create a ParallelAssembly, Module,
ModuleAssembly, or Pack object,
the Battery Builder app automatically assigns the associated defining
subcomponents. You can then specify whether to connect the subcomponents in parallel
and/or in series and scale them up to generate larger battery system models.

For example, a battery module comprises multiple parallel assemblies in series. When
you create a Module object, the Battery Builder app
automatically creates the associated ParallelAssembly subcomponent
object and assigns it to this Module object.
To modify the assigned child component of a parent component, in the Editor panel, select the parent component of which you want to assign a different child component. Then, in the Properties panel on the right of the app, in the Properties section, search for the property with the name of the child component you want to assign and click Assign.

In the new window, select the child component to assign and click OK.

Since R2026b
Custom topologies let you define arbitrary cell placement along a two-dimensional grid that the predefined topologies, such as hexagonal or square, do not support.
You can create a custom topology only from a ParallelAssembly or
Module object. To open the Custom Topology tab,
select a Module or ParallelAssembly object in the
Editor panel and, in the Topology section of
the toolstrip, click Custom Topology Editor.
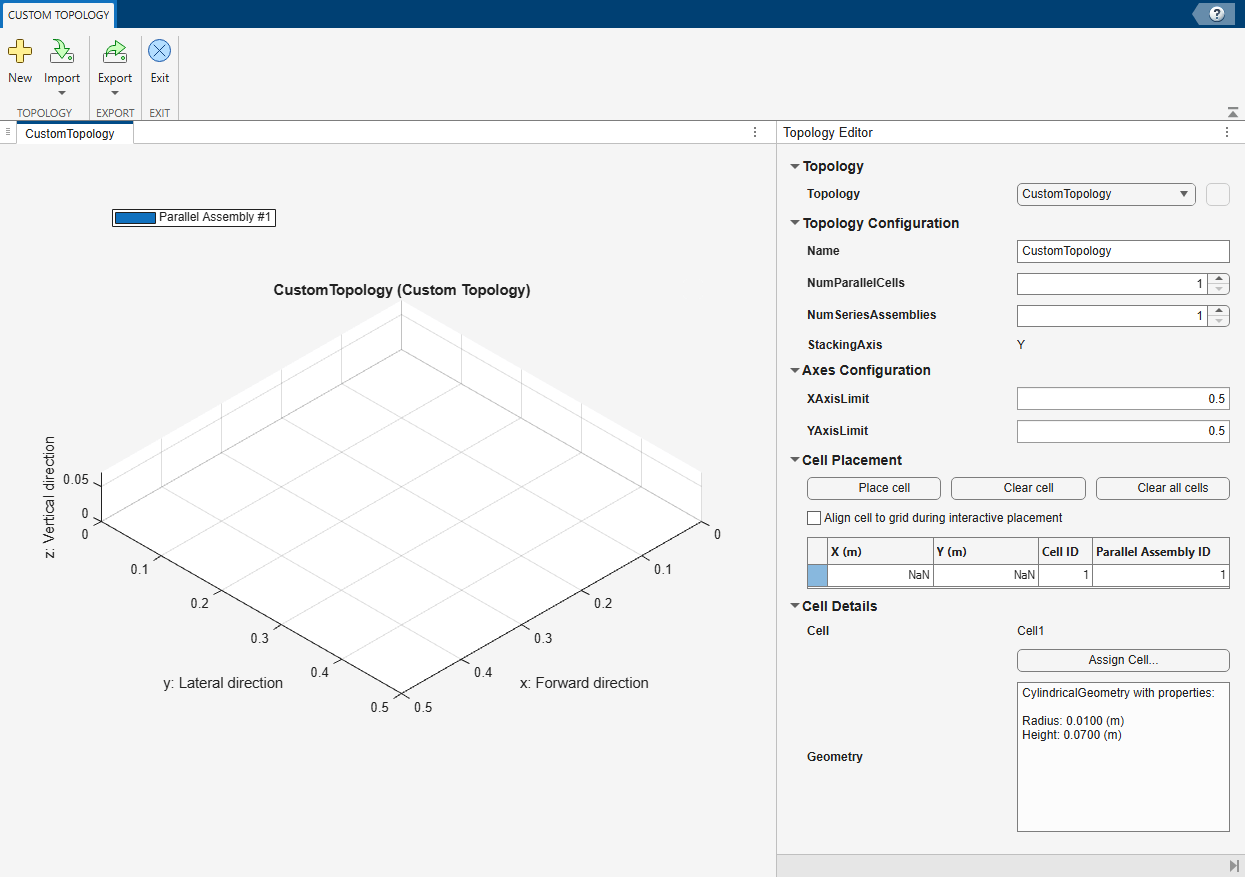
In the Custom Topology tab, you can: .
Import a custom topology from a file, such as a spreadsheet, that contains the cell positions in X and Y coordinates — In the Topology section, click Import > Import from File.
Import a custom topology from a
TopologyExport a custom topology to MATLAB workspace or a MAT-file — In the Export section, click Export and then Export to Workspace or Export to MAT-file.
Edit the custom topology properties, such as the name of the topology, number of parallel cells and series assemblies, stacking axis, and X-axis and Y-axis limits — In the Topology Editor panel, specify the
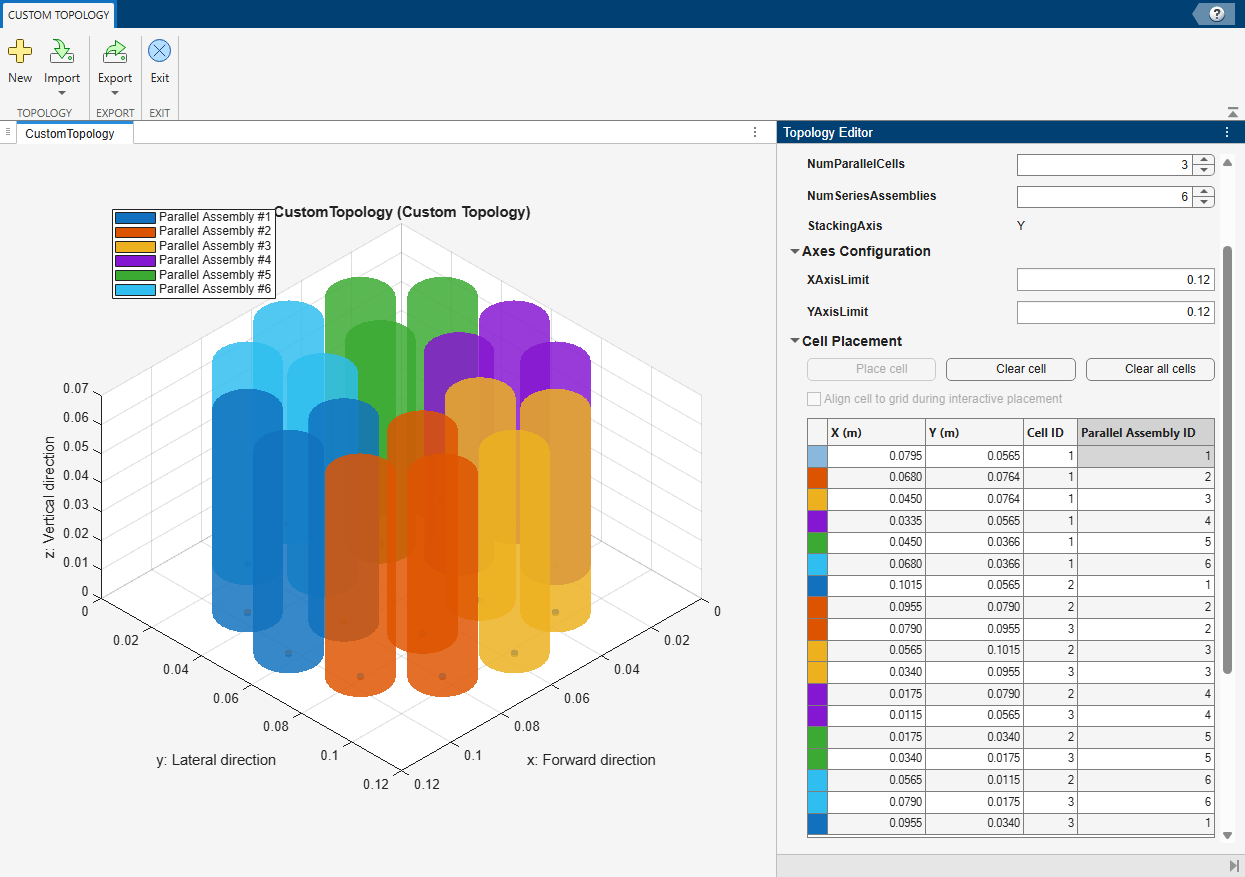
Name,NumParallelCells,NumSeriesAssemblies,StackingAxis,XAxisLimit, andYAxisLimitproperties.Place the battery cells interactively along a two-dimensional grid — In the Topology Editor panel, in the Cell Placement section, click Place cell. Then, left-click on the location in the grid where you want to place the battery cell. You can place a number of cells equal to the value of the
NumParallelCellsproperty.For example, this figure shows a custom topology with six parallel assemblies of three cells each. Each color defines a parallel assembly.
Clear previously placed cells — In the Topology Editor panel, in the Cell Placement section, click Clear cell to remove a selected cell, or Clear all cells to remove all placed cells.
Select the battery cell to assign to the custom topology — In the Topology Editor panel, in the Cell Details section, click Assign Cell. You can only assign cells currently saved in the Battery Workspace.
To assign a custom topology you create to a ParallelAssemby or
Module object, exit the Custom Topology tab and,
in the Editor panel, select the parallel assembly or module. Then,
in the Properties panel, in the Properties
section, select the Use Custom Topology property and select the
custom topology from the drop-down list.
To learn more about creating a battery model with custom topology, see Build Battery Models with Custom Topologies.
The Editor panel of the Battery Builder app allows you to manage your current work by duplicating, deleting, moving, or saving your battery objects.
To move a battery object up or down the battery hierarchy, select it and click the Up button
 to move it up the hierarchy or the Down button
  to move it down the hierarchy.
You can move only a
ModuleorModuleAssemblyobject whose parent object contains at least one other subcomponent.To duplicate a battery object, select it and click the Duplicate button
 . This action creates an identical copy of the selected object
inside the parent object.
. This action creates an identical copy of the selected object
inside the parent object.You can duplicate only a
ModuleorModuleAssemblyobject that is a child component of a parent object.To delete a battery object, select it and click the Remove button
 . This action deletes the object and all its
subcomponents.
. This action deletes the object and all its
subcomponents.You can delete only
ModuleorModuleAssemblyobjects whose parent object contains at least one other subcomponent.To remove all objects from the Editor panel, click the Clear button
 .
.To save the parent battery object and its subcomponent as a variable in the Battery Workspace, click the Send button
 . This action deletes the object and its subcomponent from the
Editor panel.
. This action deletes the object and its subcomponent from the
Editor panel.Alternatively, right-click the object you want to save as a variable in the Battery Workspace and click Send to Battery Workspace. This action does not delete the object and its subcomponent.
The Battery Workspace panel of the Battery Builder app allows you to manage your saved work by editing, duplicating, renaming, or removing your saved battery objects.
To edit a copy of a battery object saved in a variable, select the corresponding variable and click the Copy button
 . This action removes all current battery objects in the
Editor panel and replaces them with the objects inside the
selected variable.
. This action removes all current battery objects in the
Editor panel and replaces them with the objects inside the
selected variable.To duplicate any object saved as a variable in the Battery Workspace, select it and click the Duplicate button
.To rename a saved variable, select it and click the Rename button
 .
. To delete a saved variable, select it and click the Remove button
.To remove all variables from the Battery Workspace panel, click the Clear Battery Workspace button
 .
.
Since R2026a
The Battery Builder app allows you to easily identify the index of a cell model block or specific subcomponent of your battery objects.
The number of cell model blocks in your battery depends on the model resolution you
choose to model your battery at. By default, the model resolution is
Lumped. This resolution indicates that only one “scaled-up”
equivalent circuit model represents your system. If you increase the model resolution to
Grouped, you can customize the number of electrical and
thermal models. If you require a very detailed battery model, you can choose to simulate
every single cell inside your battery at a greater performance cost.
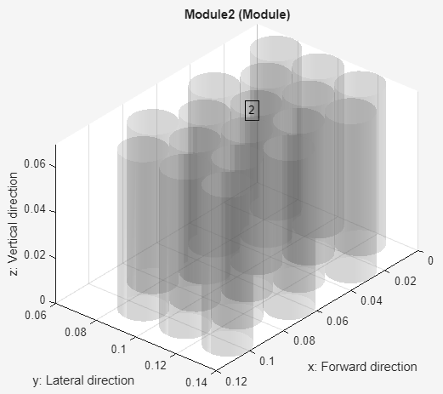
To visualize the number of cell model blocks in your battery, select the object you want to visualize in the Editor panel. Then, under the Battery Chart tab, in the Simulation Strategy section of the toolstrip, click Cell Model Numbering and select one of these options:
Independent — Restart numbering at 1 for the cell model blocks of each battery object in the Editor panel.
Cumulative — Maintain sequential numbering for cell model blocks across all battery objects in the Editor panel.
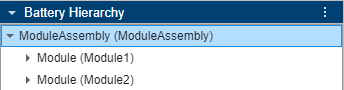
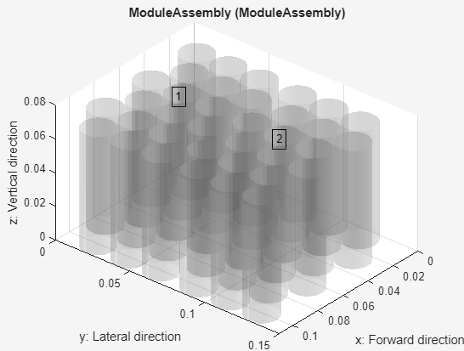
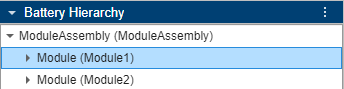
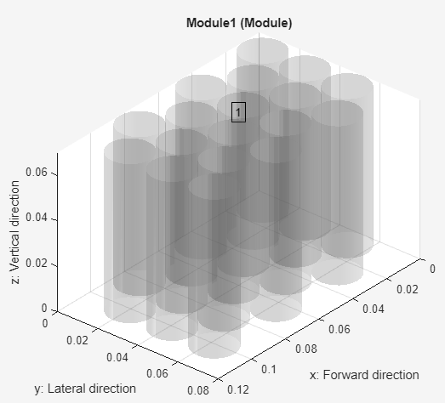
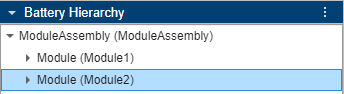
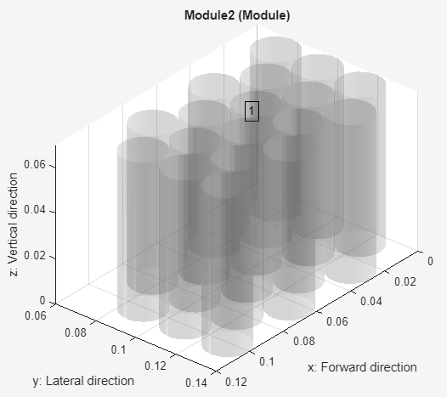
This table shows how the Battery Builder app visualizes the
cell model numbering on a module assembly with two modules and a
"Lumped" module resolution when you select
Independent or
Cumulative.
| Selected Battery Object in Battery Hierarchy | Cell Model Numbering | |
|---|---|---|
| Independent | Cumulative | |
Module assembly
| The numbering of the cell model blocks starts at 1.
| |
Module 1
| The numbering of the cell model blocks starts at 1.
| |
Module 2
| The numbering of the cell model blocks starts at 1.
| The numbering of the cell model blocks continues from the previous Module 1 and starts at 2.
|
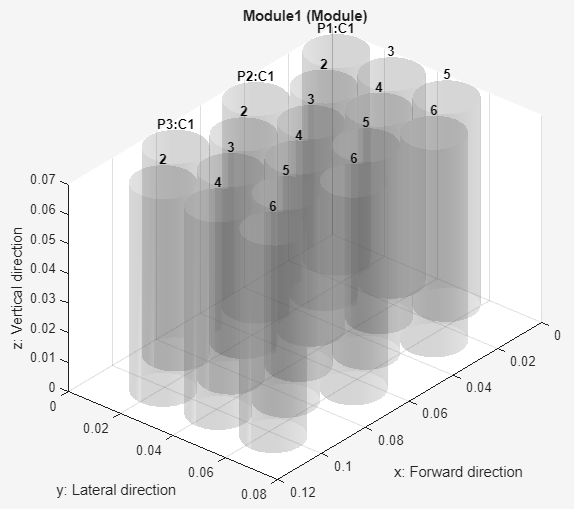
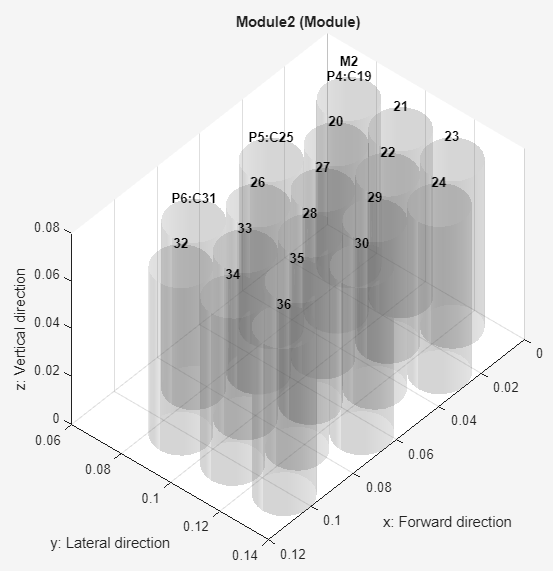
To visualize the index of a specific subcomponent inside your battery object, select the object you want to visualize in the Editor panel. Then, under the Battery Chart tab, in the Simulation Strategy section of the toolstrip, click Battery Numbering and select one of these options:
Independent — Restart numbering at 1 for the cells in each subcomponent of the selected parent battery object.
Local Cumulative — Maintain sequential numbering only inside the currently displayed subcomponent.
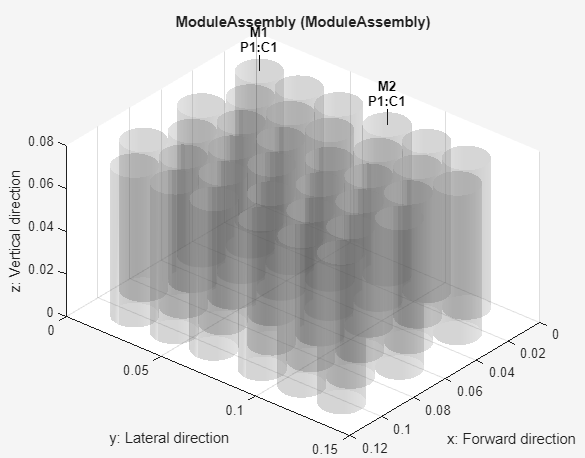
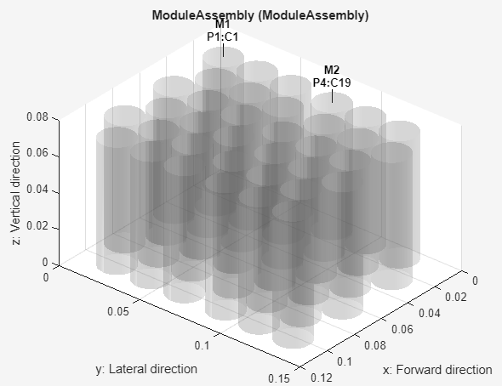
Global Cumulative — Maintain sequential numbering across all subcomponents of the highest parent battery object.
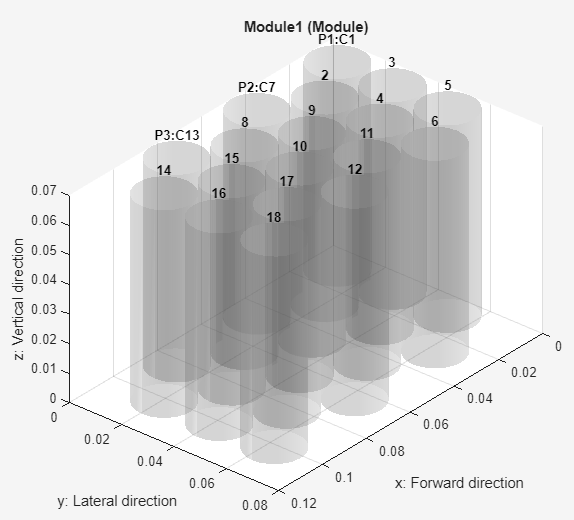
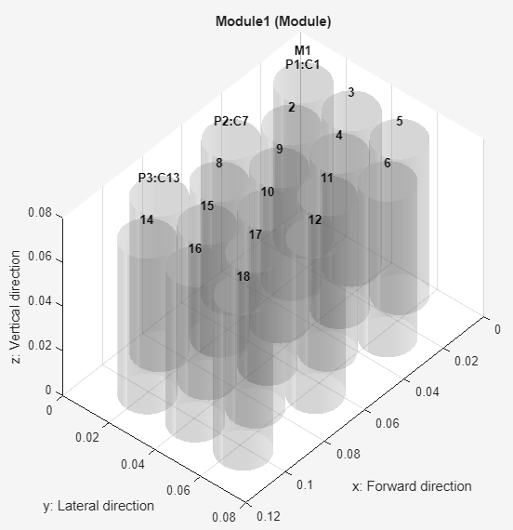
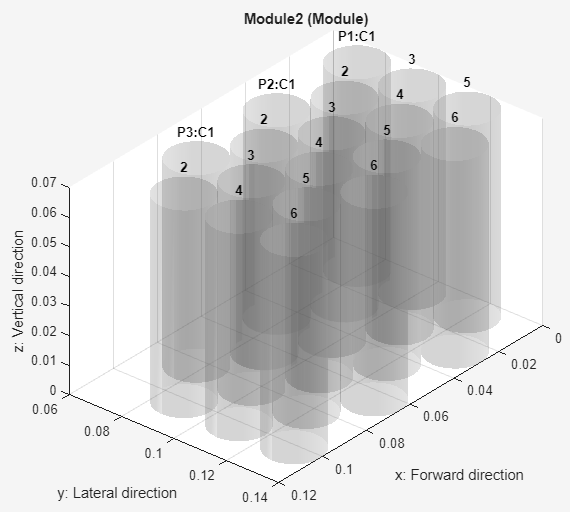
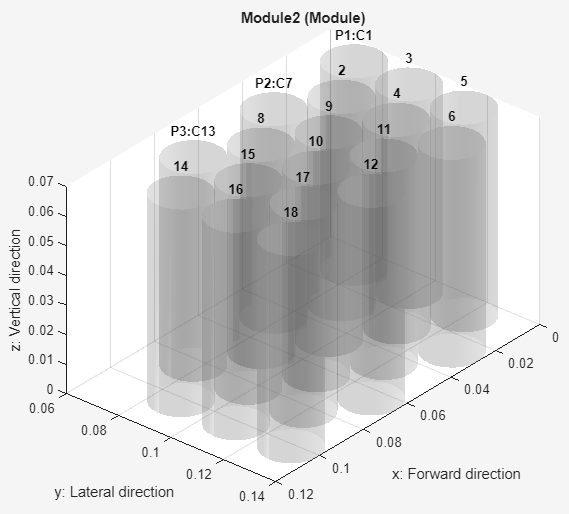
This table shows how the Battery Builder app visualizes the
battery numbering on a module assembly with two modules when you select
Independent, Local Cumulative,
or Global Cumulative. Each module comprises three parallel
assemblies of six cells.
Note
In the displayed object, C stands for cell, P stands for parallel assembly, M stands for module, and MA stands for module assembly.
| Selected Battery Object in Battery Hierarchy | Battery Numbering | ||
|---|---|---|---|
| Independent | Local Cumulative | Global Cumulative | |
Module assembly
| For the first and second module of the module assembly, the Battery Builder app starts numbering P at 1 and C at 1. | The battery numbering is cumulative
across all subcomponents of the module assembly and counts each module,
parallel assembly, and cell individually. As this is the highest parent
battery object, the | |
|
| ||
Module 1
| The battery numbering is independent of the direct parent object. The app restarts numbering C at 1 for each parallel assembly inside the module. | The battery numbering is sequential inside the displayed battery object for both the parallel assemblies and the cells. | The battery numbering is sequential across all subcomponents of the
module assembly. This is the first module of the module assembly so the
displayed numbers are identical to the numbers of the |
|
|
| |
Module 2
| The battery numbering is independent of the direct parent object. The app restarts numbering C at 1 for each parallel assembly inside the module. | The battery numbering is sequential inside the displayed battery object for both the parallel assemblies and the cells. | The battery numbering is sequential across all subcomponents of the module assembly. This is the second module of the module assembly so the numbering continues from the numbers of the previous module. |
|
|
| |
The information you obtain from the cell model blocks and battery numbering is important to perform different tasks on your battery object, including fault injection and thermal and thermal boundary modeling. This table shows the information required to perform a specific task and how to obtain it in the Battery Builder app.
| Task | Required Information | Battery Builder App | Related Examples |
|---|---|---|---|
| Thermal modeling | Cumulative number of cell model blocks. | Under the Battery Chart tab, in the
Simulation Strategy section of the toolstrip, click
Cell Model Numbering and select
"Cumulative". | |
| Thermal boundary nodes | Cumulative number of cells inside the specific battery |
| |
| Fault injection |
ModelResolution =
"Detailed" |
| |
| Independent number of a cell inside the specific battery | |||
ModelResolution = "Lumped" or
"Grouped" |
| ||
| Independent number of cell model blocks | |||
| Passive cell balancing | Global cumulative number of parallel assemblies. The size of the CB port of the generated battery blocks is equal to the number of parallel assemblies inside the block (regardless of the model resolution). | Under the Battery Chart tab, in the
Simulation Strategy section of the toolstrip, click
Battery Numbering and select "Global
Cumulative". |
To export the current battery object in the Editor panel to your workspace, a MAT file, or an STL file, under the Battery Builder tab, in the Export section of the toolstrip, click Export. Then, click Export to Workspace, Export to MAT-file, or Export to STL file. You cannot export cooling plates to STL files.
You can only export the parent object along with all its subcomponents. You cannot export a subcomponent object alone.
When you create a library model of your battery object, the Battery Builder app also automatically exports the object to a MAT file.
Note
The battery objects that you edit in the app are not automatically saved in your workspace. If you close the app, you lose the session and the objects you create.
To export the battery chart of a battery object to a file, such as a FIG, JPG, or PNG file, first select the battery object in the Editor panel. Then, under the Battery Chart tab, in the Export section of the toolstrip, click Export Chart.
To create a library model from a ParallelAssembly, Module,
ModuleAssembly, or Pack object,
click Create Library.
You can only create a library model of the parent object along with all its subcomponents. You cannot create a library model of a subcomponent object alone.
In the new window, specify the folder in which you want to save the library, the
library name, whether to use numeric values or variable names for the mask parameters
and mask initial targets, and whether to display command line output. For more
information about each of these fields, see the buildBattery documentation page.

Click the Create Library button to generate both the library model and a MAT file of your battery object in the specified folder.
Open this model to access your battery objects as Simscape blocks that you can use as a starting point for architecture evaluation in early development stages, software and hardware development, system integration and requirement evaluation, cooling system design, control strategy development, hardware-in-the-loop, and many more applications.
Related Examples
Version History
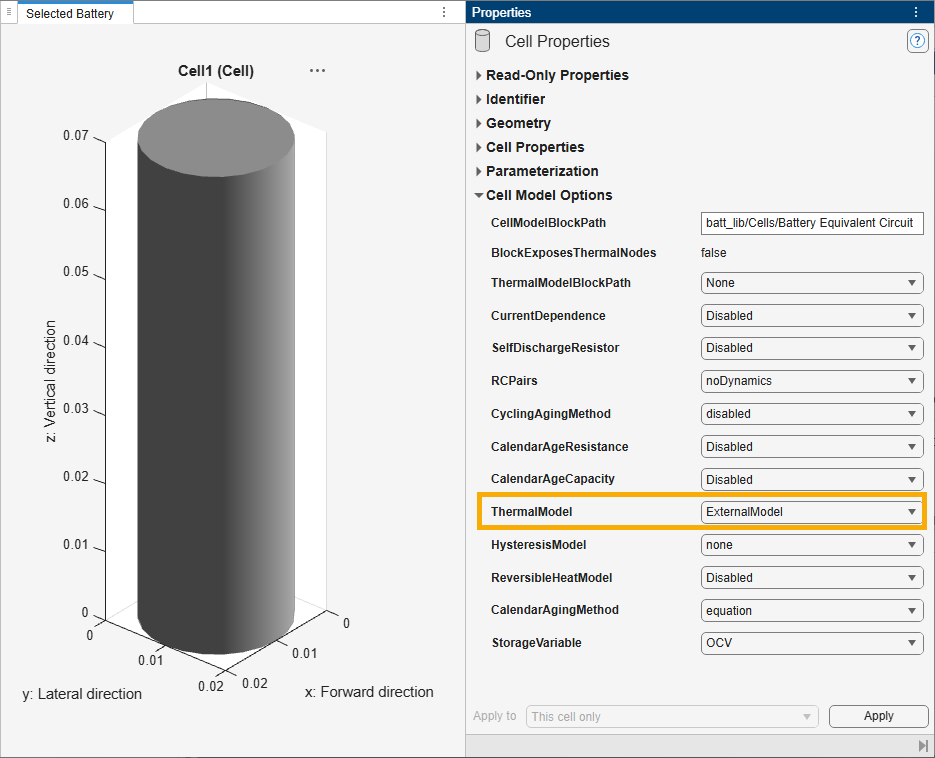
Introduced in R2023aThe Battery Builder app now allows you to integrate an external high-fidelity cell thermal model, such as reduced‑order thermal models in state‑space form, for a more accurate thermal modeling.
To integrate an external thermal model, select a Cell object in the
Editor panel and, in the Cell Properties panel,
in the Cell Model Options section, set
ThermalModel to ExternalModel. Then, when
you build the battery models, the software connects a Thermal
ROM block in series between the cell block and the downstream thermal network.
The Battery Builder app now exposes the
ParameterizationCollectionID and
ParameterizationCustomID properties of a Cell object in
the Parameterization section of the Cell
Properties panel.
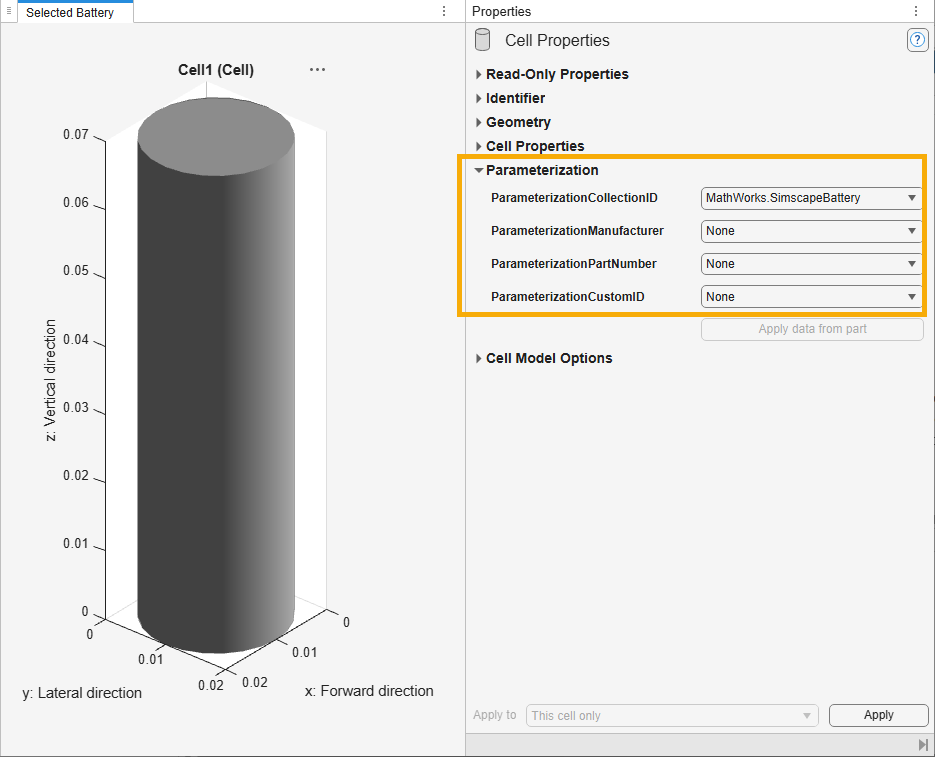
These properties allow you to parameterize a Cell object
from parts that you create. Parts contain block parameter data and metadata. To learn how to
author or install new part collections, see Programmatically Manage Simscape Block Parameter Data.
Use the ParameterizationCollectionID property to specify the
identifier of the part collection you want to parameterize your battery cell from. Use the
ParameterizationCustomID property to specify the identifier of the
custom part inside the part collection from which you want to parameterize the battery
cell,.

