Exchanging Ethernet Data with STM32xx Based Boards
This example shows you how to send and receive UDP and TCP messages on STM32xx processor based boards using Embedded Coder® Support Package for STMicroelectronics® STM32 Processors.
Introduction
In this example you will learn how to use TCP Send, TCP Receive, UDP Send and UDP Receive blocks to send and receive Ethernet data with the STM32H73ZI2 board.
This example workflow enables you for exchanging data between Host and the target via Ethernet Communication.
The Ethernet port on the STM32H73ZI2 board supports the IEEE 802.3 standard.
Prerequisites
We recommend completing
Required Hardware
To run this example you will need the following hardware:
STM32H73ZI2 board or (any STM32F4xx or STM32H7xx based boards)
RJ45 Ethernet cable.
Optional router for automatic IP assignment.
The STM32H73ZI2 board provides an Ethernet port. This port can be used for data communication using the lwIP TCP/IP stack.
Hardware and Network Configuration
In this task you will configure the hardware and network properties needed to run this example.
The default configuration of the target models present in this example are configured in STM32CubeMX project to get an IP address at startup using DHCP. This workflow is compatible when both the host computer and the target hardware are connected to a router. If you wish to connect the board straight into your host computer with the Ethernet cable, assign the STM32H73ZI2 board with a static IP address.
Click Launch to open the selected STM32CubeMX project in STM32CubeMX tool.

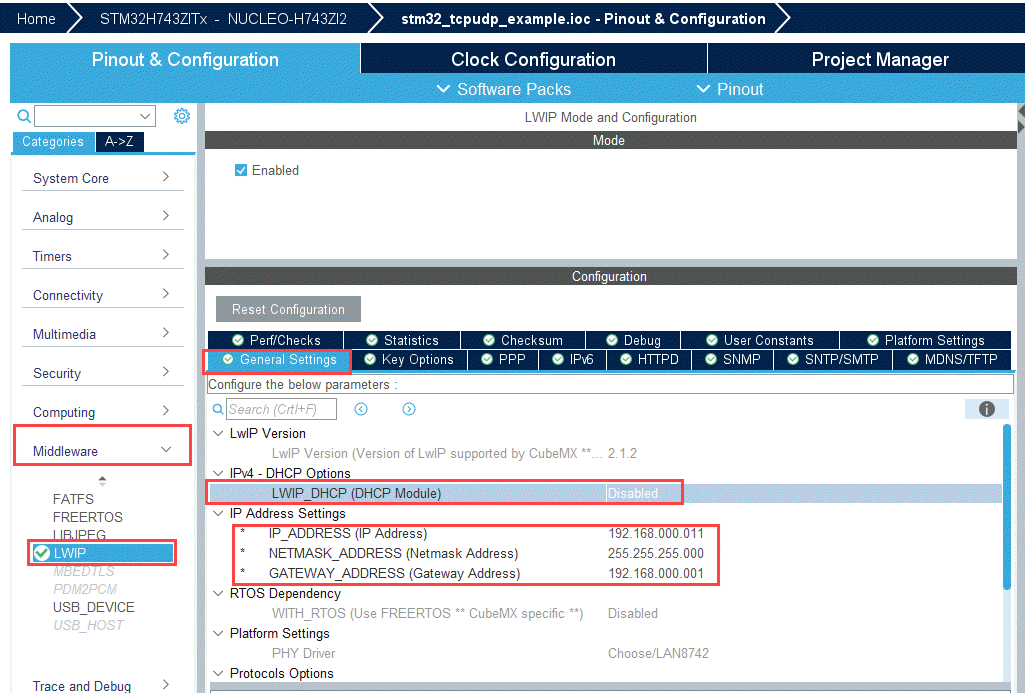
In the STM32CubeMX tool, navigate to Middleware > LWIP > General Settings and IPv4-DHCP Options
To choose a static IP address, ensure the LWP_DHCP (DHCP Module) is set to
Disabled. This will prompt you to enter the static IP and Netmask address. Ensure that the IP address and netmask are unique and appropriate.
Settings for Automatic IP Address Assignment using DHCP
Connect the STM32H73ZI2 board with a network cable to a router for automatic IP address assignment. In this configuration, the host computer also needs to be connected to the same router. This can be done with a network cable or over WiFi.

Ethernet Settings for Static IP Address Assignment
Connect the STM32H73ZI2 Board with a network cable to the host computer. In this configuration, set the controlCARD with a static IP address.
UDP Communication between the Target and the Host Computer
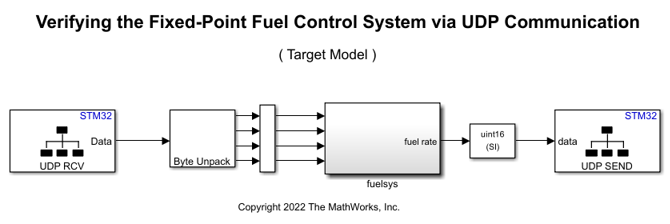
In this task, you will run the Model Fault-Tolerant Fuel Control System example on the STM32H73ZI2 board. The control algorithm runs on the target while the host runs a plant simulation of the system. The target and the host communicate via UDP. The target model receives the fuel system control sensors values from the host model and transmits back the calculated fuel mixture ratio to the host computer.
Models Involved in this Example

Run the Model configured for the target on the hardware
1. Open the stm32_udp_target.
2. Configure the network properties for the model as described in the previous section: Hardware and Network Configuration.
On the target UDP Send block, the remote IP port has to match the local IP port of the host model UDP Receive block. Make sure that the remote IP address is matching the host IP address.
On the target UDP Receive block, the local IP port has to match the remote IP port of the host model UDP Send block.
3. The UDP Send and Receive blocks on the target model are configured to do a transmit broadcast and receive from all IP address in the subnet. You can change this to send to a specific IP address and receive from a specific IP address if you know the IP address of the host computer.
4. On the stm32_udp_target, press Ctrl+B or On the Hardware tab, click Build, Deploy & Start to build, load and run the model on the target.
Run the Host Model and analyze the data
While the target model is running, run the stm32_udp_host to send simulated sensor data to the target and visualize the calculated response by the controller.
TCP Communication between the Target and the Host Computer
In this task, you will run the Model Fault-Tolerant Fuel Control System. The control algorithm runs on the target while the host runs a plant simulation of the system. The target and the host communicate via TCP. The target model receives the fuel system control sensors values from the host model and transmits back the calculated fuel mixture ratio to the host computer.
Note: For multiple clients at the host to communicate with the board configured as a server, there must be multiple server blocks in the board.
Models Involved in this Example

2. stm32_tcp_host - This model requires Instrument Control Toolbox™.

Run the model configured for the target on the hardware
1. Open the stm32_tcp_target.
2. Configure the network properties for the model as described in the previous task: Hardware and Network Configuration.
On the target TCP Send block, the local IP port has to match the port of the host model TCP Receive block.
On the target TCP Receive block, the local IP port has to match the port of the host model TCP Send block.
3. On the stm32_tcp_target, press Ctrl+B or on the Hardware tab, click Build, Deploy & Start to build, load and run the model on the target.
Run the Host Model to receive and analyze the data
While the target model is running, run the stm32_tcp_host to send simulated sensor data to the target and visualize the calculated response by the controller.
See Also
You can also select a web site from the following list:
Americas
- América Latina (Español)
- Canada (English)
- United States (English)
Europe
- Belgium (English)
- Denmark (English)
- Deutschland (Deutsch)
- España (Español)
- Finland (English)
- France (Français)
- Ireland (English)
- Italia (Italiano)
- Luxembourg (English)
- Netherlands (English)
- Norway (English)
- Österreich (Deutsch)
- Portugal (English)
- Sweden (English)
- Switzerland
- United Kingdom (English)