Register, Validate, and Deploy Custom Natural Logarithm Layer Network to FPGA
This example shows how to register, validate, and deploy a custom natural logarithm (log) layer network by using Deep Learning HDL Toolbox™. To deploy the network with the custom natural logarithm (log) layer:
Create a custom processor configuration by using the
dlhdl.ProcessorConfigobject.Create a MATLAB® Function and Simulink® model to represent your custom layer.
Register the custom natural logarithm log) layer by using the
registerCustomLayermethod.Simulate and verify your custom layer by using a generated verification model. Generate a verification model by using the
openCustomLayerModelmethod. Verify the custom layer by using theverifyCustomLayerModelmethod.Generate a custom bitstream by using the
dlhdl.buildProcessorfunction.Create a workflow object that has your custom layer network and custom bitstream by using the
dlhdl.Workflowobject.Compile and deploy the workflow object by using the
compileanddeploymethods.
To retrieve the prediction results from the deployed custom layer network, use MATLAB.
Create a Deep Learning Processor Configuration
To generate a custom processor configuration, use the dlhdl.ProcessorConfig object. The generated deep learning processor configuration object has a custom module that contains the preconfigured custom layers. Save the deep learning processor configuration to a variable hPC.
hPC = dlhdl.ProcessorConfig
hPC =
                    Processing Module "conv"
                            ModuleGeneration: 'on'
                          LRNBlockGeneration: 'off'
                 SegmentationBlockGeneration: 'on'
                         GELUBlockGeneration: 'off'
                            ConvThreadNumber: 16
                             InputMemorySize: [227 227 3]
                            OutputMemorySize: [227 227 3]
                            FeatureSizeLimit: 2048

                      Processing Module "fc"
                            ModuleGeneration: 'on'
                      SoftmaxBlockGeneration: 'off'
                         GELUBlockGeneration: 'off'
                              FCThreadNumber: 4
                             InputMemorySize: 25088
                            OutputMemorySize: 4096

                  Processing Module "custom"
                            ModuleGeneration: 'on'
                                    Addition: 'on'
                                   MishLayer: 'off'
                              Multiplication: 'on'
                                    Resize2D: 'off'
                                     Sigmoid: 'off'
                                  SwishLayer: 'off'
                                   TanhLayer: 'off'
                             InputMemorySize: 40
                            OutputMemorySize: 120

              Processor Top Level Properties
                              RunTimeControl: 'register'
                               RunTimeStatus: 'register'
                          InputStreamControl: 'register'
                         OutputStreamControl: 'register'
                                SetupControl: 'register'
                           ProcessorDataType: 'single'
                            UseVendorLibrary: 'on'
                     LayerNormalizationBlock: 'off'

                     System Level Properties
                              TargetPlatform: 'Xilinx Zynq UltraScale+ MPSoC ZCU102 Evaluation Kit'
                             TargetFrequency: 200
                               SynthesisTool: 'Xilinx Vivado'
                             ReferenceDesign: 'AXI-Stream DDR Memory Access : 3-AXIM'
                     SynthesisToolChipFamily: 'Zynq UltraScale+'
                     SynthesisToolDeviceName: 'xczu9eg-ffvb1156-2-e'
                    SynthesisToolPackageName: ''
                     SynthesisToolSpeedValue: ''
Create Custom Layer MATLAB Function
Design the custom layer function by using a MATLAB function. The custom layer function must:
Have a maximum of two inputs and one output.
Use only element-wise operations. These operations are not element-wise operations, Matrix multiplication, flatten, reshape, concatenation, batch normalization
This example code shows the MATLAB function for a custom logarithm layer.
classdef LogLayer < nnet.layer.Layer
    % To create a custom network with exponential layer for verification
    % and for using it in yolov2transform layer, this class can be used.

    methods
        % function layer = LogLayer(varargin)
        %     p = inputParser;
        %     addParameter(p,'Name', []);
        %     parse(p,varargin{:});
        %     layer.Name = p.Results.Name;
        %     layer.Type = 'Log';
        % end

        function layer = LogLayer(name)
            layer.Name = name;
            layer.Description = 'Custom Log Layer';
        end

        function Z = predict(~, X)
            % Forward input data through the layer at prediction time and
            % output the result
            Z = log(X);
        end
    end
end
Create Custom Layer Simulink Function
Design the custom layer model in Simulink. Your model design must:
Use subsystem reference blocks only. Model reference blocks are not supported.
Model the
inputvalidandoutputValidsignals.Have the same inputs and outputs as the custom layer MATLAB function.

Register Custom Layer and Model
To register an instance of the custom layer and custom layer Simulink model use the registerCustomLayer method. Deep Learning HDL Toolbox uses the Simulink model to generate a verification model for the custom layer.
hLogLayer = LogLayer('customLog');
registerCustomLayer(hPC,Layer = hLogLayer, Model = 'dnnfpgaLogLayerModel.slx');
hPC
hPC =
                    Processing Module "conv"
                            ModuleGeneration: 'on'
                          LRNBlockGeneration: 'off'
                 SegmentationBlockGeneration: 'on'
                         GELUBlockGeneration: 'off'
                            ConvThreadNumber: 16
                             InputMemorySize: [227 227 3]
                            OutputMemorySize: [227 227 3]
                            FeatureSizeLimit: 2048

                      Processing Module "fc"
                            ModuleGeneration: 'on'
                      SoftmaxBlockGeneration: 'off'
                         GELUBlockGeneration: 'off'
                              FCThreadNumber: 4
                             InputMemorySize: 25088
                            OutputMemorySize: 4096

                  Processing Module "custom"
                            ModuleGeneration: 'on'
                                    Addition: 'on'
                                    LogLayer: 'on'
                                   MishLayer: 'off'
                              Multiplication: 'on'
                                    Resize2D: 'off'
                                     Sigmoid: 'off'
                                  SwishLayer: 'off'
                                   TanhLayer: 'off'
                             InputMemorySize: 40
                            OutputMemorySize: 120

              Processor Top Level Properties
                              RunTimeControl: 'register'
                               RunTimeStatus: 'register'
                          InputStreamControl: 'register'
                         OutputStreamControl: 'register'
                                SetupControl: 'register'
                           ProcessorDataType: 'single'
                            UseVendorLibrary: 'on'
                     LayerNormalizationBlock: 'off'

                     System Level Properties
                              TargetPlatform: 'Xilinx Zynq UltraScale+ MPSoC ZCU102 Evaluation Kit'
                             TargetFrequency: 200
                               SynthesisTool: 'Xilinx Vivado'
                             ReferenceDesign: 'AXI-Stream DDR Memory Access : 3-AXIM'
                     SynthesisToolChipFamily: 'Zynq UltraScale+'
                     SynthesisToolDeviceName: 'xczu9eg-ffvb1156-2-e'
                    SynthesisToolPackageName: ''
                     SynthesisToolSpeedValue: ''
The custom deep learning processor configuration has a Log layer under the custom processing module. The custom natural logarithm (log) layer is enabled by default for the bitstream generation.
Generate Verification Model for Custom Layer
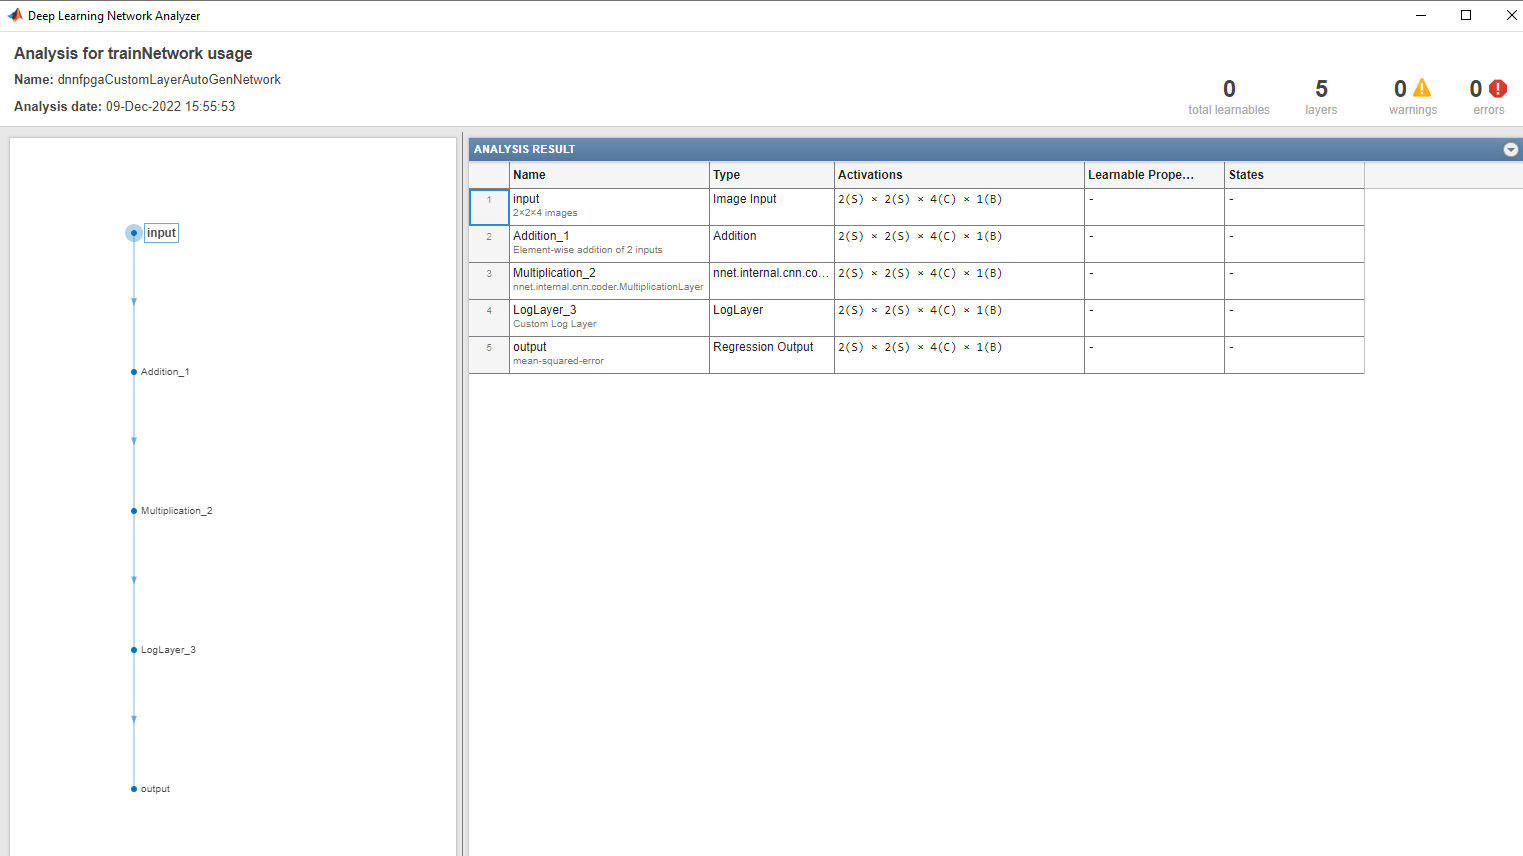
Generate a verification model for your custom layer by using the openCustomLayerModel method. Generate a test network for your custom layer network by specifying blank arguments for the Network. Create a test image with dimensions two-by-two-by-four, ensuring all values are between 1 and 255, specifically for Log operation, and use this image to set the InputImages parameter for the openCustomLayerModel method.
image = randi([1 255], [2,2,4]);
openCustomLayerModel(hPC, InputImages = single(image))
### The 'Network' property is empty for the given object. An auto-generated network is provided.
### Custom layer verification model generation begin.
### Compiling network for Deep Learning FPGA prototyping ...
### Custom layer verification model generation complete.
This image shows the auto-generated network for the custom layer model.
The openCustomLayerModel method generates a verification model file called dnnfpgaCustomLayerVerificationModel.slx for your custom layer. The generated verification model consists a test bench block TB and a design under test block DUT. The test bench block contains test signals that are applied to your custom layer model which is a part of the design under test block to verify the functionality of the custom layer and prediction accuracy of the network that has the custom layer. This image shows the generated verification model blocks.

Simulate and Validate Custom Layer Model
Before you verify your custom layer model by using the verifyCustomLayerModel method, open the dnnfpgaCustomLayerVerificationModel.slx verification model. The verifyCustomLayerModel verifies the functionality of the custom layer and prediction accuracy of the network which has the custom layer.
open_system('dnnfpgaCustomLayerVerificationModel.slx');
verifyCustomLayerModel(hPC);
### Custom layer verification model simulation and validation begin. ### Compiling Simulink model 'dnnfpgaCustomLayerVerificationModel' ...
Warning: Matching "From" for "Goto" '<a href="matlab:open_and_hilite_hyperlink ('dnnfpgaCustomLayerVerificationModel/DUT/Kernel Algorithms/Add Engine/Layer Normalization/Dummy Layer Norm/Goto1','error')">dnnfpgaCustomLayerVerificationModel/DUT/Kernel Algorithms/Add Engine/Layer Normalization/Dummy Layer Norm/Goto1</a>' not found
Warning: Matching "From" for "Goto" '<a href="matlab:open_and_hilite_hyperlink ('dnnfpgaCustomLayerVerificationModel/DUT/Kernel Algorithms/Add Engine/Layer Normalization/Dummy Layer Norm/Goto2','error')">dnnfpgaCustomLayerVerificationModel/DUT/Kernel Algorithms/Add Engine/Layer Normalization/Dummy Layer Norm/Goto2</a>' not found
Warning: Log of zero in '<a href="matlab:open_and_hilite_hyperlink ('dnnfpgaCustomLayerVerificationModel/DUT/Kernel Algorithms/Add Engine/CustomKernel/customLayer/real/DL Custom Layers/Reference_dnnfpgaCustomLayer_4/Math Function','error')">dnnfpgaCustomLayerVerificationModel/DUT/Kernel Algorithms/Add Engine/CustomKernel/customLayer/real/DL Custom Layers/Reference_dnnfpgaCustomLayer_4/Math Function</a>'
### Complete Simulink model 'dnnfpgaCustomLayerVerificationModel' compilation.
Verification passed.
### Custom layer verification model simulation and validation complete.
Warning can be ignored here as model is initialized with zero values. Use the generated verification model to simulate, test, iterate, and develop your custom kernel Simulink model. This image shows the custom kernel development process.

Generate Custom Bitstream
Generate a custom bitstream that has the name myCustomLayer.bit by using the dlhdl.buildProcessor function. Save the generated bitstream to the myCustomLayer_prj folder.
dlhdl.buildProcessor(hPC,ProjectFolder = 'myCustomLayer_prj',ProcessorName ='myCustomLayer');
Deploy and Predict Custom Layer Network on Hardware
Deploy the custom layer network by creating a dlhdl.Workflow object with the custom layer network as the Network argument and the custom bitstream myCustomLayer.bit as the Bitstream argument. To retrieve the prediction results from the deployed network use MATLAB and the predict method.
load('myCustomNet.mat');
hTarget = dlhdl.Target('Xilinx','Interface','JTAG');
hW = dlhdl.Workflow(Network = myCustomNet, Bitstream='myCustomLayer.bit',Target=hTarget);
compile(hW);
deploy(hW);
image = randi(255, [4,4,4]);
predict(hW,single(image),Profile='on');
See Also
dlhdl.Workflow | dlhdl.ProcessorConfig | registerCustomLayer | openCustomLayerModel | verifyCustomLayerModel | dlhdl.buildProcessor