Specify the Hardware
Specify the name of your hardware. This name displays in Simulink® dialog boxes so that the users can select it when they want to build a model for it. Also, specify the processor ID that determines the sizes of the different data types used by the processors that your hardware includes. Repeat these steps for each hardware device that your target supports.
Create the Hardware object,
hw, that represents your hardware by callingcreateHardwarewith the name you chose for the hardware, for example,'My ARM Cortex M Board'.hw = createHardware('My ARM Cortex M Board');You will map the
Hardwareobject to theTargetobject in a later step.Set the
DeviceIDproperty of theHardwareobject to a name-identifier of the processor that your hardware includes, for example,'ARM Cortex-M4F'.hw.DeviceID = 'ARM Cortex-M4F';View the properties of the
Hardwareobject.hw
hw =

  Hardware with properties:

           Name: 'My ARM Cortex M Board'
       DeviceID: 'ARM Cortex-M4F'
    IOInterface: {}
Map the
Hardwareobject to theTargetobject by callingmapwith the name you chose for your hardware for Simulink dialog boxes, for example,'My ARM Cortex M Board'.map(tgt,hw,'My ARM Cortex M Board');The name used in the above command is also known as the display name. The display name enables you to have unique names appear in the dialog boxes for the hardware even when the same
Hardwareobject is mapped to differentTargetobjects.For example, suppose that you want your new target to support the same hardware that its reference target already supports. Because the names of the hardware supported by both targets show in the same list in Simulink, the display name used for the hardware with your new target must be different than the display name used for the same hardware with the reference target.
The
Hardwareobject is now mapped to yourTargetobject. The display name of the hardware is set to'My ARM Cortex M Board'.Do not delete the
Hardwareobject from the MATLAB® workspace before you save the target.Confirm that your target supports the hardware and that the hardware display name is
'My ARM Cortex M Board'.show(tgt);
                   My ARM Cortex M Board
Display Name       My ARM Cortex M Board
The output shows that the hardware
'My ARM Cortex M Board'is added to the target with the display name'My ARM Cortex M Board'.Define I/O interfaces for each hardware device that your target supports. The hardware can have multiple I/O interfaces of either Ethernet or serial type. Typically, ARM® Cortex®-M hardware uses a serial interface. I/O interfaces are used for the PIL and External mode features, which you add to your target in later steps.
Add a Serial interface to the hardware by calling addNewSerialInterface with the name of the interface to be displayed in Simulink, for example,
'My Serial Interface'.io = addNewSerialInterface(hw,'My Serial Interface');A similar command exists for the Ethernet interface. For more information, see addNewEthernetInterface.
View the properties of the SerialInterface object.
io
io =

  SerialInterface with properties:

       DefaultBaudrate: 115200
    AvailableBaudrates: {[115200]}
           DefaultPort: 'COM1'
        AvailablePorts: {'COM1'}
                  Name: 'My Serial Interface'
Set the properties as appropriate for your hardware.
Save the target description information to that target’s framework.
saveTarget(tgt);
Test that the hardware has been registered successfully.
testTarget(tgt,'hardware');Upon completion of the test, a summary result is displayed. If the test
PASSED, then you can proceed with adding the next feature. Otherwise, if the test eitherFAILEDor isINCOMPLETE, a link to the test diagnostic logs is shown below the test summary.
Repeat the process in this section for each additional hardware device that your new target supports. Use unique hardware names each time.
Example
Confirm that your hardware is registered with Simulink by following the steps below.
Create a new Simulink model and select Simulation > Model Configuration Parameters.
In the Configuration Parameters dialog box, select
Solver.From the Type list, select
Fixed-step. From the Solver list, selectauto.In the Configuration Parameters dialog box, select Hardware Implementation.
Expand the
Hardware boardlist and confirm that the selection of the name that you specified for your hardware.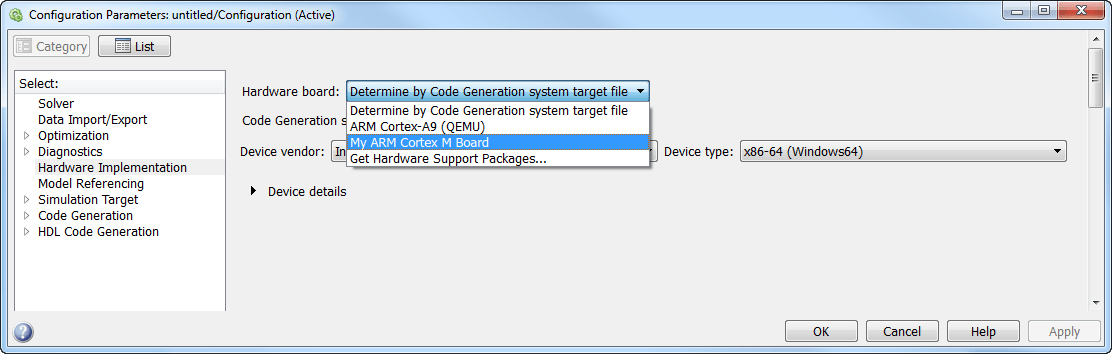
Click Cancel.