Configure and Build Model for Rapid Simulation
After you identify your rapid simulation requirements, configure the model for rapid simulation.
Set model configuration parameter System target file to
rsim.tlc(Rapid Simulation Target).Click RSim Target to view the RSim Target pane.
Set the RSim target configuration parameters for your rapid simulation requirements.
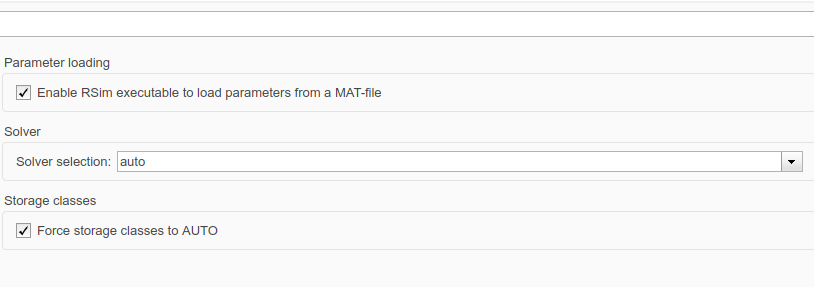
Goal Parameter Settings Generate code that allows the RSim executable program to load parameters from a MAT-file Select Enable RSim executable to load parameters from a MAT-file (default). Let the target choose a solver based on the solver already configured for the model Set Solver selection to
auto(default). The code generator uses a built-in solver if a fixed-step solver is specified on the Solver pane or calls the Simulink® solver module (a shared library) if a variable-step solver is specified.Explicitly instruct the target to use a fixed-step solver Set Solver selection to Use fixed-step solvers. In the Configuration Parameters dialog box, on the Solver pane, specify a fixed-step solver.Explicitly instruct the target to use a variable-step solver Set Solver selection to
Use Simulink solver module. In the Configuration Parameters dialog box, on the Solver pane, specify a variable-step solver.Force storage classes to Autofor flexible custom code interfacingSelect Force storage classes to AUTO (default). Retain storage class settings, such as ExportedGlobalorImportedExtern, due to application requirementsClear Force storage classes to AUTO. Set up data import and export options. On the Data Import/Export pane, in the Save to Workspace section, select the Time, States, Outputs, and Final States parameters, as they apply. By default, the code generator saves simulation logging results to a file named
model.matIf you are using external mode communication, set up the interface, using the Code Generation > Interface pane. See External Mode Simulations for Parameter Tuning, Signal Monitoring, and Code Execution Profiling for details.
Press Ctrl+B. The code generator builds a highly optimized executable program that you can run on your development computer with varying data, without rebuilding.
For more information on compilers that are compatible with the Simulink Coder™ product, see Select and Configure C or C++ Compiler and Template Makefiles and Make Options.