Link Safety Analysis Manager Spreadsheet Cells and Rows to Linkable Items
If you have a Requirements Toolbox™ license, you can define the traceability between cells (since R2023b) and rows (since R2024b) in Safety Analysis Manager spreadsheets by linking cells and rows to other linkable items. Linkable items in Simulink® include requirements, test cases, faults, conditionals, and other Safety Analysis Manager spreadsheet cells and rows. For a list of linkable items, see Linkable Items (Requirements Toolbox).
To link artifacts in the Safety Analysis Manager, you must save the document first. When you link spreadsheet cells or rows, the Requirements Toolbox software stores the links in a SLMX file by default.
Link Cells and Rows to Requirements
Link Safety Analysis Manager cells and rows to requirements to specify design requirements in your spreadsheets. Before you begin, in the Apps tab, open Safety Analysis Manager and the Requirements Editor.
To link Safety Analysis Manager cells to requirements:
In the Requirements Editor, open or create a new requirement set with at least one requirement. See Author Requirements in MATLAB or Simulink (Requirements Toolbox).
Click the requirement.
In a saved Safety Analysis Manager, spreadsheet, right-click the cell or row index and select Requirements > Link to Selection in Requirements Browser.
You can view the links in the Requirements Editor by clicking
Show Links in the View section. In the
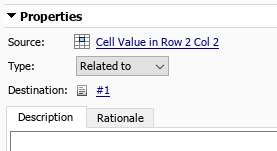
right pane, the Source field of a link from a cell includes the
spreadsheet cell badge ![]() , the name of the spreadsheet that contains the cell,
the cell row index, and the cell column label.
, the name of the spreadsheet that contains the cell,
the cell row index, and the cell column label.

The Source field of a link from a row includes the spreadsheet
row badge ![]() , the name of the spreadsheet that contains the row,
and cell row index.
, the name of the spreadsheet that contains the row,
and cell row index.
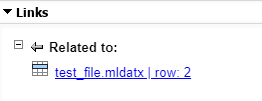
You can also see the cells and rows linked to each requirement in the requirements
view. In the View section, click Show
Requirements and select a requirement. Links to cells and rows display
in the Links section. Links to cells have the spreadsheet cell
badge ![]() and links to rows have the spreadsheet row badge
and links to rows have the spreadsheet row badge
![]() . In this example image, a spreadsheet row links to
the requirement.
. In this example image, a spreadsheet row links to
the requirement.

Link Spreadsheet Cells and Rows to Simulink Test Artifacts
If you have a Requirements Toolbox and Simulink Test™ license, you can link cells and rows to Simulink Test objects, such as test files, test suites, and test cases.
To link test cases to cells or rows:
In the Apps tab, click Simulink Test.
Open the Test Manager. In the Tests tab, in the Test Cases section, click Simulink Test Manager.
Load or create a test suite or test file and click the test case. The test suite or test file must have at least one test case. For more information on how to create a test case, see Baseline Testing (Simulink Test).
Click the test case.
In a saved Safety Analysis Manager spreadsheet, right-click the cell or row index and select Requirements > Link to Current Test Case.
Link to Simulink Fault Analyzer Artifacts
You can create links to conditionals, faults, or to other Safety Analysis Manager spreadsheet or rows.
Link Cells or Rows to Faults
To create links to faults:
In a Simulink model, open the Fault Table pane. In the Fault Analyzer tab, in the View section, click Fault Table.
In the Fault Table pane, click the Fault tab.
Expand the model element list and click the fault.
In a saved Safety Analysis Manager spreadsheet, right-click the cell or row index and select Requirements > Link to Selection in Fault Table.
Link Cells or Rows to Conditionals
To create links to conditionals:
Open the Fault Table pane.
Click the Conditional tab.
Click the conditional.
In a saved Safety Analysis Manager spreadsheet, right-click the cell and select Requirements > Link to Selection in Fault Table.
Link to Other Spreadsheet Cells and Rows
You can link between cells or rows in the same or a different spreadsheet. To create links to other spreadsheet cells or rows in the Safety Analysis Manager:
Create and save a new spreadsheet or open an existing spreadsheet that contains at least two cells.
Right-click the cell or row, and select Requirements > Select for Linking in Safety Analysis Manager.
In the same or a different spreadsheet, right-click the other cell or row, and select Requirements > Link to Selection in Safety Analysis Manager.
The first artifact you select has the incoming link icon
![]() and the second artifact has the outgoing link
icon
and the second artifact has the outgoing link
icon ![]() . If you click the spreadsheet cell or row, the
Properties pane displays the link and the direction in the
Cell or Row tab, depending on what you
select.
. If you click the spreadsheet cell or row, the
Properties pane displays the link and the direction in the
Cell or Row tab, depending on what you
select.

Refresh Resolved Status in Spreadsheets
Links can become unresolved when you delete or close the link source or destination. The Safety Analysis Manager does not automatically determine if the links are resolved or unresolved. To update the resolved status of the links, in the Links section, click Refresh Links (since R2025a).
Programmatically Link Spreadsheet Cells and Rows
You can also programmatically link spreadsheet cells and rows in the Safety
Analysis Manager. For example, suppose that you have a spreadsheet open in the
Safety Analysis Manager and a requirement set called
my_requirements. To link the cell in the first column and first
row of a spreadsheet to the first requirement, and then link the second row to the first
requirement:
Retrieve the
Spreadsheetobject associated with the spreadsheet by using thesafetyAnalysisMgr.getOpenDocumentsfunction.mySpreadsheet = safetyAnalysisMgr.getOpenDocuments;
Get the
SpreadsheetCellobject associated with the cell in the first row and first column by using thegetCellfunction.myCell = getCell(mySpreadsheet,1,1);
Get the
SpreadsheetRowobject associated with the second row by using thegetRowfunction.myRow = getRow(mySpreadsheet,2);
Load the requirement set by using the
slreq.load(Requirements Toolbox) function.rs = slreq.load("my_requirements");Get the first requirement with the
findfunction.req = find(rs,Index=1);
Link the requirement to the cell and row.
link1 = slreq.createLink(myCell,req);
link2 = slreq.createLink(myRow,req);
To update the resolved status of the links, use the
refreshLinks function (since R2025a).
See Also
Apps
Functions
slreq.createLink(Requirements Toolbox)