Real-Time Image Acquisition, Image Processing, and Fixed-Point Blob Analysis for Target Practice Analysis
This example shows how to acquire real-time images from a GigE Vision® camera or webcam, process the images using fixed-point blob analysis, and determine world coordinates to score a laser pistol target.
The technology featured in this example is used in a wide range of applications, such as estimating distances to objects in front of a car, medical image analysis of cells [1], and detecting asteroids [2].
Key features of this example include:
Fixed-point blob analysis for collecting measurements
Real-time image acquisition
Camera calibration to determine world coordinates of image points
Correct images for lens distortion to ensure accuracy of collected measurements in world units
Determine world coordinates of image points by mapping pixel locations to locations in real-world units
Required Products
This example uses these products for the algorithm:
MATLAB®
Fixed-Point Designer™
Computer Vision Toolbox™
Image Acquisition Toolbox™
Image Processing Toolbox™
If you run the example in simulation mode, then you do not need a camera. Simulation mode loads recorded images and runs them through the algorithm as if a camera was attached.
If you use a GigE Vision camera, then you need this support package:
Image Acquisition Toolbox™ Support Package for GigE Vision® Hardware
If you use a webcam, then you need this support package:
MATLAB® Support Package for USB Webcams
Hardware Setup
Cameras
Image Acquisition Toolbox™ enables you to acquire images and video from cameras and frame grabbers directly into MATLAB® and Simulink®. Use the Image Acquisition Toolbox™ Support Package for GigE Vision® Hardware or the MATLAB® Support Package for USB Webcams to set up a camera to acquire the real-time images to perform the analysis.
For more information on setting up the camera, see Setting Up Image Acquisition Hardware (Image Acquisition Toolbox).
Target
Use these commands to create a target to print for use in this example. This code generates a pdf file of front the target, and a pdf file of the checkerboard for camera calibration for the back. Print the front and back double-sided on one piece of paper.
close all;
distance_m = 10;
offset_mm = 0;
print_target = true;
LaserTargetExample.make_target_airpistol10m(distance_m, offset_mm, print_target)
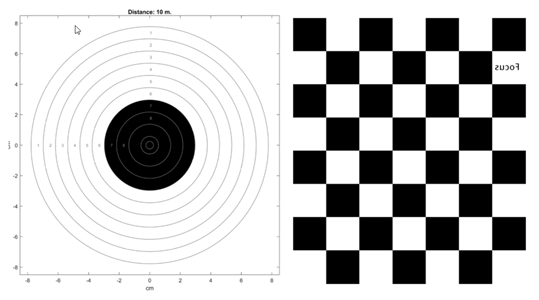
You can find an example target, airpistoltarget_10m.pdf, in the +LaserTargetExample/targets_for_printing folder.
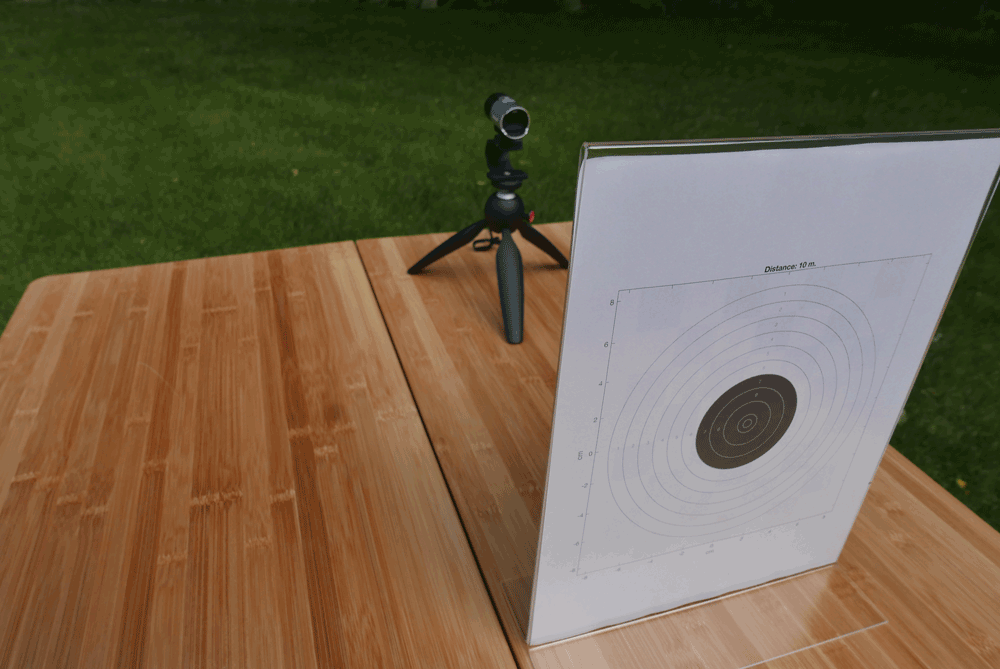
Setup
Set up the camera so that it faces the checkerboard side of the target. The shooter faces the target. You can keep the target and camera in fixed positions by mounting them on a board.

You can choose an iPhone as your webcam if you are using a Mac computer. An iPhone is the easiest to set up and use.
You can use a GigeCam for high-speed image capture.
You can use a standard webcam, but it can miss laser hits because the frame rate is slower than other cameras.
Algorithm
Calibrate the Image
Camera calibration is the process of estimating the parameters of the lens and the image sensor. These parameters measure objects captured by the camera. Use the Camera Calibrator (Computer Vision Toolbox) app to detect the checkerboard pattern on the back of the target and remove any distortion. Determine the threshold of ambient light on the target. You may need to adjust the camera settings or the lighting so that the image is not saturated. Use the pointsToWorld (Computer Vision Toolbox) function to determine world coordinates of the image points.
For more information, see What Is Camera Calibration? (Computer Vision Toolbox).
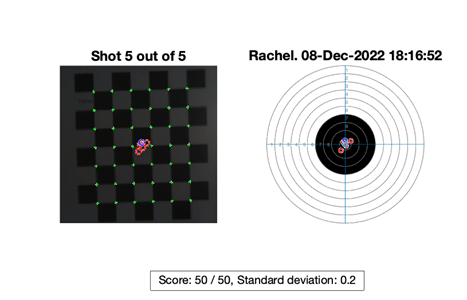
Find and Score the Shot
The algorithm scores the shots by detecting the bright light of the laser pistol. While shooting, get a frame and detect if there is a bright spot. If there is a bright spot over the specified threshold, process that frame.
Use blob analysis to find the center of the bright spot and translate the location from pixel coordinates to world coordinates. The blob analysis is done in fixed point because the image is stored as an 8-bit signed integer. After finding the center of the bright spot in world coordinates, calculate its distance from the bullseye at the origin and assign a point value to the shot.
Run the Example
To start the simulation, execute the run script stored in the +LaserTargetExample folder.
LaserTargetExample.run
This prompt appears:
(1) gigecam
(2) webcam
(3) simulation
Enter the number of the source type: 3
The script prompts you to select the source to use for the simulation. Enter 3 to watch a simulation of a previously recorded session. There is one previously recorded simulation available in the example files. A simulation recording is saved each time you run the example using a live camera and will be added to the simulation list. Enter a number to begin the simulation.
(1) saved_shots_20221208T181652
Enter number of file from list: 1
Entering a value of 1 or 2 prompts you to set up a GigE Vision camera or a webcam. It may take a couple of minutes for the camera to be found. When the camera is found, a Deployable Video Player window appears.
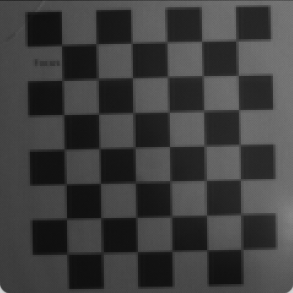
Adjust the camera so that:
All of the squares on the back of the target are in view.
The target is in focus.
There are no bright spots that can be confused with a laser hit.
It does not matter if the image is not straight. The algorithm corrects for this. Close the Deployable Video Player to continue.

The example then prompts you to enter the distance from the shooter to the target in meters and the name of the shooter. After shooting five shots at the target with a laser pistol, you will be prompted to enter the name of another shooter or empty return to quit.
Use a Different Camera
To set up the example using your own camera, use the Camera Calibrator (Computer Vision Toolbox) app to detect the checkerboard on the back of the target and remove distortion. Save the calibration variables in a MAT-file. The calibration variables for the GigE Vision camera and a webcam are saved in these MAT-files:
+LaserTargetExample/gigecam_240x240_calibration_parameters.mat+LaserTargetExample/webcam_LifeCam_480x480_camera_parameters.mat
Edit one of these files by substituting the settings with appropriate values for your camera:
+LaserTargetExample/gigecam_setup.m+LaserTargetExample/webcam_setup.m
Explore Data
Shot Database
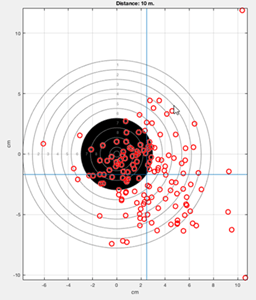
Each time you shoot, the hits are recorded in a file named ShotDatabase.csv. You can use the readtable function to load the data into a table object to visualize it. For example, after shooting, which populates the ShotDatabase.csv file, this code plots the center of a group of many shots:
T = readtable('ShotDatabase.csv');
LaserTargetExample.make_target_airpistol10m;
LaserTargetExample.plot_shot_points(T.X, T.Y);
ax = gca;
line(mean(T.X)*[1,1], ax.YLim);
line(ax.XLim, mean(T.Y)*[1,1]);
grid on;
Simulation Recordings
Each time you shoot, the video frames in which shots were detected are stored in files in a folder named simulation_recordings. You can load these files and explore the raw data from the shots. You can also edit the algorithm.
The variable frames contains the first frame which was used for calibration, plus ten frames for each detected shot. The first frame in each run of ten is where a shot was detected. You can see your hand movement in the subsequent frames. You can make a short animation of the data using this code:
d = dir(fullfile('simulation_recordings','*.mat'));
record = load(fullfile(d(1).folder, d(1).name));
t = LaserTargetExample.SerialDateNumber_to_seconds(...
    record.times);
t = t-t(1);
figure
for k = 1:size(record.frames, 3)
    imshow(record.frames(:,:,k), ...
        'InitialMagnification','fit');
    title(sprintf('Time since beginning of round: %.3f seconds',...
        t(k)))
    drawnow
end
References
[1] Cell Counting (Computer Vision Toolbox)
[2] Rizza, Antonio, Felice Piccolo, Mattia Pugliatti, Paolo Panicucci, and Francesco Topputo. "Hardware-in-the-Loop Simulation Framework for CubeSats Proximity Operations: Application to the Milani Mission." 73rd International Astronautical Congress, Paris, France, September 18-22, 2022.
See Also
undistortImage (Computer Vision Toolbox) | pointsToWorld (Computer Vision Toolbox) | vision.BlobAnalysis (Computer Vision Toolbox) | detectCheckerboardPoints (Computer Vision Toolbox)
Topics
- Acquire Images from GigE Vision Cameras (Image Acquisition Toolbox)
- Install the MATLAB Support Package for USB Webcams (Image Acquisition Toolbox)