Integrate DPI Components with Custom Predictors for UVM Framework
This example shows how to integrate a DPI sequence component with a custom predictor component and generate a fully functional UVM framework (UVMF) testbench. You design the sequence component in MATLAB®, predictor component in SystemVerilog and generate a UVMF compliant YAML from MATLAB. You then generate UVMF testbench code compatible with the generated components and run the block level RTL simulations using Questa® simulator.
Introduction
In certain instances of RTL verification for a design, custom predictors are developed using different programming languages apart from MATLAB. These custom predictors serve the purpose of predicting behaviors or outcomes of the design. Additionally, MATLAB is often used to generate sequences that are then incorporated as DPI components. To seamlessly integrate these custom predictors and DPI-based sequences into a UVMF testbench, it is necessary to create custom YAML files.
The primary objective of the example is to provide a step-by-step process of generating UVMF testbench YAML files using custom YAML templates. These templates allow for the customization of the UVMF testbench to suit the specific requirements of the verification environment. By following this process, you can integrate custom predictors and DPI-based sequences into the UVMF testbench more efficiently and streamline the process.
The YAML generation from MATLAB for custom predictors is supported on both Windows® and Linux® platforms. This example illustrates the step by step process on Linux. The yaml_gen_custom_predictors_proj project contains the supporting scripts and HDL files. Save the example working folder to the exampleWorkingFolder variable and open the project.
exampleWorkingFolder = pwd;
project = openProject("yaml_gen_custom_predictors_proj");
Design Overview
This example uses the digital clock design. For more information on the design, see Design Overview section of the Generate UVM Framework Testbench for Block-Level Verification example.
Block-Level Verification
This figure illustrates the architecture of the block-level UVMF verification environment for the alarm block in the digital clock chip.

The different components that are part of this block-level verification environment are as follows:
input_agent — Active agent that drives the test vectors into the input interface of the design. This agent uses the DPI component for the stimulus MATLAB file as sequences.
custom_predictor — Component developed outside MATLAB predicts the outputs of the
alarmRTL block. This component sends the predicted outputs to the Scoreboard component.output_agent — Passive agent that monitors the output interface of the design and transfers the signal information to the Scoreboard component. The interface information of this agent cannot be derived automatically since the predictor DPI component is developed outside MATLAB. So, the interface for this agent needs to be part of the custom YAML template.
Scoreboard — Component that compares the actual and expected design outputs received from the output agent and predictor, respectively. This component generates a uvm_error if it detects a comparison mismatch.
Block-Level Verification Environment Generation
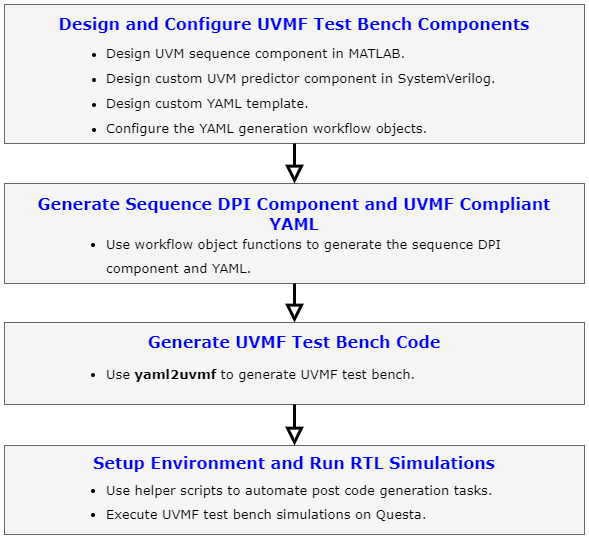
The generation of block-level verification environments involves multiple steps that are elaborated in this section. This figure illustrates the end-to-end workflow.

Design and Configure UVMF Testbench Components
Design UVM Sequence Component in MATLAB
Develop MATLAB files whose DPI components are used in the block-level UVMF verification environment shown in the previous section. You can use the sequence components for a few blocks in the digital clock chip that are part of the supporting scripts for this example.
open(fullfile("dut_dpi","alarm","alarm_test.m"))
Design Custom Predictor in SystemVerilog
You can develop a predictor in various languages. In this example, you use a SystemVerilog class-based predictor for the alarm block. You can consider this as a reference to develop custom predictors for other blocks.
open(fullfile("dut_custom","alarm","alarm_predictor_component.sv"))
Design Custom YAML Template
The uvmfTestBenchConfiguration class supports a default YAML template that expects DPI-based predictor and sequence components as inputs. Since the alarm block has a custom predictor, the default template cannot be used. Therefore, you need a custom YAML template to describe the block-level verification environment illustrated in the previous section. You can use the custom template that is part of the supporting scripts for this example.
open(fullfile("yaml_custom","alarm_test_bench.tlc"))
Create and Configure UVMF Sequence and Predictor Components
To create and configure the svdpiConfiguration and uvmfTestBenchConfiguration objects, execute these steps:
1. Navigate to the dut_dpi/alarm folder.
cd(fullfile("dut_dpi","alarm"))
2. Create and configure the svdpiConfiguration object for uvmf-sequence ComponentKind:
seq = svdpiConfiguration("uvmf-sequence");
seq.MATLABFunctionName = "alarm_test";
3. Create and configure the uvmfTestBenchConfiguration object to generate the UVMF testbench YAML along with the necessary DPI component files:
uvmfTestBenchKind = "custom";
uvmfObject = uvmfTestBenchConfiguration(uvmfTestBenchKind,{seq});
Set the UVMFTestBenchYAMLTemplate property to the custom template file.
pathToCustomYAMLTemplate = fullfile("..","..","yaml_custom","alarm_test_bench.tlc");
uvmfObject.UVMFTestBenchYAMLTemplate = pathToCustomYAMLTemplate;
Add DPI_COMPONENT_NAME template variable to the TemplateDictionary property.
uvmfObject.TemplateDictionary = {
    'DPI_COMPONENT_NAME', 'alarm'
    };
Generate Sequence DPI Component and UVMF Compliant YAML
To generate the DPI component for the sequence and corresponding UVMF testbench YAML, execute the generateYAMLforUVMFTestBench function.
generateYAMLforUVMFTestBench(uvmfObject);
Generate UVMF Testbench Code
Set these environment variables:
UVMF_HOME– Set this environment variable to the UVMF installation path.MTI_VCO_MODE– Set this environment variable to64to use the 64-bit Questa® executable for UVMF testbench simulations. Other simulators must be compatible but the workflow is not shown in this example.
setenv("UVMF_HOME","/home/Documents/UVMF_2023.4_2")
setenv("MTI_VCO_MODE","64")
Navigate to the uvmfbuild/uvmf_testbench folder.
cd(fullfile("uvmfbuild","uvmf_testbench"))
Execute the yaml2uvmf command by providing the UVMF testbench YAML file as arguments to the yamluvmf script.
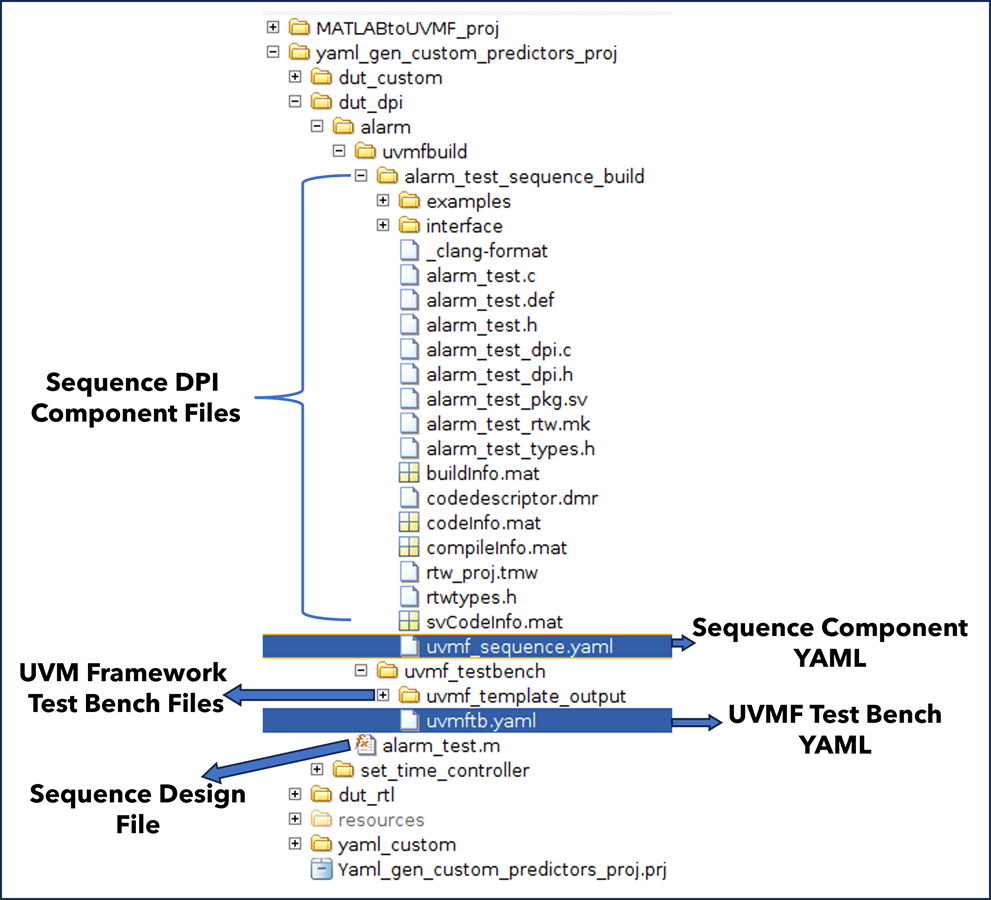
!$UVMF_HOME/scripts/yaml2uvmf.py uvmftb.yamlThis figure shows the generated folder contents.

Setup Environment and Run RTL Simulations
Execute SH Scripts
UVMF generates the SystemVerilog files to integrate the DPI components (e.g. alarm_input_agent_DPI_stimgen_sequence_mtlb.svh and a corresponding SH script (alarm_input_agent_interface_mtlb_prep.sh) that replaces the base UVMF testbench files with these generated SystemVerilog files for DPI components. To automate the execution of these scripts use the helper function hExecuteUVMFShellScripts, and pass the path to the uvmf_template_output folder as an input argument.
hExecuteUVMFShellScripts("uvmf_template_output")Navigate back to the project folder.
cd(project.ProjectStartupFolder)
Add Custom Predictor to Generated Predictor File
Since the predictor is developed using custom means, it needs to be manually integrated into the predictor file generated from UVMF. Instead of authoring this manually, you can use the alarm_predictor.svh file for this example.
open(fullfile("dut_custom","alarm","alarm_predictor.svh"));
Replace the predictor file generated from UVMF with this file.
copyfile("dut_custom/alarm/alarm_predictor_component.sv","dut_dpi/alarm/uvmfbuild/uvmf_testbench/uvmf_template_output/verification_ip/environment_packages/alarm_env_pkg/src","f")
copyfile("dut_custom/alarm/alarm_predictor.svh","dut_dpi/alarm/uvmfbuild/uvmf_testbench/uvmf_template_output/verification_ip/environment_packages/alarm_env_pkg/src/alarm_predictor.svh","f");
Set Environment Variables in Generated Setup Script
Find the setup_mode_alarm_environment_variables script with .source extension in the uvmf_template_output/project_benches/alarm/sim folder. Update the environment variables in that file by using the hUpdateEnvironmentVariables function. The function also sets the environment variables from MATLAB.
hUpdateEnvironmentVariables(fullfile("dut_dpi","alarm"));
For more information about this setup script, see the Set Environment Variables in Generated Setup Script section of the Integrate SystemVerilog DPI into UVM Framework Workflow example.
Validate Block Functionality Using RTL Simulations
Execute the block-level simulations in Questa software by following these steps.
1. Navigate to the uvmf_template_output/project_benches/alarm/sim folder.
cd(fullfile("dut_dpi","alarm","uvmfbuild","uvmf_testbench","uvmf_template_output","project_benches","alarm","sim"))
2. Execute the make command
!make debug TEST_NAME=DPI_stimgen_testIn the Questa window, enter run -all in the Transcript window. This figure shows the simulation results in Questa.

Navigate back to the example working folder.
cd(exampleWorkingFolder);
Conclusion
This example shows how to develop a custom YAML template to generate UVMF compliant YAML along with the necessary DPI components from MATLAB and integrate it into UVMF using yaml2uvmf workflow. You can follow this approach to generate the UVMF environments for other blocks in the digital clock design.
See Also
uvmfTestBenchConfiguration | svdpiConfiguration