Import Custom Character Meshes
This section shows the workflow to create and import a character mesh that is compatible with RoadRunner Scenario. To create a compatible custom character mesh, follow these workflow steps.
Step | Description | |
|---|---|---|
| Create Character Mesh | In a 3D creation environment, set up the character mesh bone hierarchy and specify part names. | |
| Set Up Bone Hierarchy | Create a compatible bone hierarchy and rig to the character mesh. | |
| Create Idle, Walk, and Run Animations (Optional) | Create idle, walk, and run animations of your character. | |
| Import Character into RoadRunner Scenario | Import the character mesh, rig, and optional animations into RoadRunner Scenario. | |
Create Character Mesh
Create a character mesh in the 3D creation software. To ensure that the character mesh can be imported into RoadRunner Scenario, the character mesh must:
Be in a T-pose, by default.
Include a diffuse, normal, and specular texture map.
Use proper edge flow with no broken edge seams.
This figure shows a sample of the default character mesh in 3D creation software.
Set Up Bone Hierarchy
Using the character mesh developed in the previous section, create a character rig. To
be usable in RoadRunner Scenario, the bones in the character rig must follow the hierarchies in the tables
shown. The Hips_Male bone must be the root element of the hierarchy.
Supported values of sideL for left and R for right. For example,
Hips_Male has children Spine_Male,
R_UpperLeg_Male, and L_UpperLeg_Male.
Supported values of fingerThumb, Index, Middle,
Ring, and Pinky. For example,
R_Hand_Male has five children: R_Thumb1_Male,
R_Index1_Male, R_Middle1_Male,
R_Ring1_Male, and R_Pinky1_Male. Similarly,
R_Thumb1_Male has child R_Thumb2_Male.
Body Hierarchy
| Name | Parent | Children |
|---|---|---|
| None |
|
| Hips_Male | Spine1_Male |
| Spine_Male | Spine2_Male |
| Spine1_Male |
|
| Spine2_Male | Neck_Male |
| Head_Male | None |
Leg Hierarchy
| Name | Parent | Children |
|---|---|---|
| Hips_Male | |
| | |
| | |
| | None |
Arm Hierarchy
| Name | Parent | Children |
|---|---|---|
| Spine2_Male | |
| | |
| |
|
| |
|
|
| |
| | |
| | |
| | None |
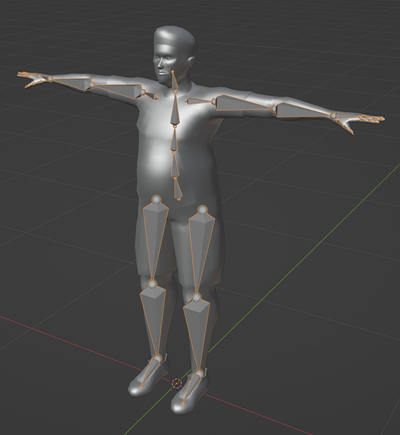
This image shows a sample of the rig for the Male_Citizen character
compatible with RoadRunner Scenario.
Create Idle, Walk, and Run Animations
Using the character rig, you can generate animations in 3D creation software. A typical strategy for creating an animation from a character rig is:
Create controllers for the rig for easier manipulation of the limbs without going through each joint.
With the controllers, generate keyframes for the rig.
Using the keyframes, create the idle, walk, and run animations.
Note
The animations can be made in different tools than the mesh and rig, but the rig hierarchy must be the same to support import into RoadRunner Scenario.
Optionally, if you do not want to create animations, then you can use existing
animations of the Male_Citizen character asset because your mesh will
share the same skeletal rig hierarchy. For more information on rigging and animation in
Blender®, see https://docs.blender.org/manual/en/latest/animation/introduction.html.
Import Character into RoadRunner Scenario
To import the new character model into RoadRunner Scenario, follow these steps.
In RoadRunner Scenario, open the Asset Browser, open the Assets > Characters folder. Create a new folder with the name of your new character.
In 3D creation software, export these objects to your new character folder:
Character mesh and rig as an
FBXfile.Idle animation as an
FBXfile.Walking animation as an
FBXfile.Running animation as an
FBXfile.
In the Assets > Characters folder, create a new character by right-clicking in the Asset Browser and selecting New > Character. Give the new character the same name as the new character folder created earlier.
Assign the character mesh and rig
FBXfile to theSkinandSkeletonattributes.Assign the idle, walking, and run
FBXfiles to theIdle Animation,Walk Animation, andRun Animationproperties, respectively.Click Apply Changes button. Your character display in the Asset Browser updates to mesh provided.
Now you can use your new character asset in any RoadRunner Scenario simulation.