Link Cloud Account to Cloud Center
What Is Cloud Center?
From Cloud Center, you can create and manage cloud resources in your account at Amazon® Web Services, including:
A single machine with MATLAB® installed that you can access from a web browser or a remote desktop application.
A MATLAB Parallel Server™ cluster that you can access from any MATLAB.
Don't have a cloud account? Get immediate access to MATLAB in a web browser using MATLAB Online.
Link Your Cloud Account to Cloud Center
To access Cloud Center, navigate to the website: https://cloudcenter.mathworks.com.
Sign in using your MathWorks® Account email address and password.
If you have never used Cloud Center before, there is a one-time setup to link your cloud account with Cloud Center.
In the Welcome to Cloud Center dialog box, click Get Started.
You need to link your cloud account, so that you can use Cloud Center to start and manage resources. In the Authorize Cloud Account dialog box, choose and click an option, either:
Follow guided steps (recommended), or
Provide access keys, if you have some keys already.
Tip
Click the option Follow guided steps. To link your account to Cloud Center, follow the steps on the Manually Create and Import Amazon Web Services (AWS) Cloud Account screen. This grants Cloud Center access to your AWS account, so that you can use Cloud Center to create and manage cloud resources.
It is easier to complete the steps if you position the AWS console and these instructions so they are both visible.
Log in to the Amazon Web Services (AWS®) console. Click Log in to console to open a dialog, and click Navigate to AWS to open the console and log in.
Alternatively, you might need to access the console from a single-sign-on link or portal provided by your organization instead. You must use an account that can create a role.
To complete the create role wizard in AWS, click Create role in AWS, then in the dialog, click Navigate to AWS.
Follow the steps to complete the create role wizard.
Get the role ARN from the AWS role summary screen by clicking Copy role ARN. If you closed the success notification, search for the role name and click the role name to find the ARN and copy it.
Paste the ARN you copied in step B into the Role ARN edit box.
Optionally, you can edit the Description of the role to display in Cloud Center.
To complete the setup, click Next. You return to the Cloud Accounts view, where you can see the details of the cloud account you just linked to Cloud Center.
Below is a screenshot showing the Cloud Center web app steps for linking your cloud account.

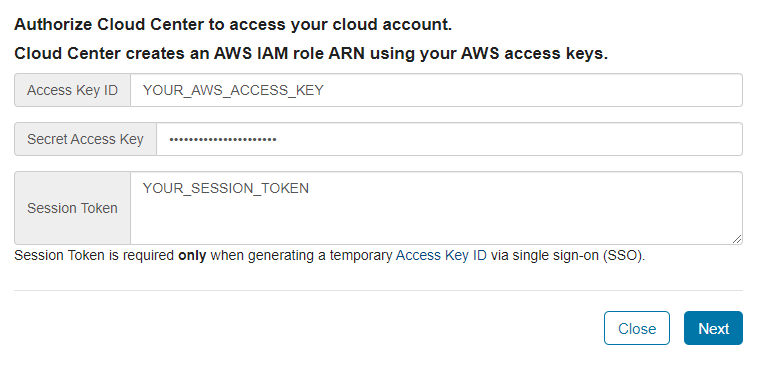
Click the option Provide access keys if you have an access key ID and secret access key for your AWS account. Contact your administrator for access keys.
Alternatively, generate an access key for an IAM user to receive an access key ID, a secret access key, and session token. See the Amazon documentation for Managing access keys for IAM users.
Paste the access key ID and secret access key into the Access Key ID and Secret Access Key edit boxes. Optionally, you can specify a session token.
Below is a screenshot showing the Cloud Center provide access keys screen:
Now you can start cloud resources in Cloud Center. To switch to the cloud resources tab, click Cloud Resources. To get started, see:
For a step-by-step example, you can read this Amazon blog post: How to set up MATLAB parallel cloud computing on AWS.

