Add Holes in Microsoft Word Templates
Holes are placeholders in a template that are filled with content as you generate a report. Use holes for dynamic content in a report. You can create two types of holes in a Microsoft® Word report:
Inline hole — A placeholder for content that a paragraph can contain, such as text, an image, or a link.
Block hole — A placeholder for content that a paragraph cannot contain, such as a table or a list. A block hole can also contain content that an inline hole can contain, but in a Word report, the content is wrapped in a paragraph.
To add holes to a Word template, use rich text content controls. Before you add holes, make paragraph and formatting symbols visible and display the Developer tab.
Open Word Template
Open the Word template file by using one of these methods:
In MATLAB®, in the Current Folder pane, right-click the template file and click Open Outside MATLAB.
Outside of MATLAB, right-click the template file and click Open.
Note
Do not double-click a Word template file to open it. Double-clicking the file opens a Word document file that uses the template.
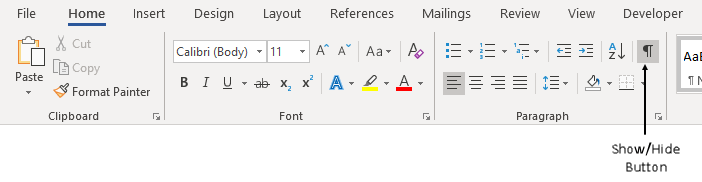
Display Formatting Symbols
To make paragraph and formatting symbols visible in Word, on the
Home tab, in the Paragraph group, click
the Show/Hide button ![]() .
.
The formatting symbols help you to see whether a hole is an inline hole or a block hole.
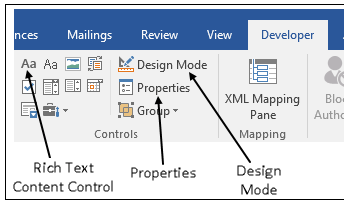
Display Developer Tab
Before you can add a hole to a Word template, you must display the Developer tab.
If the Developer tab is not available, click File > Options, and then click Customize Ribbon. Under Main Tabs, click the Developer check box.
Tip
If you do not see the Developer check box in the list,
set Customize the Ribbon to Main
Tabs.
When you create a hole, you use these controls on the Developer tab:
Design Mode
Rich Text Content Control
Properties
Add Holes Using Rich Text Content Controls
Add holes to Word templates by using rich text content controls.
If you add a rich text content control with formatting symbols displayed and Design Mode enabled, you can tell whether you are creating a block or inline hole. For a block hole:
The control bounding box includes a paragraph symbol.
The control start and end tags contain left-pointing and right-pointing triangles, respectively. To see the triangles, zoom in on the Word document by opening the View tab and clicking Zoom.
Here is an example of a rich text control for a block hole:

For an inline hole:
The control bounding box does not include a paragraph symbol.
The control start and end tags do not include triangles.
Here is an example of a rich text control for an inline hole:

The procedure that you use to add a rich text content control depends on whether you are adding an inline or block hole and whether you want to add the hole in the document body or in a table cell.
Add Inline Holes in Document Body Paragraphs
On the Developer tab, make sure that Design Mode is enabled. In this mode, when you create a hole, you can see the hole marks with the title tag.
Click in a paragraph where you want to create an inline hole. Add several blank spaces in front of the paragraph mark to make sure that you create an inline hole, not a block hole.
Click in front of the spaces.
Click the Rich Text Content Control button
 . A rich text content control appears at
the insertion point.
. A rich text content control appears at
the insertion point.You can tell that you are creating an inline hole because the bounding box does not include the paragraph mark and the start and end tags do not include triangles.
Click the hole and then click Properties.
In the Content Control Properties dialog box:
In the Title field, enter an ID for the hole. Use this value to identify the hole in your report generation program or custom reporter class.
In the Tag field, enter
Hole.Optionally, set the default style for text that fills the hole. See Specify Default Styles for Text That Fill Holes.
Click OK.
Delete the spaces that you added in front of the paragraph.
Add Block Holes in Document Bodies
On the Developer tab, make sure that Design Mode is enabled. In this mode, when you create a hole, you can see the hole marks with the title tag.
Create an empty paragraph where you want to create a block hole. Creating a paragraph ensures that you create a block hole and not an inline hole. If you are at the end of a document, create an empty paragraph before the existing empty paragraph.
Select the empty paragraph that you added.
Click the Rich Text Content Control button
. A rich text content control
appears.You can tell that you are creating a block hole because the bounding box includes the paragraph mark and the start and end tags include triangles.
Click the hole and then click Properties.
In the Content Control Properties dialog box:
In the Title field, enter an ID for the hole. Use this value to identify the hole in your report generation program or custom reporter class.
In the Tag field, enter
Hole.Optionally, set the default style for text that fills the hole. See Specify Default Styles for Text That Fill Holes.
Click OK.
Add Inline Holes in Table Entries
On the Developer tab, make sure that Design Mode is enabled. In this mode, when you create a hole, you can see the hole marks with the title tag.
To add an inline hole to a table entry, you must add the hole inside a paragraph in the entry. Every Word table entry is a paragraph, however, the paragraph mark is not visible. To ensure that you add the hole in the paragraph and that you do not include the default table cell in the hole, add a few spaces to the empty table entry.
Click in front of the spaces.
Click the Rich Text Content Control button
 . A rich text content control appears at
the insertion point.
. A rich text content control appears at
the insertion point.
You can tell that you are creating an inline hole because the hole bounding box does not include a paragraph or table entry mark and the start and end tags do not include triangles.
Click the hole and then, click Properties.
In the Content Control Properties dialog box:
In the Title field, enter an ID for the hole. Use this value to identify the hole in your report generation program or custom reporter class.
In the Tag field, enter
Hole.Optionally, set the default style for text that fills the hole. See Specify Default Styles for Text That Fill Holes.
Click OK.
Delete the spaces that you added.
Add Block Holes in Table Entries
On the Developer tab, make sure that Design Mode is enabled. In this mode, when you create a hole, you can see the hole marks with the title tag.
To ensure that you create a hole that includes a paragraph and does not include the default table cell, add an empty paragraph to the table entry.
Select the empty paragraph that you added.
Click the Rich Text Content Control button
. A rich text content control appears at
the insertion point.
You can tell that you are creating a block hole because the hole bounding box includes the paragraph mark and the start and end tags include triangles. You can tell that the hole does not include the default cell because the bounding box does not include the table entry mark.
Click the hole and then click Properties.
In the Content Control Properties dialog box:
In the Title field, enter an ID for the hole. Use this value to identify the hole in your report generation program or custom reporter class.
In the Tag field, enter
Hole.Optionally, set the default style for text that fills the hole. See Specify Default Styles for Text That Fill Holes.
Click OK.
Note
Block holes in a table do not support DocumentPart
elements.
Specify Default Styles for Text That Fill Holes
You can specify a default style for text that fills a hole. Text formatting that you specify in your report generation program overrides the default style. See Report Formatting Approaches. The default text style applies to text that fills an inline hole and to text or a paragraph that fills a block hole. It does not apply to text in other report elements, such as tables, that can fill a block hole.
To specify the default style for text that fills a hole, in the Content Control Properties dialog box:
Select the Use a style to format text typed into the empty control check box.
Select the style in the Style list or click New Style to create a style.
For text in a paragraph, make sure that the style applies to a paragraph. If you create a style, in the Create New Style from Formatting dialog box, for Style type, select
Linked (paragraph and character).