Resolve Conflicts in Models Using Three-Way Merge
You attempt to merge the changes on your Git™ branch into the main branch. Conflicts occur.
Open Three-Way Merge Tool
Open the example to download the supporting files.
The repository has two conflicted model files. To make the changes that cause the conflicts yourself instead, see Make Changes and Merge Git Local Branch. If you have not yet determined the order in which you should resolve conflicted files, see Identify Order of Resolving Conflicts in Changeset.
To investigate and resolve conflicts using the Three-Way Merge Tool, in the Files panel, right-click the models that have conflicts and select Source Control > View Conflicts. Alternatively, in the Source Control panel, in the Modified Files section, right-click the models that have conflicts and select View Conflicts. If the Source Control icon is not in the sidebar, click the Open more panels button (...) and select the Source Control panel.
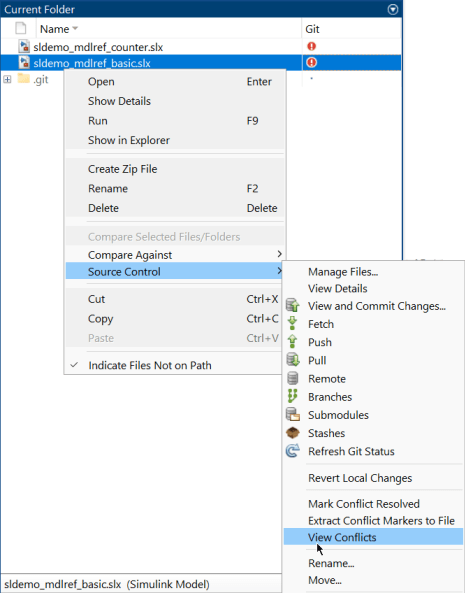
Resolve the conflicts in the sldemo_mdlref_counter.slx model before you resolve the conflicts in the sldemo_mdlref_basic.slx model.
Resolve Conflicts in Changeset
The Three-Way Merge Tool opens three panes at the top.
The Mine pane displays the changes you made. In this example, the Mine pane is called taskBranch.
The Theirs pane displays the changes your colleague made. In this example, the Theirs pane is called main.
The Base pane displays the common ancestor version.
Below, the tool automatically resolves differences when possible and opens a Target pane. The Target pane contains a copy of your changes from the taskBranch branch and automatic merges. Review the automerge choices, edit if desired, and decide how to resolve any remaining conflicts.
In this example, to resolve conflicts in your model files, resolve conflicts in the
sldemo_mdlref_counter.slx model before you resolve the conflicts in the
sldemo_mdlref_basic.slx model.
Resolve Conflicts in sldemo_mdlref_counter
To resolve conflicts in the sldemo_mdlref_counter.slx model:
Examine the Three-Way Merge report for the
sldemo_mdlref_counter.slxmodel.The summary table in the right bottom corner shows that two items in the report require your attention. The table also shows that the tool automatically merged two changes.
In the report, the tool colors unresolved conflicts in red. The tool also colors automatically resolved items with the color of the corresponding revision. For more information about colors and conflict classification in the report, see Simulink Three-Way Merge Tool.

Examine and resolve the first item that requires your attention. The Three-Way Merge Tool selects the first item when it opens.
Tip
Merge blocks before lines, and merge states and junctions before merging transitions. The merge tool then attempts to connect all lines to blocks. See Recommended Merge Order in Models.
The tool selects the Scope row. In the Target pane, in the details table, the tool marks Name as a conflict
 . This means that the tool can perform the change. The
tool provides option buttons next to the item.
. This means that the tool can perform the change. The
tool provides option buttons next to the item. 
In this example, the report shows that your colleague changed the scope name to
Scope A, which conflicts with the name you added,Scope.The tool displays two models to the right of the report and highlights the differences in the Simulink® Editor. In this example, the tool highlights the scope block in red with yellow around the edges.
By default, the tool opens the Theirs model, called in this example
mainon top and the Target model below. To configure the tool to open different models to the right of the report, in the toolstrip, in Highlight section, select one of the available configurations for Top Model and Bottom Model.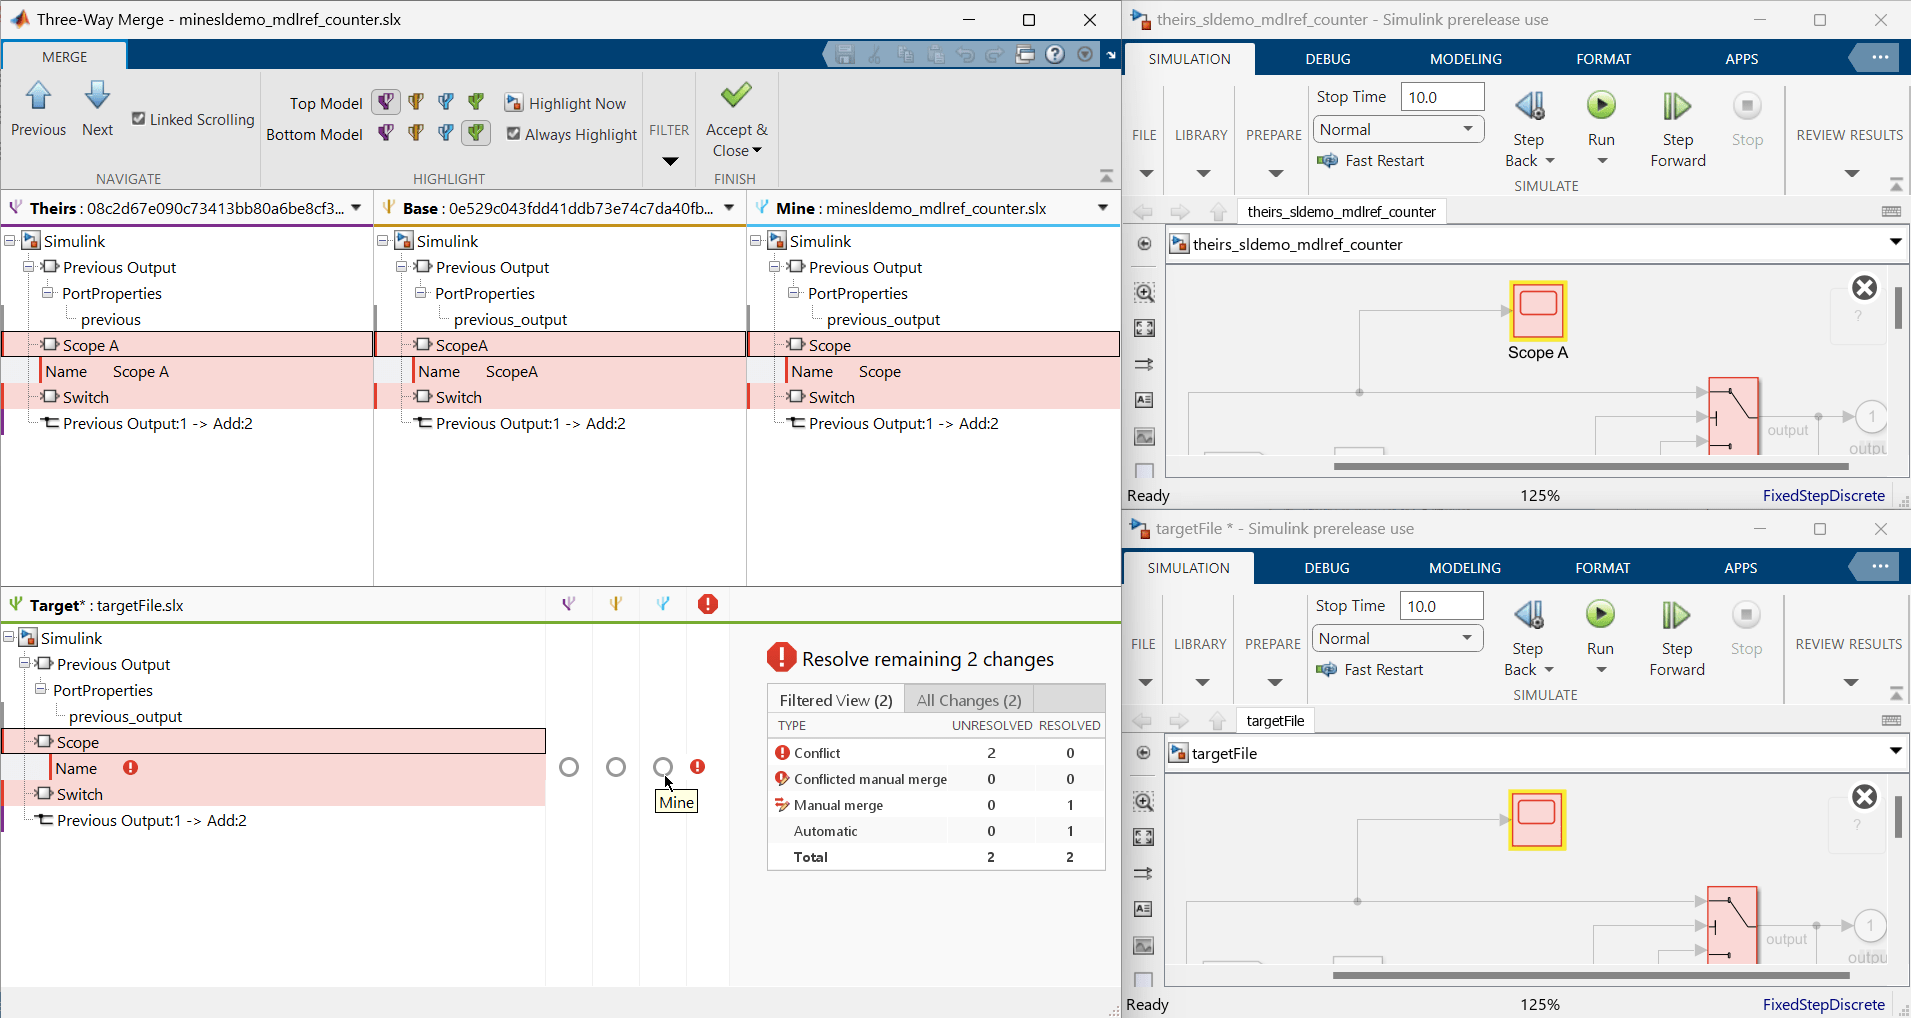
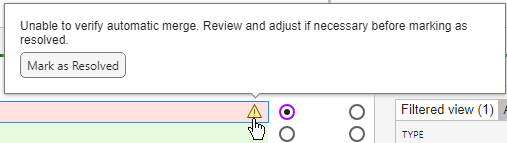
By default, in the Target pane, the tool selects the change you made in taskBranch. Suppose you want to keep the default selection. In the pane, click the conflict icon
in the Name row and click
Mark as Resolved. Alternatively, right-click the row
and select Mark as Resolved. The tool updates the row
color from red to blue to indicate that the targetFile
now contains the taskBranch change.
If you want to keep the change from the main branch instead, select the option button in the main branch column. When you make a selection, the tool automatically marks the item as resolved and updates the row color.
Starting in R2026a, when a node that has a conflict is selected, the conflict resolution pop-out opens automatically to help you resolve the conflict. To disable this behavior, select Don't show this again.
Examine and resolve the next item that requires your attention. Click Next to navigate to the next item.
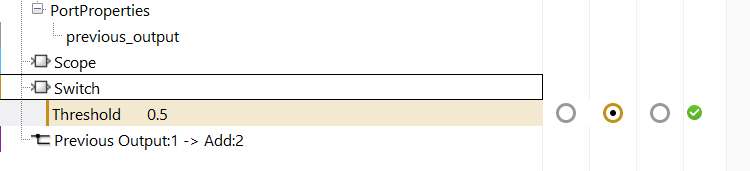
The tool selects the Switch row. In the Target pane, in the details table, the tool marks Threshold as a conflict
. This icon means that the tool can perform the change. The
tool provides option buttons next to the item.In this example, the report shows that your colleague changed the switch Threshold value to
0.4, a value that contradicts with your change.The tool displays two models to the right of the report and highlights the differences in the Simulink Editor. In this example, the tool highlights the switch block in red with yellow around the edges.
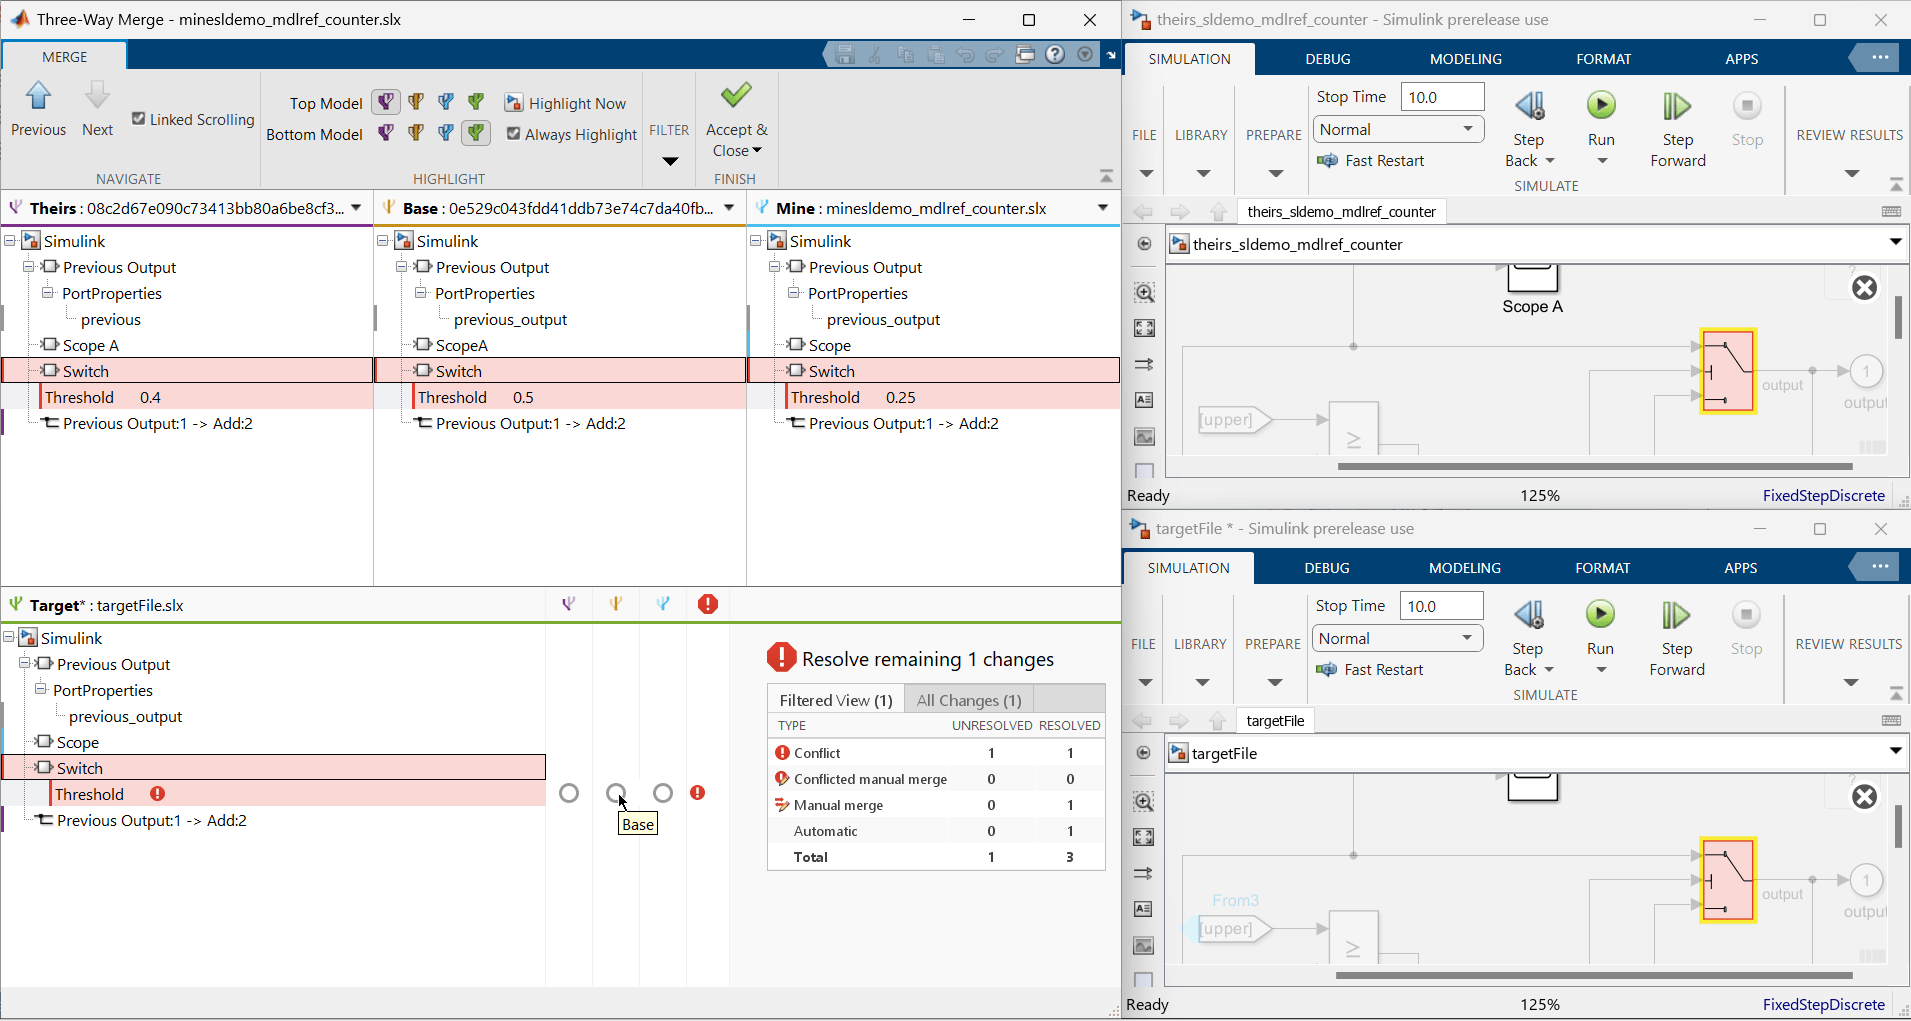
Suppose you want to restore the value in the Base file. In the Target pane, select the option button in the Base column.
The tool automatically marks the item as resolved. The tool also colors the line in orange to indicate that the targetFile now contains the Base change.
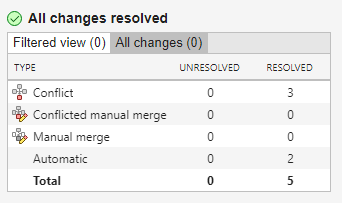
Examine the summary table. The table now shows that you resolved all the items.
Before you save the merge results, you can review and adjust all automatic merge choices. For example, the Three-Way Merge tool automatically merged the port name of the Previous Output block by taking your change from the taskBranch branch. You can adjust the automatic choices using the option buttons.
To save the target file with all your merges and mark the conflicted file as resolved in the source control tool, click Accept & Close.
Resolve Conflicts in sldemo_mdlref_basic
To resolve conflicts in the sldemo_mdlref_basic.slx model:
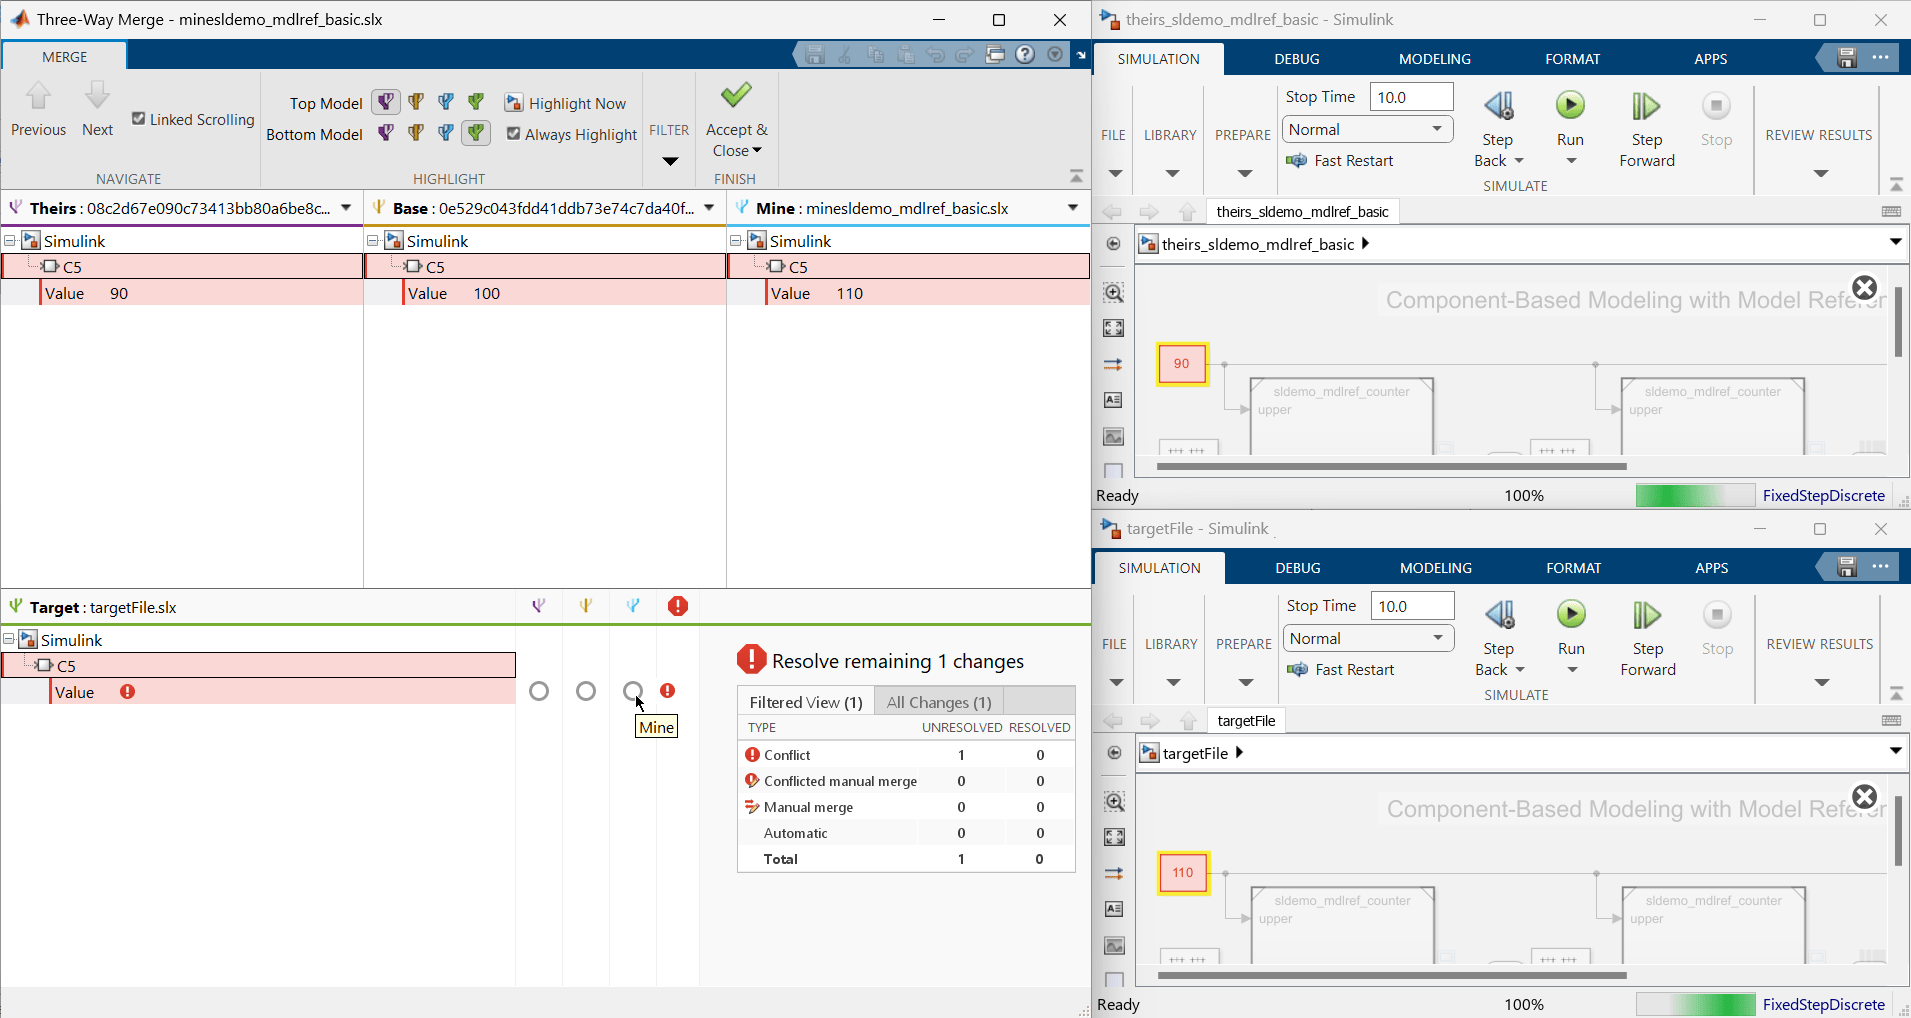
Examine the Three-Way Merge report for the
sldemo_mdlref_basic.slxmodel. The summary table in the right bottom corner shows that one conflict in the report requires your attention.Examine and resolve the conflict. Click Next to navigate to the item that requires your attention.
The tool selects the Value row under C5. In the Target pane, the tool marks the item as a conflict
. This icon means that the tool can perform the change. The
tool provides option buttons next to the item.In this example, the report shows that your colleague changed the Constant block Value to
90, a value that contradicts with your change.The tool displays two models to the right of the report and highlights the differences in the Simulink Editor. In this example, the tool highlights the constant block in red with yellow around the edges.
By default, in the pane, the tool selects the change you made in taskBranch. To confirm that you want to keep the default selection, in the Target pane, click the conflict icon
in the Value row and click
Mark as Resolved. The tool updates the row color from
red to blue to indicate that the targetFile now contains
the taskBranch change.
If you want to keep the change from the main branch, select the option button in the main branch instead. When you make a selection, the tool automatically marks the item as resolved and updates the row color.
Starting in R2026a, when a node that has a conflict is selected, the conflict resolution pop-out opens automatically to help you resolve the conflict. To disable this behavior, select Don't show this again.
Examine the summary table. The table now shows that you resolved all the items that require attention.
To save the target file with all your merges and mark the conflicted file resolved in the source control tool, click Accept & Close.
Tips
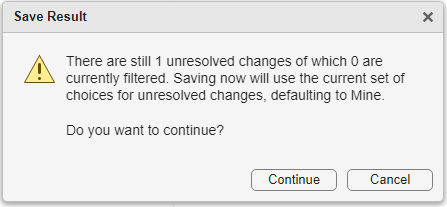
If you resolved all conflicts in the current view but the summary table title is x unresolved changes of which y are filtered, you must disable the filters to view and resolve the remaining conflicts. To clear all applied filters, click the filters next to Visible changes.

Use the Next and Previous buttons to navigate between the unresolved changes that require your attention.
For every item that requires resolution, the tool provides a hint to help you resolve the issue. Click the icon that appears next to the row in the Target pane.
Starting in R2026a, when a node that requires resolution is selected, the resolution pop-out opens automatically to help you resolve the item. To disable this behavior, select Don't show this again.
When you click Accept & Close, the tool prompts you if you still have conflicts to resolve. If you click Continue, the tool selects the Mine change, in this example taskBranch, to resolve all unresolved conflicts.
Perform Last Checks
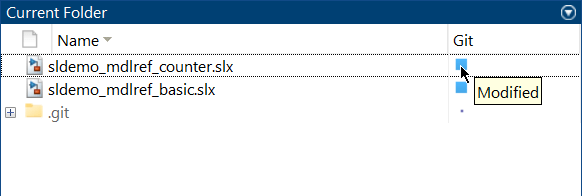
When you resolve the conflicts in both model files, the Git status in the Files and Source Control panels now shows the model files as Modified.
Before you commit the resolved model files to source control, perform a final review by comparing the merge changes against the current branch. You should always qualify merged models by verifying simulation results or running tests.
For an example on resolving conflicts using three-way merge in a MATLAB® projects under source control, see Resolve Conflicts in Project Using Simulink Three-Way Merge.
If you are using source control outside of MATLAB, you can customize external source control tools to use MATLAB comparison and merge tools. For instructions, see Customize External Source Control to Use MATLAB for Diff and Merge.