Simulation 3D Actor

Libraries:
Simulink 3D Animation /
Simulation 3D /
Actors
Description
The Simulation 3D Actor block implements an actor in the Unreal Engine® environment. You can use this block to specify actor name and source file,
set how the actor is created and behaves during simulation, and initialize the actor.
The block creates a movable actor. Additionally, you can create and add other
sim3d actor objects to the 3D environment as children of this
actor.
Examples
Create custom lighting with a point light, a spot light, and a rectangular light using the Simulation 3D Actor block. First, create a room in the 3D environment. Next, create three actors using sim3d.Actor objects, add them as child actors of the room, and position them inside the room. Then, create a point light, a spot light, and a rectangular light, add them as child actors of the room, and position them above the actors inside the room. Finally, in the Simulation 3D Viewer, view the room and its actors illuminated by the different types of light.
Open the model.
open_system("CreateLightUsingSimulink.slx");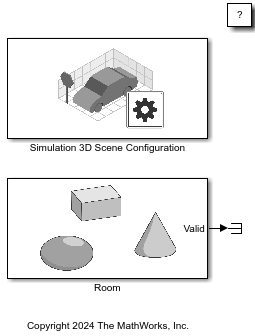
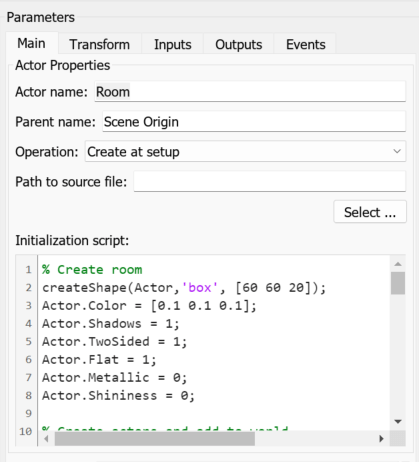
The model includes a Simulation 3D Scene Configuration block and a Simulation 3D Actor block. The Simulation 3D Scene Configuration block implements a 3D simulation environment and sets a view in the scene with the Scene view parameter. The Simulation 3D Actor block, named Room, creates an actor in the 3D environment. The block first creates an empty actor named Room, as specified by the Actor name parameter. The block then runs the Initialization script. In the Initialization script, use Actor as the handle to the actor object created by the Simulation 3D Actor block and World as the handle to the world object created by the Simulation 3D Scene Configuration block. The script builds a box shape for Actor using the createShape function to create a room in the 3D environment and set the properties of the room to visualize the custom lighting. The Initialization script then creates three actors using sim3d.Actor objects with box, sphere, and cone shapes. Set the translation of the actors to position them inside the room. Add the actors to World as child actors of Actor. The Initialization script finally creates a point light, spot light, and rectangular light using the sim3d.Light objects, positions the lights above the actors inside the room, and adds them to World as child actors of Actor. Transform properties of an actor are relative to its parent actor. Set the properties of the child actors for enhanced lighting effects.
Simulate the model and view the custom lighting in the Simulation 3D Viewer. You can visualize the reflections of each light type on the wall behind the actors.
sim("CreateLightUsingSimulink.slx");
close_system("CreateLightUsingSimulink.slx");Create arrows and text labels in the 3D environment and attach them to an actor using Simulation 3D Actor block.
Open the model.
open_system("CreateAnnotationsUsingSimulink.slx");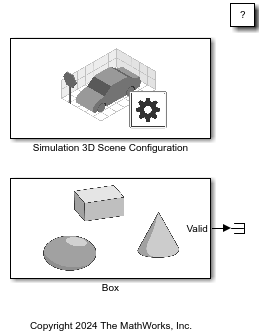
The model includes Simulation 3D Scene Configuration and Simulation 3D Actor blocks. The Simulation 3D Scene Configuration block implements a 3D simulation environment and sets a view in the scene that you specify with the Scene view parameter. The Simulation 3D Actor block named Box creates a box actor in the 3D environment. The block creates an empty actor with the name you specify in the Actor name parameter. Then, the block runs the Initialization script. In the Initialization script, use Actor as the handle to the actor object created by the Simulation 3D Actor block and World as the handle to the world object created by the Simulation 3D Scene Configuration block. The Initialization script builds a box shape for the Actor object using the createShape function. The Initialization script then creates arrows and text labels as child actors of the Actor object using the sim3d.graphics.Arrow and sim3d.graphics.Text objects, respectively. Set the properties of the box, arrows, and text labels. Transform properties of the child actors are relative to the parent actor.
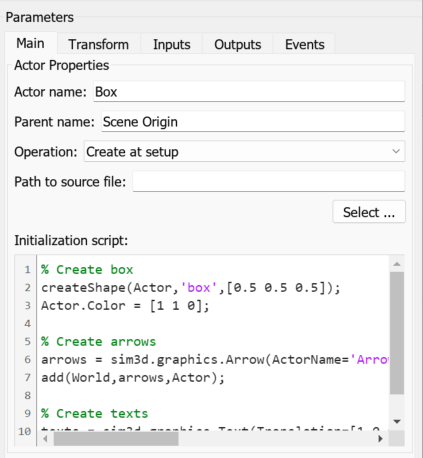
Simulate the model and view the annotated box actor in the Simulation 3D Viewer.
sim("CreateAnnotationsUsingSimulink.slx");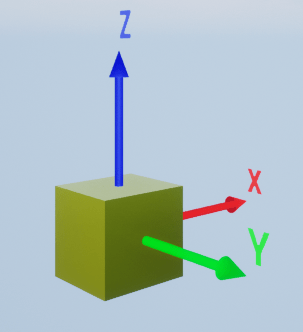
close_system("CreateAnnotationsUsingSimulink.slx");Extended Examples
Create Multiple Instances of Actors
Use For Each Subsystem block to create multiple instances of an actor.
Delete Actor During Simulation Using Simulink
Remove an actor during simulation from the Unreal Engine visualization environment using Simulink®.
Ports
Input
Instance number of actor, specified as a real integer.
For positive values, a new actor is created if it has not been created already. The reference block refers to this actor if the actor is present in the world.
For negative values, actor instances are deleted, if they exist. For example, instance 1 is deleted if the value of this port is
-1at a given time step.
Dependencies
This input is visible when the operating mode of the block is set to either
Create at step or
Reference by instance number.
Output
Validity of the specified actor, returned as false if the specified
actor cannot be found in the world or true if the
actor is found.
Parameters
Main
Name of the root actor for the current Simulation 3D Actor block.
Name of the parent actor of the actor, specified as a string.
Operating mode that determines block behavior, specified as one of these options.
Create at setup– Use this option to create actors in the scene. The actors are created during game setup, before the simulation runs. You can also control the simulation of these actors using the Input, Output, and Event ports.Create at step– Use this option to dynamically create and delete actors when the simulation is running. An Instance input port of the typeintis created in this mode, and the actors are dynamically generated based on the values input to the block. If the value of Instance is greater than zero, an actor with the name'Actor name + Instance value'is created. The name of the actor is derived from'Actor Name'in the block mask. The instance value is the current value of the port. When the value of Instance is negative, then the actor is deleted. Unlike theCreate at setupoption, you cannot control the actors created with this option selected in the block mask.Reference by name– Use this option to refer to an actor in the scene usingActor Name, and control this actor's simulation using the inputs of the block. Get data of the actor using the outputs or events. This also provides a Valid output port.If an actor with the specified name is not present, the Valid port returns
falseor0. In this case, default values will be passed as output for rest of the out ports (if any). Use theValidport to verify whether the other outputs generated are currently valid or not.Note
Path to source file and Initialization script parameters are unavailable in the
Reference by nameoperating mode.Reference by instance number– Use this option to refer to an instance created via a different actor block. Similar to theCreate at stepoperating mode, this option creates an Instance input in the block, and the effective actor name'Actor name + Instance value'is used to reference the actor.If an actor with the generated name is not present, the Valid port returns
falseor0. In this case, default values are passed as output for rest of the output ports, if any. Use the Valid port to verify whether the other outputs generated are currently valid or not.Note
Path to source file and Initialization script parameters are unavailable in the
Reference by instance numberoperating mode.
Dependencies
The Transform tab is available if you set
Operation as either Create at
setup or Create at
step.
File from which actors are sourced, specified as a string.
This option loads a 3D file or imports a sim3d.Actor object, including child actor objects.
Simulation 3D Actor block supports these as sources.
File Formats
MAT (MAT file from MATLAB®)
STL (Stereolithography)
FBX (Autodesk® Filmbox format)
URDF (Unified Robot Description File)
X3D (Extensible 3D)
WRL (Virtual Reality Modeling Language)
DAE (Collada digital asset exchange)
USD, USDA, USDC (Universal Scene Description)
You can also instantiate actors using
.m files.
Alternatively, the Select button can also be used to select a file from the Windows® file browser.
Note
USD file import is not supported on Linux®. USD files do not support collision detection.
Code to initialize the actor created by the block, specified as a MATLAB script. You can also use this script to create other actor
objects, set their properties, and add them to the 3D environment as
child actors using the add function. You must set the parent actor using the
parent in the add
function.
This MATLAB script runs when the 3D environment initializes the actors created by the block. The order of actor creation is:
Root actor with specified name is created.
The Path to source file is loaded into the root actor.
The Initialization script runs.
Use the name Actor when modifying the root actor
of the block. Actor is a reserved handle in the
initialization script. Otherwise, use the findBy function to get the actor handle of a different
name, for example, one of the child actors. Then use the retrieved actor
handle to initialize that specific actor. For example, to add an actor
as child of the root actor, set Actor as the parent
actor in the add function.
Use the name World for actors in the 3D
environment. World is a reserved handle in the
initialization script for the 3D environment created by the
Simulation 3D Scene Configuration block.
You can create and add these sim3d actor objects.
Initialization script does not use the base workspace variables.
Sample time, Ts. The graphics frame rate is the inverse of the sample time.
If you set the sample time to -1, the block uses the sample time
specified in the Simulation 3D Scene Configuration
block.
For optimal performance, check that this value is not less than the value of Sample time specified in the Simulation 3D Scene Configuration block.
Transform
The Transform tab is available to set the initial transform properties
when you set Operation as either Create at
setup or Create at step. Otherwise, the
transform properties set in the Initialization script are used
in the Transform tab and overwrite any values set there.
Translation (x,y,z) of the actor object relative to its parent actor, specified as a real 1-by-3 vector, in meters.
Dependencies
The Translation property set in the Initialization script overwrites this parameter value.
Rotation (roll, pitch, yaw) of the actor object relative to its parent actor, specified as a real 1-by-3 vector, in radians.
Dependencies
The Rotation property set in the Initialization script overwrites this parameter value.
Relative scale in x, y and z coordinates, specified as a real 1-by-3 vector.
Dependencies
The Scale property set in the Initialization script overwrites this parameter value.
Note
Setting the initial transform properties in the Initialization script overwrites the Transform tab values.
Inputs
This text area lists the user-selected input ports of the block and provides a button that opens the port selector app, which you can use to modify the input ports. Each line in the text area represents one block port.
You can manually modify the ports using the text area, but using the port selector app is recommended for choosing the ports.
Outputs
This text area lists the user-selected output ports of the block and provides a button that opens the port selector app, which you can use to modify the output ports. Each line in the text area represents one block port.
You can manually modify the ports using the text area, but using the port selector app is recommended for choosing the ports.
More About
Create at setup– Use this operating mode to create actors before simulation begins and control the actors when the simulation is running. You can control actors in a simulation by adding input ports to the block using the Inputs tab in the block dialog. Similarly, you can read specific actor properties using the Outputs tab to create custom output ports for the block.The Simulation 3D Actor block implements these steps during actor creation:
An empty root actor is created with an
Actor Nameequal to the name specified in the block dialog box.The source file is used to load actors, meshes, or 3D objects into the root actor.
The initialization script is run to initialize the actors that have been created.
Note
The initialization script and the source file are optional. However, if both are empty, the block will only create an empty actor in the scene.
You can use the
loadfunction in the initialization script as an alternative to the source file. This command has the same effect as specifying a source file path.load(actor, "source_file_path")Create at step– Use this operating mode to create actors dynamically during simulation runtime. When the Instance port is a nonzero number, an instance of the specified actors is created. If the instance input is unique, it will only create a new instance for the first step in which it is equal to the input number.When this operating mode is selected, the block creates actor instances by creating an empty root actor is created with name equal to specified values of
Actor Name+ Instance.So, if the actor name specified in the dialog box is
ActorInst, and value ofInstanceis specified as1, then theActorNamefor the new instance will be equal toActorInst1. This process is followed for every new instance that is created.Note
The Valid output port for this mode returns
0(false) by default and returns1(true) when an instance is created.Reference by name– Use this operating mode to control an actor that is already present in the scene. The block looks for an actor with the actor name specified in the block dialog box. If found, the block controls that specific actor using the specified input ports. You can control the actor in a simulation by adding input ports to the block using the Inputs tab in the block dialog box.Reference by instance number– Use this operating mode to control an actor that is already present in the scene. The block looks for an actor with the actor name'Actor name + Instance value'specified in the block dialog box and the current value of the Instance port. If found, the block controls that specific actor using the specified input ports. You can control the actor in a simulation by adding input ports to the block using the Inputs tab in the block dialog box.
The difference between the Reference by name and
Reference by instance
											number
operating modes is that,
based on the value of the Instance input port, the Simulation 3D Actor
block can control multiple actors during simulation. However, during individual time
steps, the block still controls a single actor. In the Reference by
name operating mode, the block can control only a single actor
during the entire simulation.
Use the Simulation 3D Actor block to control simulation during runtime by modifying the block ports. To control actors during simulation, you can use the Inputs tab of the block mask to add input ports to the block which can then be used to control specific actors.
Similarly, you can use the output and event ports of the block mask to get data about the actors from Unreal Engine. The output ports can be modified from the Outputs and Event tabs in the dialog. Selecting event ports on the Event tab creates corresponding output ports on the block.
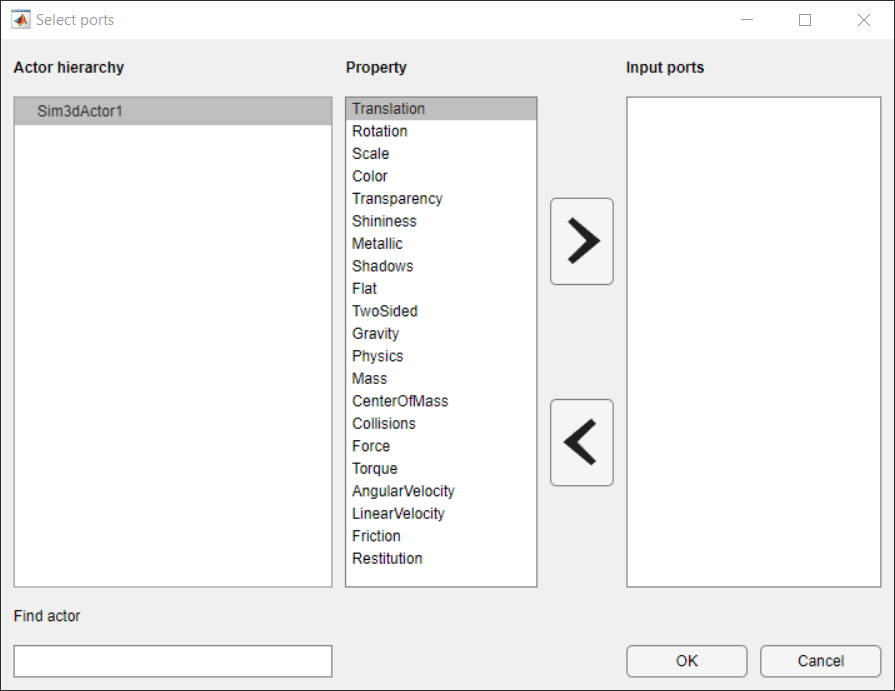
The Browse buttons in Inputs,
Outputs, and Events text area opens up
the port selection app, which you can use to add or delete input and output ports.
Select the actor from the Actor hierarchy to display its
corresponding ports. Although ports can be modified manually, the suggested method
is to use the port selection app.
This table provides the possible input, output, and event Properties of the sim3d.Actor.
| Type | Properties |
|---|---|
| Input and output properties | |
| Event properties |
|
Additionally, these are the possible input and output ports of the
Simulation 3D Actor block if you add sim3d actor objects.
Actors can be controlled for all operating modes, except Create at
step. For all other operating modes, these are some special considerations.
Create at setup– The port selection app in this mode lists the entire tree hierarchy of actors created in the actor block, and you can use the block ports to control the simulation of the parent as well as child actors. These actors are present throughout the entire simulation, and the outputs of the blocks are always valid.Reference by name– In this operating mode, the block can only control a single actor during the simulation, specified using the actor name. If the actor is not present in the world, the block inputs are ignored, the Valid output isfalse, and the remaining outputs are default values (invalid).Reference by instance number– In this operating mode, the Simulation 3D Actor block only controls one actor per time step. In different time steps the block can control different actor based on the value of the Instance input. The port selection app for this operating mode uses*as a placeholder for the actor name. The actor being controlled has the name as a concatenated string: actor name (in block dialog) + current instance input value. The*wildcard only applies to theReference by instance numberoperating mode. Similar toReference by nameoperating mode, the Valid output isfalsewhenever the actor currently being referenced is not present in the world.
Version History
Introduced in R2022bUse the Simulation 3D Actor block Initialization script to initialize and add these actors in the 3D environment with tunable block parameters.
Light using the
sim3d.LightobjectArrow using the
sim3d.graphics.ArrowobjectText using the
sim3d.graphics.Textobject
These Simulation 3D Actor block parameters are tunable, allowing you to use the For Each Subsystem (Simulink) block to create multiple instances of the same actor type in the virtual world.
Translation
Rotation
Scale
For an example, see Create Multiple Instances of Actors.
Use the Simulation 3D Actor block event ports to communicate events in the Unreal Engine simulation 3D environment, including when:
You click on an actor.
An actor collides or overlaps with another actor.
MATLAB Command
You clicked a link that corresponds to this MATLAB command:
Run the command by entering it in the MATLAB Command Window. Web browsers do not support MATLAB commands.
Sélectionner un site web
Choisissez un site web pour accéder au contenu traduit dans votre langue (lorsqu'il est disponible) et voir les événements et les offres locales. D’après votre position, nous vous recommandons de sélectionner la région suivante : .
Vous pouvez également sélectionner un site web dans la liste suivante :
Comment optimiser les performances du site
Pour optimiser les performances du site, sélectionnez la région Chine (en chinois ou en anglais). Les sites de MathWorks pour les autres pays ne sont pas optimisés pour les visites provenant de votre région.
Amériques
- América Latina (Español)
- Canada (English)
- United States (English)
Europe
- Belgium (English)
- Denmark (English)
- Deutschland (Deutsch)
- España (Español)
- Finland (English)
- France (Français)
- Ireland (English)
- Italia (Italiano)
- Luxembourg (English)
- Netherlands (English)
- Norway (English)
- Österreich (Deutsch)
- Portugal (English)
- Sweden (English)
- Switzerland
- United Kingdom (English)


