Use a Custom Document Interface to Link External Application Requirements
You can link Simulink® models, subsystems, and blocks to requirements in an external application by using a custom document interface. You can also use a custom document interface to import requirements. Before you link to or import requirements, you must first define and register the custom document interface.
In this example, you link Simulink blocks to a PowerPoint® presentation that contains requirements. Afterwards, you import the requirements into the model. The model represents the controls for a car window.

Define and Register a Custom Document Interface
In this example, you use a pre-made custom document interface contained in the file rmidemo_pp.m. Custom document interfaces set properties and provide callbacks that allow Requirements Toolbox™ to interface with an external application. For more information, see Define Custom Document Interface for Direct Linking to Requirements.
The rmidemo_pp.m file:
Sets PPT and PPTX as the supported file types.
Defines how Requirements Toolbox interprets PowerPoint documents.
Uses the Office VBA language to access and navigate to PowerPoint documents. For more information about Office VBA for PowerPoint, see the Microsoft Developer Reference pages.
To use a custom document interface, register the associated file in Requirements Toolbox.
rmi register rmidemo_pp
Create Links by Using Slide Numbers
After you register the custom document interface, you can link to a specific slide number in the PowerPoint presentation. If the slide order changes, the link does not update to match the new location.
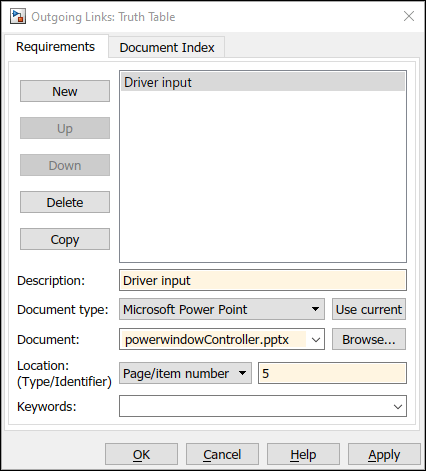
Link to the fifth slide, which contains the requirements for the driver input.
Right-click the
Truth Tableblock, which connects to thedriverinput of thecontrolchart. In the context menu, point to Select Apps and click the Requirements Manager button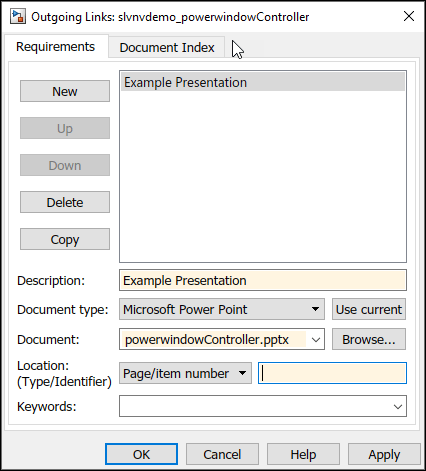 .
.Right-click the
Truth Tableblock and, in the Requirements Manager app section, click the Outgoing Links Editor button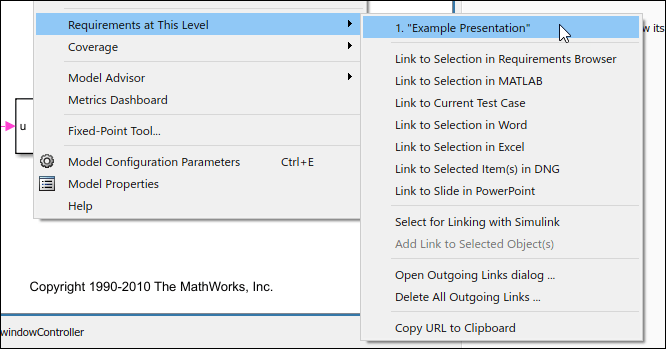 .
.In the Outgoing Links dialog box, click New.
In the Description, enter
Driver input.In the Document type drop-down, select
Microsoft PowerPoint.Click Browse. Select
powerwindowController.pptxand click Open.In the Location (Type/Identifier) text field, enter
5.Click OK.
Right-click the
Truth Tableblock. The menu option Driver input appears in the Requirements Manager app section of the context menu. When you click this menu option, MATLAB® opens the PowerPoint document to the fifth slide.
Create Persistent Links by Using Slide IDs
You can create a persistent link to a slide by using the slide ID. If the slide order changes, the link continues to point to the correct slide.
To find the ID of the fifth slide, open powerwindowController.pptx and use the MATLAB command line to query Office VBA:
hApp = actxGetRunningServer('powerpoint.application');
hDoc = hApp.ActivePresentation;
hDoc.Slides.Item(5).SlideID
ans = 260
Link a block to the slide.
Right-click the
Truth Tableblock and, in the Requirements Manager app section, click the Outgoing Links Editor button .
.In the Outgoing Links dialog box, click New.
In the Description, enter
Driver input (ID).In the Document type drop-down, select
Microsoft PowerPoint.Click Browse. Select
powerwindowController.pptxand click Open.In the Location (Type/Identifier) drop-down, select
Named Item.In the Location (Type/Identifier) text, enter
260.Click OK.
Right-click the
Truth Tableblock. The menu option Multiple Outgoing Links... > Driver input (ID) appears in the Requirements Manager app section of the context menu. When you click this menu option, MATLAB opens the PowerPoint document to the appropriate slide.
Create Persistent Links by Using the Document Index Tab
You can also create persistent links by using the Document Index tab of the Outgoing Links dialog box. To use the Document Index tab, your custom document interface must use the ContentsFcn method to store the slide ID. For more information about ContentsFcn, see Define Custom Document Interface.
Right-click the
Truth Table1block, which connects to thepassengerinput of thecontrolchart. In the Requirements Manager app section, click the Outgoing Links Editor button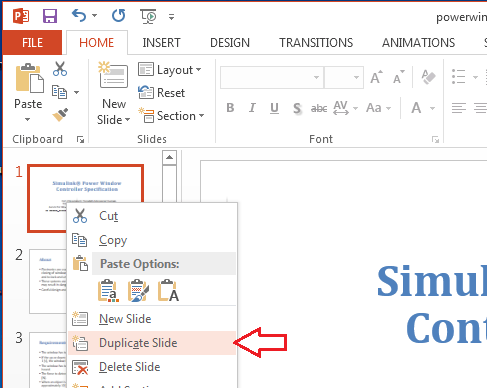 .
.In the Outgoing Links dialog box, click New.
In the Document type drop-down, select
Microsoft PowerPoint.Click Browse. Select
powerwindowController.pptxand click Open.Click the Document Index tab.
Click Refresh.
Double-click
Passenger Input consists of a vector with three elements. The Description and Location (Type/Identifier) fields automatically populate.Click OK.
Right-click the
Truth Table1block. The menu option Implement: "Passenger Input consists of a vector with three elements in powerwindowController.pptx" appears in the Requirements Manager app section of the context menu. When you click this menu option, MATLAB opens the PowerPoint document to the appropriate slide.

Create Persistent Link to Current Slide
You can create a persistent link to the active slide in an open PowerPoint presentation. For this example, create a link to the sixth slide. To create a link:
Open the PowerPoint presentation.
Go to the sixth slide,
Top or bottom of the window frame is reached.In the Simulink model, right-click the
endstopblock. Select Link to Selected Requirement > Link to Microsoft PowerPoint. Requirements Toolbox creates a link to the open slide.Right-click the
endstopblock. The menu option Implement "Top or bottom of the window frame is rea..." appears in the Requirements Manager app section of the context menu. When you click this menu option, MATLAB opens the PowerPoint document to the appropriate slide.
Create Bidirectional Links
You can enable Requirements Toolbox to automatically create bidirectional links. When you enable bidirectional links, linking to a requirement in an external application also creates a link from the external application to your model, subsystem, or block.
To create bidirectional links, your custom document interface must use the SelectLinkFcn method to insert the hyperlink. For more information about SelectionLinkFcn, see Define Custom Document Interface.
First, enable bidirectional linking.
In the Apps tab, open Requirements Manager.
In the Requirements pane, in the View drop-down menu, select
Links.Select the Requirements tab in the toolstrip.
Click Link Settings > Linking Options to open the Selection Linking tab in the Requirements Setting window.
Select the Modify destination for bidirectional linking checkbox.
Click Close.
Then, add the bidirectional link.
Open the PowerPoint presentation.
Go to the seventh slide,
Obstacle is present between the window and its frame.In the Simulink model, right-click the
obstacleblock and select Link to Selected Requirement > Link to Microsoft PowerPoint. A MATLAB link icon appears in the top-left corner of the slide.Return to the slide and control-click the link icon. In the model, the
obstacleblock is highlighted.
Bidirectional links only appear for links created after you enable the Modify destination for bidirectional linking option. Clearing the Enable external connectivity at MATLAB startup check box may prevent PowerPoint from connecting to MATLAB when you select a link.
Import Requirements
You can use the custom document interface to import requirements from an external application.
In the Requirements pane, in the View drop-down menu, select
Requirements.Open the PowerPoint document.
In the Requirements tab, click Import.
In the Document Type drop-down, select
Microsoft PowerPoint.Click Use Current. The Document location will automatically populate.
Click Import.
In the Requirements tab, in the Requirement Set section, click Requirements Editor to see the imported requirements.
The instructions above may be incompatible with files on Microsoft® OneDrive™ or other network locations. If you receive an error stating that importing the import isn't possible, follow these steps:
Close
powerwindowController.pptx.Create a local copy of
powerwindowController.pptx.Open the local copy.
Import the requirements again.

Remove Custom Document Interface
Use the unregister command to remove custom document interfaces you no longer require. After unregistering, links that use the custom document interface do not work.
rmi unregister rmidemo_pp