Package Custom Scenes into Executable
When you finish modifying a custom scene as described in Customize Scenes Using Simulink and Unreal Editor, you can package the project file containing this scene into an executable. You can then configure your model to simulate from this executable by using the Simulation 3D Scene Configuration block. Executable files can improve simulation performance and do not require opening the Unreal® Editor to simulate your scene. Instead, the scene runs by using the Unreal Engine® that comes installed with Vehicle Dynamics Blockset™.
Package Scene into Executable Using Unreal Editor
Before packaging the custom scenes into an executable, make sure that the plugins are:
Located in the Unreal Engine installation area, for example,
C:\Program Files\Epic Games\UE_5.4\Engine\Plugins\Marketplace\Mathworks.Deleted from your project area, for example,
C:\project\AutoVrtlEnv\Plugins.
Then, follow these steps.
Open the project containing the scene in the Unreal Editor. You must open the project from a Simulink® model that is configured to co-simulate with the Unreal Editor.
For more details on how to package projects, see "Packaging Projects" under Unreal Engine Documentation.
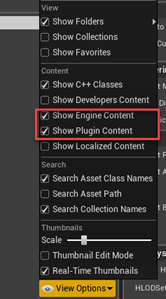
Ensure the plugin content is visible in the Content Browser or Content Drawer. Under Settings, select the Show Engine Content and Show Plugin Content check boxes.
In the Unreal Editor toolbar, select Edit > Project Settings to open the Project Settings window.
In the left pane, in the Project section, click Packaging.
In the Packaging section, set or verify the options in the table. If you do not see all these options, at the bottom of the Packaging section, click the Show Advanced expander.

Packaging Option Enable or Disable Use Pak File Enable Cook everything in the project content directory (ignore list of maps below) Disable Cook only maps (this only affects cookall) Enable Create compressed cooked packages Enable Exclude editor content when cooking Enable Specify the scene from the project that you want to package into an executable.
In the List of maps to include in a packaged build option, click the Adds Element button
 .
.Specify the path to the scene that you want to include in the executable. By default, the Unreal Editor saves maps to the
/Game/Mapsfolder. For example, if the/Game/Mapsfolder has a scene namedmyScenethat you want to include in the executable, enter/Game/Maps/myScene.Add or remove additional scenes as needed.
Specify the required asset directories to include in the executable. These directories are located in the
MathWorks Interfaceplugin.Under Additional Asset Directories to Cook, click the Adds Element button
to add elements and specify these directories:/MathWorksSimulation/Characters/MathWorksSimulation/VehicleCommon/MathWorksSimulation/Vehicles/MathWorksAutomotiveContent/Vehicles/MathWorksSimulation/Weather
Rebuild the lighting in your scenes. If you do not rebuild the lighting, the shadows from the light source in your executable file are incorrect and a warning about rebuilding the lighting displays during simulation. In the Unreal Editor toolbar, select Build > Build Lighting Only.
(Optional) If you plan to obtain semantic segmentation data from the scene by using a Simulation 3D Camera (Simulink 3D Animation) block, enable rendering of the stencil IDs. In the left pane, in the Engine section, click Rendering. Then, in the main window, in the Postprocessing section, set Custom Depth-Stencil Pass to
Enabled with
                            Stencil
. For more details on applying stencil IDs for semantic segmentation, see Apply Labels to Unreal Scene Elements for Semantic Segmentation and Object Detection (Simulink 3D Animation).Close the Project Settings window.
Select Windows as a supported platform for your project. From the scene toolbar, select Platforms > Supported Platforms and enable Windows.
From the scene toolbar, select Platforms > Windows > Package Project. Select a local folder in which to save the executable, such as to the root of the project file (for example,
C:/Local/myProject).Note
Packaging a project into an executable can take several minutes. The more scenes that you include in the executable, the longer the packaging takes.
Once packaging is complete, the folder where you saved the package contains a
WindowsNoEditorfolder that includes the executable file. This file has the same name as the project file.Note
If you repackage a project into the same folder, the new executable folder overwrites the old one.
Suppose you package a scene that is from the
myProject.uprojectfile and save the executable to theC:/Local/myProjectfolder. The editor creates a file namedmyProject.exewith this path:C:/Local/myProject/WindowsNoEditor/myProject.exe
Simulate Scene from Executable in Simulink
To improve co-simulation performance, consider configuring the Simulation 3D Scene Configuration block to co-simulate with the project executable.
In the Simulation 3D Scene Configuration block of your Simulink model, set the Scene source parameter to
Unreal Executable.Set the File name parameter to the name of your Unreal Editor executable file. You can either browse for the file or specify the full path to the file by using backslashes. For example:
C:\Local\myProject\WindowsNoEditor\myProject.exe
Set the Scene parameter to the name of a scene from within the executable file. For example:
/Game/Maps/myScene
Run the simulation. The model simulates in the custom scene that you created.
If you are simulating a scene from a project that is not based on the
AutoVtrlEnv project, then the scene simulates in full screen
mode. To use the same window size as the default scenes, copy the
DefaultGameUserSettings.ini file from the support package
installation folder to your custom project folder. For example, copy
DefaultGameUserSettings.ini from:
C:\ProgramData\MATLAB\SupportPackages\<MATLABrelease>\toolbox\shared\sim3dprojects\automotive\AutoVrtlEnv\Config
to:
C:\<yourproject>.project\Config
Then, package scenes from the project into an executable again and retry the simulation.