Create an App to Morph Binary and Grayscale Images
R2026bThis example shows how to build an app to interactively morph 2-D binary and grayscale images using App Designer. Using the MorphologyApp app, users can preview common morphological operations on a 2‑D binary or grayscale image and commit only the results they want. The app enables users to stack a series of committed morphological operations. Users can iterate on the input image and visually validate each step before they commit the operation. As users adjust the parameters of the morphological operation, the app updates the display immediately. The app supports these morphological operations: imopen, imclose, bwskel, bwperim, bwhitmiss, imtophat, imbothat, imdilate, imerode. For more information about the various types of morphological operations on images, see Types of Morphological Operations.
Open App Designer
App Designer is an interactive development environment for designing apps and custom UI components and programming their behavior.
To build the app from scratch, open App Designer using this command. Alternatively, you can open App Designer by selecting the Design App option on the Apps tab of the MATLAB® toolstrip.
appdesigner
The MorphologyApp app is also attached to this example as a supporting file. For information on running the app, see the Morph 2-D Image Using App section.
You can also open this example from the App Designer home page by clicking Show examples in the Apps section of the home page and selecting Refine Morphological Masks from the list of examples.
You can customize the code of the app in the attached supporting files. For information on customizing the app, see the Customize the App section.
App Layout Design
The MorphologyApp app has two main regions: a toolstrip and a working area.
The toolstrip contains these sections:
Import Image — Consists of UI components used to import 2-D grayscale or binary image data from a file or the workspace.
Morphology — Consists of UI components used to select a morphological operation and invert the current image.
Export — Consists of UI components used to export the morphed image to a file or the workspace.
The working area of the app contains these sections:
Viewer — Displays the imported image, the current preview, or the last committed result. The app displays the image using the
imageshowfunction. The handle of the displayed image is anImageobject. AViewerobject is the parent of theImageobject. For more information about theImageobject, see Image Properties. For more information about theViewerobject, see Viewer Properties.Parameters — Contains operation‑specific parameter controls. Because each morphological operation requires different inputs, the app dynamically creates the parameter UI when the user changes the selected approach. This section also has Commit and Cancel buttons to commit or cancel the current morphological operation, respectively.
Morphological Operation History — Displays a tabular list in which each row represents a committed operation. Each row has a View button to enable the user to view the result up to the corresponding morphological operation. Each row also has a Delete button to enable the user to delete morphological operations including and following the corresponding morphological operation.
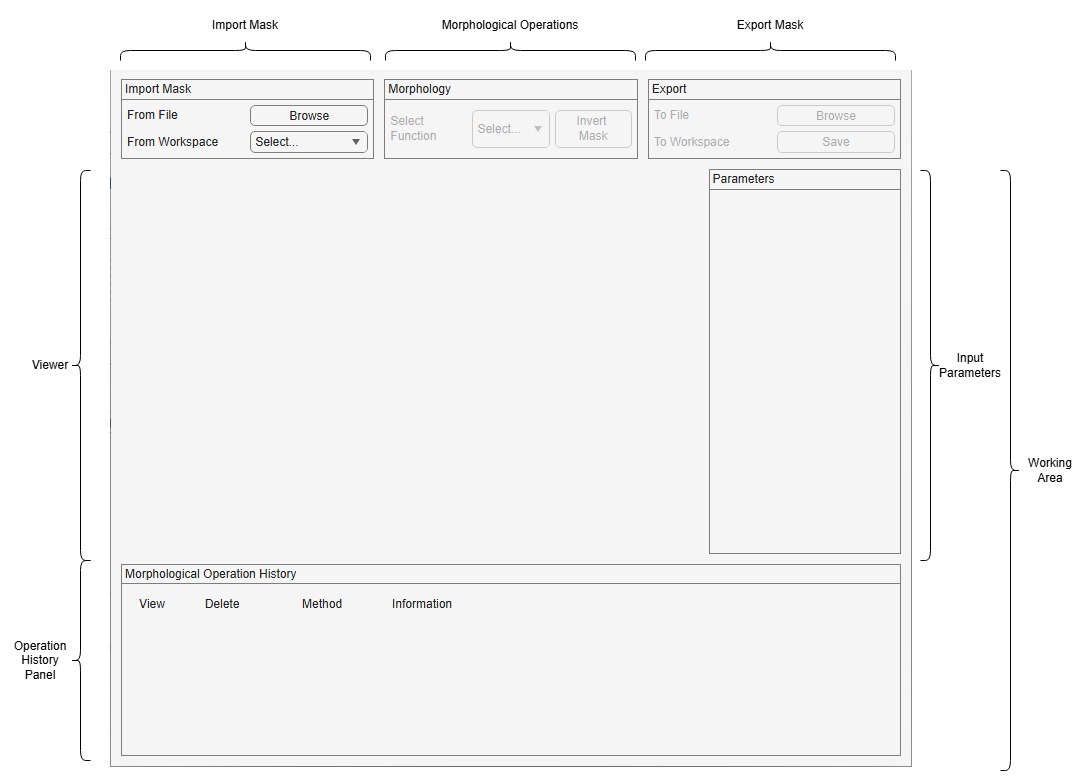
The app uses a grid layout structure to create the defined layout.
Main App figure
Main app grid layout
Toolstrip grid layout
Toolstrip elements like import, morphology, and export
Working area grid layout
Image panel containing
ImageobjectParameter grid layout containing the Parameters panel with parameter inputs and Commit and Cancel buttons
Morphological operation history grid layout containing tabular list of committed morphological operations
For more information on using grid layout with App Designer, see Use Grid Layout Managers in App Designer.
Define App Properties
The app stores the input image and current and intermediate results in these properties.
Viewer—Viewerobject used to display the image.ImageHandle—Imageobject created byimageshowand used to display and update the loaded image.OriginalImage— Original image loaded by the user of the app.ProcessedImages— Array of images representing the operation stack. The first slice is the original image, and each subsequent slice is the result of applying the next committed operation to the previous slice.
These properties enable the app to stack morphological operations. Each committed operation operates on the last committed image and appends a new result to the history.
Define App Methods
The app uses methods to import and visualize data, process user input and update the display, export the final results, and control the app state. The app also requires some helper functions to improve code readability and code reusability. These are some of the important app methods.
Reset App on New Data Load
When the user loads a new image into the app, the app clears the existing image data, displays the loaded image, and clears the morphological operation stack. The app resets UI elements to their default states and enables the drop-down used to select the morphological operation. The app enables the bwskel morphological operation only if the input image is a binary mask of the logical data type. The resetAppOnNewDataLoad method defines this behavior.
function resetAppOnNewDataLoad(app,imageData)
    % Function to reset app when new data is loaded

    % Set the newly loaded image data, and reset viewer2d
    app.ImageHandle.Data = imageData;
    app.Viewer.Interactions = ["pan","zoom"];

    % Reset UI elements to default state
    app.SelectFunctionDropDown.Enable = "on";
    app.SelectFunctionDropDownLabel.Enable = "on";
    app.InvertMaskButton.Enable = "on";

    % Clear any previous rows of morphological operations
    delete(app.MorphologyGridLayout.Children(2:end));

    % Set data
    app.OriginalImage = imageData;
    app.ProcessedImages = imageData;

    % If data is logical, enable bwskel morphology option
    if isa(imageData,"logical") && ~ismember("bwskel",app.SelectFunctionDropDown.Items)
        app.SelectFunctionDropDown.Items(end+1) = {convertStringsToChars("bwskel")};
    elseif ~isa(imageData,"logical") && ismember("bwskel",app.SelectFunctionDropDown.Items)
        app.SelectFunctionDropDown.Items(ismember(app.SelectFunctionDropDown.Items,"bwskel")) = [];
    end
end
Preview Morphological Operations
The app has two distinct modes.
Preview Mode — The app goes into preview mode when the user selects a morphological operation. In this mode, the user can adjust the parameters. The app computes and displays the results in real-time, but does not add them to the committed history until the user selects Commit. To enable users to safely experiment with parameters without accidentally committing experimental results, the app locks most other controls in preview mode by toggling the enable and visible states across import, operation selection, export, and history-table controls.
Default Mode — The app goes into default mode when the user is not actively configuring a morphological operation. The app shows the last committed result, and the user can import new data, pick a new operation, view or delete history, or export results.
When the user selects an operation in the Select Function drop-down, the SelectFunctionDropDownValueChanged callback switches the app into preview mode and creates the appropriate parameter UI in the Parameters section. The imopen, imclose, imtophat, imbothat, imdilate, and imerode functions require a single structuring element as the only parameter, so selectign any of them causes the app to display a single structuring element input in the parameter UI. The bwhitmiss function requires two structuring elements as parameters, so the app displays two structuring element inputs in the parameter UI. The bwskel function requires only the minimum branch length, and the bwperim function requires only the pixel connectivity, so the app displays a minimum branch length input for the bwskel function and a pixel connectivity input for the bwperim function in the parameter UI.
After constructing the parameter UI, the callback triggers a live preview to enable the user to immediately see the effect of the default parameters of the selected morphological operation.
% Value changed function: SelectFunctionDropDown
function SelectFunctionDropDownValueChanged(app,event)
    % Callback function to process user selecting a morphological
    % operation to perform
    value = app.SelectFunctionDropDown.Value;
    if strcmp(value,app.DefaultDropDownValue)
        % If user selected 'Select' then do nothing
        return;
    end
    app.disableDuringPreviewMode(false);
    % Set parameter inputs for performing morphology
    switch value
        case {"imopen","imclose","imtophat","imbothat","imdilate","imerode"}
            app.showSecondStrelInput(false);
            app.displayStructuringElementInput();
        case "bwhitmiss"
            app.displayTwoStructuringElementInput();
        case "bwskel"
            app.displayMinBranchLength();
        case "bwperim"
            app.displayPixelConnectivity();
    end
    app.liveUpdatePreview();
end
When the app constructs the parameter UI in preview mode, or when the user updates parameters, the app calls the liveUpdatePreview method to enable the user to immediately see the effect of the selected morphological operation. The liveUpdatePreview method calls the morphAndShow method to perform the morphological operation on the image with instructions not to commit the results to the ProcessedImages array. When the user loads a new image, the OriginalImage and ProcessedImages properties are initially the same as the input image. Every time the user commits a morphological operation, the app appends the result of the committed morphological operation to the ProcessedImages property, stacking the results of multiple morphological operations to refine the image. The morphAndShow method calls parameter-specific methods to get the parameter values for the morphological operation. For example, for operations that use a single structuring element, the morphAndShow method calls the getStrel method to get the value of the structuring element.
% Value changed function: Parameter2EditField
function liveUpdatePreview(app,event)
    % Function to update the view based on current input, simulating
    % live updates
    app.morphAndShow(false);
end

function morphedImage = morphAndShow(app,commitTF)
    % Perform the selected morphological operation on the last known mask. If the
    % 'commitTF' flag is true, the method commits the results and updates the history table
    prevImage = app.ProcessedImages(:,:,end);
    value = app.SelectFunctionDropDown.Value;
    switch value
        case "imopen"
            se = getStrel(app);
            if isempty(se)
                return;
            end
            morphedImage = imopen(prevImage,se);
        case "imclose"
            se = getStrel(app);
            if isempty(se)
                return;
            end
            morphedImage = imclose(prevImage,se);
        case "bwskel"
            n = getMinBranchLength(app);
            morphedImage = bwskel(prevImage,MinBranchLength=n);
        case "bwperim"
            conn = getPixelConnectivity(app);
            morphedImage = bwperim(prevImage,conn);
        case "bwhitmiss"
            se1 = getStrel(app);
            se2 = getSecondStrel(app);
            if isempty(se1) || isempty(se2)
                return;
            end
            morphedImage = bwhitmiss(prevImage,se1,se2);
        case "imtophat"
            se = getStrel(app);
            if isempty(se),
                return;
            end
            morphedImage = imtophat(prevImage,se);
        case "imbothat"
            se = getStrel(app);
            if isempty(se),
                return;
            end
            morphedImage = imbothat(prevImage,se);
        case "imdilate"
            se = getStrel(app);
            if isempty(se),
                return;
            end
            morphedImage = imdilate(prevImage,se);
        case "imerode"
            se = getStrel(app);
            if isempty(se),
                return;
            end
            morphedImage = imerode(prevImage,se);
    end
    % Update current view
    app.ImageHandle.Data = morphedImage;
    if commitTF
        % Store the results for viewing history
        switch value
            case {"imopen","imclose","imtophat","imbothat","imdilate","imerode"}
                info = sprintf("using structuring element of dimensionality %d",se.Dimensionality);
            case "bwhitmiss"
                info = sprintf("using structuring elements of dimensionalities %d and %d",se1.Dimensionality,se2.Dimensionality);
            case "bwskel"
                info = sprintf("using minimum branch length of %d",n);
            case "bwperim"
                info = sprintf("using pixel connectivity %d",conn);
        end
        app.ProcessedImages(:,:,end+1) = morphedImage;
        app.appendToTable(value,info);
    end
end

function SE = getStrel(app)
    % Function to get the current first structuring element
    % input as a strel object
    switch app.Parameter1Input.Value
        case "diamond"
            SE = strel("diamond",app.Parameter2EditField.Value);
        case "disk"
            SE = strel("disk",app.Parameter2EditField.Value,str2double(app.Parameter3Input.Value));
        case "octagon"
            if mod(app.Parameter2EditField.Value,3) == 0
                SE = strel("octagon",app.Parameter2EditField.Value);
            else
                uialert(app.MaskMorphologyAppUIFigure,"Radius must be a multiple of 3 for octagon neighborhood shape.","Invalid Input");
                SE = [];
                app.CommitButton.Enable = "off";
                return;
            end
        case "line"
            SE = strel("line",app.Parameter2EditField.Value,app.Parameter3Input.Value);
        case "rectangle"
            SE = strel("rectangle",[app.Parameter2EditField.Value app.Parameter3Input.Value]);
        case "square"
            SE = strel("square",app.Parameter2EditField.Value);
    end
    app.CommitButton.Enable = "on";
end
When the selected operation requires a structuring element, the app builds the strel object from the currently selected shape. The app supports shapes such as diamond, disk, octagon, line, rectangle, and square for structuring elements. When the user changes the shape of the structuring element, the neighborhoodShapeValueChangedFunction method updates the UI to display parameter inputs related to the selected shape. The neighborhoodShapeValueChangedFunction method calls a shape-specific method to create the UI for the parameters of each shape. For example, if the user selects the diamond shape, the neighborhoodShapeValueChangedFunction method calls the setDiamondInputs method.
function neighborhoodShapeValueChangedFunction(app,src,evt)
    % Callback function to update strel function structuring
    % element dimension parameters input based on structuring
    % element selection
    isSourceSecondStrel = false;
    if isequal(src,app.SecondStrelShapeDropDown)
        isSourceSecondStrel = true;
    end
    switch evt.Value
        case "diamond"
            app.setDiamondInputs(isSourceSecondStrel);
        case "disk"
            app.setDiskInputs(isSourceSecondStrel);
        case "octagon"
            app.setOctagonInputs(isSourceSecondStrel);
        case "line"
            app.setLineInputs(isSourceSecondStrel);
        case "rectangle"
            app.setRectangleInputs(isSourceSecondStrel);
        case "square"
            app.setSquareInputs(isSourceSecondStrel);
    end
    app.liveUpdatePreview();
end

function setDiamondInputs(app,isSourceSecondStrel)
    % Function to set up 'diamond' structuring element input. The
    % 'isSourceSecondStrel' flag determines whether to setup parameter 2 of
    % the first or second strel input
    if isSourceSecondStrel
        app.SecondStrelParameter2Label.Text = "Radius";
        app.SecondStrelParameter2EditField.Value = 1;
        app.SecondStrelParameter2EditField.Step = 1;
        app.showSecondStrelProperty3Input(false);
    else
        app.Parameter2Label.Text = "Radius";
        app.Parameter2EditField.Value = 1;
        app.Parameter2EditField.Step = 1;
        app.showProperty3Input(false);
    end
end
Commit or Cancel a Morphological Operation
When the user commits a morphological operation by selecting Commit, the app switches back to default mode and appends the results of the last morphological operation to the ProcessedImages array. The app creates View and Delete buttons for the committed operation in the Morphological Operation History list, and adds key parameter information about the last commit to the list. The appendToTable method defines this behavior.
function appendToTable(app,method,info)
    % Function to add a row of the performed morphology to MorphologyGridLayout

    % Compute the index of new row. new row index = number of
    % existing rows + 1
    newRowIndx = length(app.MorphologyGridLayout.Children) + 1;

    % If elements were previously deleted and an empty row exists in
    % MorphologyGridLayout, use it. Otherwise, add a new row
    if newRowIndx > length(app.MorphologyGridLayout.Children)
        app.MorphologyGridLayout.RowHeight(newRowIndx) = {20};
    end

    % Create MorphologyRowGridLayout
    morphologyRow = uigridlayout(app.MorphologyGridLayout);
    morphologyRow.ColumnWidth = {60,60,120,"1x"}; % In pixel units, allocates space for each of the UI elements to match the title spacing
    morphologyRow.RowHeight = {20};
    morphologyRow.Layout.Row = newRowIndx;
    morphologyRow.Layout.Column = 1;
    morphologyRow.Padding = 0;

    % Create View button
    viewBtn = uibutton(morphologyRow,Text="View");
    viewBtn.Layout.Row = 1;
    viewBtn.Layout.Column = 1;
    viewBtn.ButtonPushedFcn = @(~,~)app.viewButtonPushed(newRowIndx);

    % Create Delete button
    deleteBtn = uibutton(morphologyRow,Text="Delete");
    deleteBtn.Layout.Row = 1;
    deleteBtn.Layout.Column = 2;
    deleteBtn.ButtonPushedFcn = @(~,~)app.deleteButtonPushed(newRowIndx);

    % Create Morphology method label
    methodLabel = uilabel(morphologyRow,HorizontalAlignment="center");
    methodLabel.Text = method;
    methodLabel.Layout.Row = 1;
    methodLabel.Layout.Column = 3;

    % Create Information label
    infoLabel = uilabel(morphologyRow);
    infoLabel.Text = info;
    infoLabel.Layout.Row = 1;
    infoLabel.Layout.Column = 4;

    % Enable exporting
    app.SaveButton.Enable = "on";
    app.ToWorkspaceLabel.Enable = "on";
    app.ExportBrowseButton.Enable = "on";
    app.ToFileLabel.Enable = "on";
end
If the user selects Cancel, the app discards the preview, restores the last committed result to the viewer, and returns to default mode. This explicit split between the commit and cancel operations makes it safe to experiment with different morphological operations without accidentally committing experimental results to the stack.
Invert Image
The Morphology section of the app toolstrip includes an Invert Image button. When the user selects this button, the app computes the complement of the current image using the imcomplement function, appends the result to the processed stack, updates the display, and records the operation in the history list as a committed step. The app treats this as a committed operation. Users can revert it by deleting it from the Morphological Operation History list. The InvertMaskButtonPushed method defines this behavior.
% Button pushed function: InvertMaskButton
function InvertMaskButtonPushed(app,event)
    % Callback function to compute the inverse of the current mask
    prevImage = app.ProcessedImages(:,:,end);
    morphedImage = imcomplement(prevImage);
    app.ProcessedImages(:,:,end+1) = morphedImage;
    app.ImageHandle.Data = morphedImage;
    app.appendToTable("InvertMask"," ");
end
View or Delete Committed Morphological Operations
The app records each committed operation as a new row in the Morphological Operation History list. Each row contains a View button to display the result at that point in the stack, a Delete button that deletes the selected row and all operations that follow it, and labels that record the method name and a short information string about parameters used for that operation. When the user deletes operations back to the first committed row, the app locks export controls because there is no committed result to export. The viewButtonPushed and deleteButtonPushed methods defines these behaviors.
function viewButtonPushed(app,index)
    % Callback function for when user presses the view button on any
    % of the previously performed morphological operations to view
    % the result history of operations.
    prevImage = app.ProcessedImages(:,:,index);
    app.ImageHandle.Data = prevImage;
end

function deleteButtonPushed(app,index)
    % Callback function to delete the current and following
    % operations
    app.ProcessedImages(:,:,index:end) = [];
    prevImage = app.ProcessedImages(:,:,index-1);
    app.ImageHandle.Data = prevImage;
    delete(app.MorphologyGridLayout.Children(index:end));
    if index == 2
        % As only the table header is remains, lock exporting
        app.SaveButton.Enable = "off";
        app.ToWorkspaceLabel.Enable = "off";
        app.ExportBrowseButton.Enable = "off";
        app.ToFileLabel.Enable = "off";
    end
end
Export Last Committed Morphological Operation
In the default mode of the app, users can export the last committed mask to a file or the workspace by using the Export section of the app toolstrip. The app exports the last image in ProcessedImages to a file. The ExportBrowseButtonPushed and SaveButtonPushed methods define these behaviors.
% Button pushed function: ExportBrowseButton
function ExportBrowseButtonPushed(app,event)
    % Callback function to write the last created mask to disk
    finalMask = app.ProcessedImages(:,:,end);
    filterSpec = app.getSupportedFileFilter(true);
    [file,location] = uiputfile(filterSpec,"Save Morphed Mask","mask.png");
    if ~isequal(file,0)
        try
            imwrite(finalMask,fullfile(location,file));
            uialert(app.MaskMorphologyAppUIFigure,"Mask saved successfully","Export Success",Icon="success");
        catch ME
            uialert(app.MaskMorphologyAppUIFigure,ME.message,"Export Failed");
        end
    end
end

% Button pushed function: SaveButton
function SaveButtonPushed(app,event)
    % Write final mask to base workspace
    finalMask = app.ProcessedImages(:,:,end);
    assignin("base","BwMorphedMask",finalMask);
    uialert(app.MaskMorphologyAppUIFigure,"Mask saved to workspace successfully","Export Success",Icon="success");
end
Morph 2-D Image Using App
Run the MorphologyApp app.
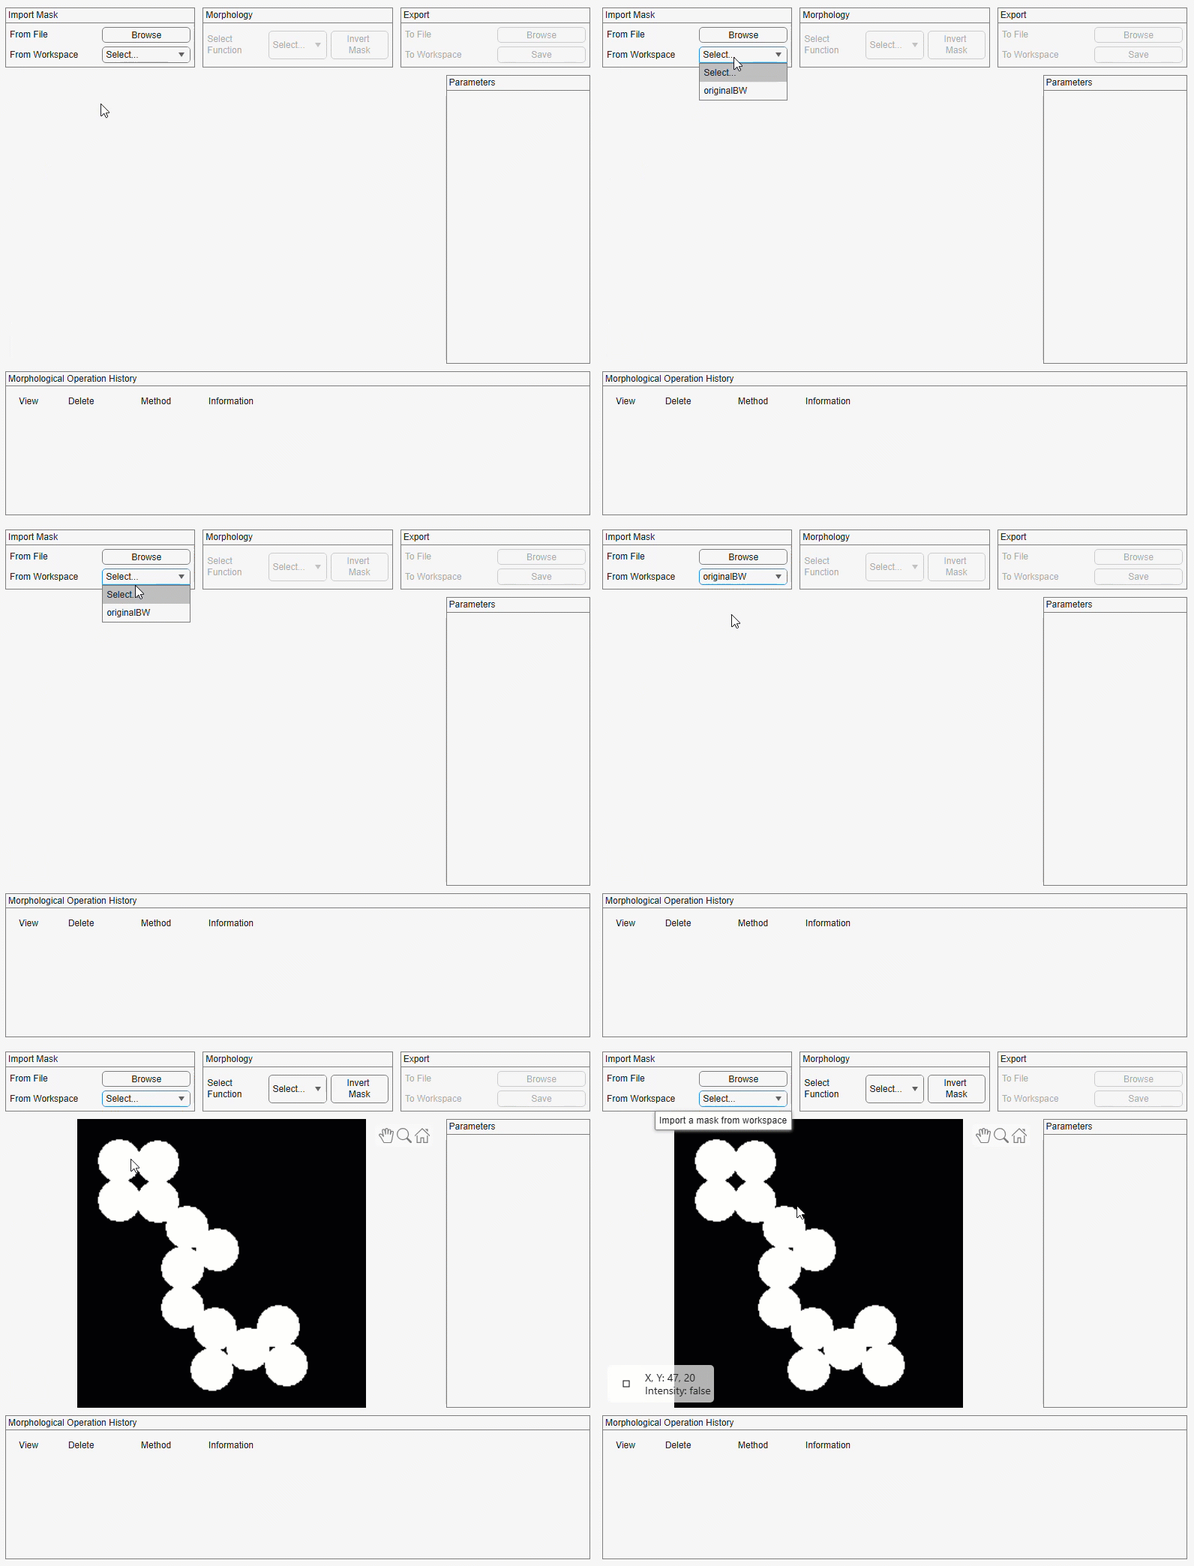
Import an image either from a file or from the workspace using the options in the Import Image section of the app toolstrip. If you choose to import the image from a file, the app opens a dialog box enabling you to browse files that have image file formats. If you choose to import the image from the workspace, the app filters workspace variables for potential images and displays the variable names in the dropdown. When you import an image, the app resets and displays the imported image in the viewer section of the app.
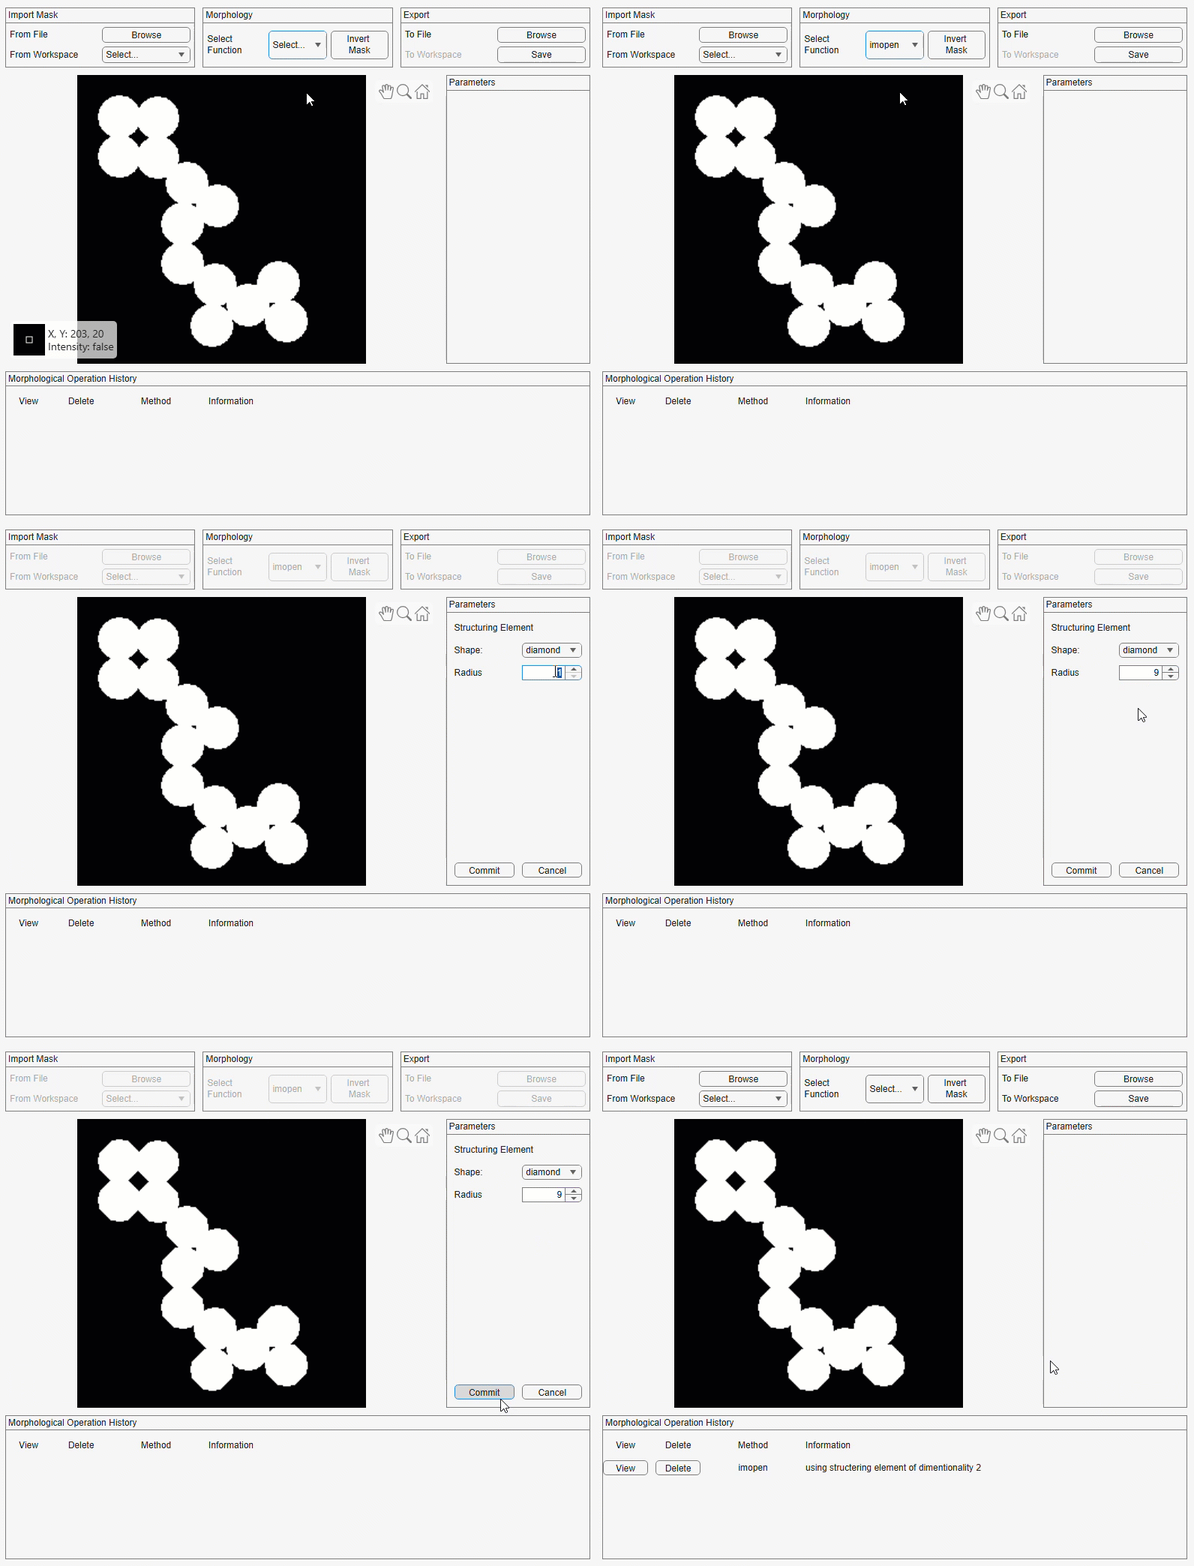
Select a morphology operation from the Morphology section of the app toolstrip. The app switches into preview mode and displays the relevant parameter inputs in the Parameters section. Adjust the parameters of the morphological operation. The viewer updates live as you change the parameter inputs. Select Commit to add the operation to the stack and record it in the history, or select Cancel to discard it. For example, to morph the imported image using imopen, select imopen from the list of morphological operations in the Morphology section of the app toolstrip. Experiment with different structuring elements in the Parameter section. Select Commit when you are satisfied with your results to add the morphological operation to the stack.
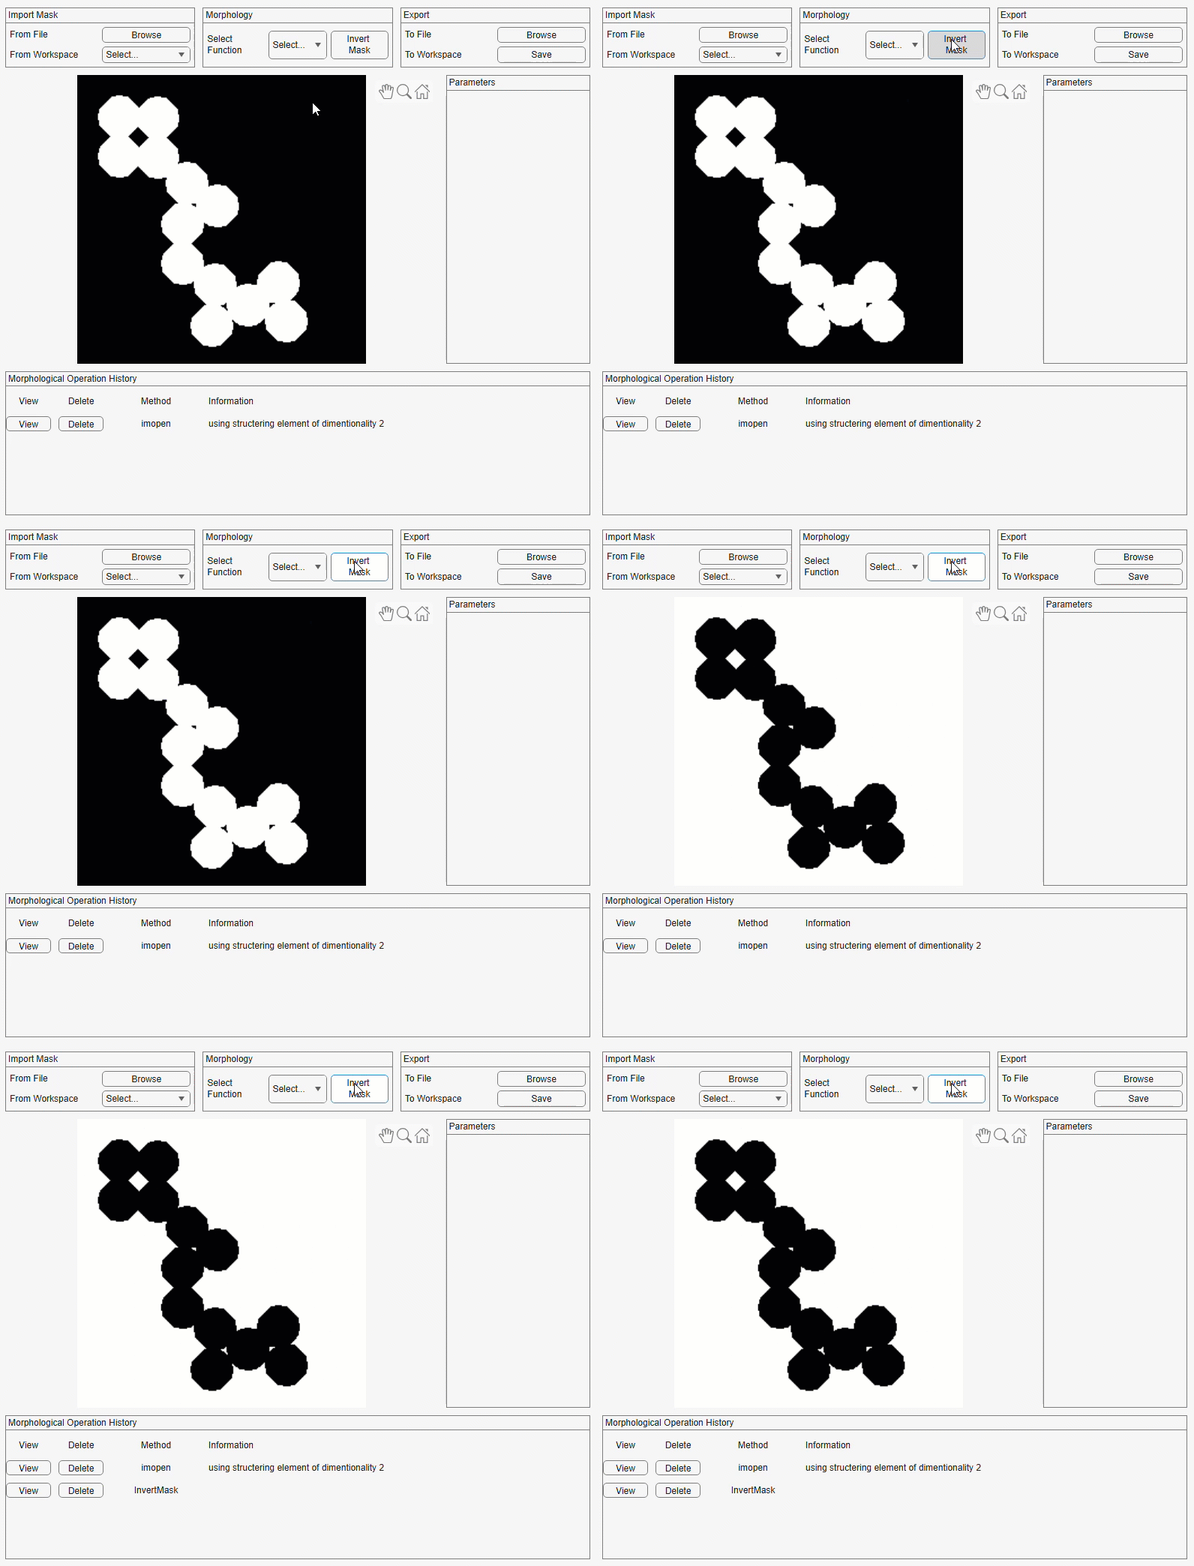
To invert the current image, select the Invert Image button in the Morphology section of the app toolstrip. The app automatically commits the inversion operation to the history. To revert the process, you can delete the operation from the Morphological Operation History list. Use the Morphological Operation History list to view earlier results in the stack, or to delete operations back to a previous state.
Export the last committed result to a file or to the workspace using the Export section of the app toolstrip.
Customize the App
You can customize the code of the MorphologyApp app in the attached supporting file. You can include support for more morphological operations by adding them to the list of methods, adding the UI elements required for their parameters, and adding steps to perform the additional morphological operations in the morphAndShow method. You can also add support for arbitrary shapes as structural element, supported by the strel function.
To customize the app, you can choose one of these options:
Open the attached MLAPP files in App Designer and edit the code in the Code View.
Open the attached MLAPP files in App Designer, select Share in the Designer tab and then Export to MATLAB Class (.m), and save the M file. You can then edit the M file.
See Also
Apps
Properties
Functions
imageshow|imopen|imclose|imdilate|imtophat|imbothat|imerode|bwskel|bwperim|bwhitmiss

