Connect UI Components to Simulink Model Elements
When you create a custom app to interface with a Simulink model, you can connect specific UI components in the app to model elements by creating a binding. You can use connected UI components to control and display those model elements. For an example of an app with an associated model, see Create App for Simulink Model.
App Designer has Simulink® UI components that perform specific tasks that are common to many simulations. For example, you can use the Simulation Controls component to start, stop, and pause a simulation from an app. When you add a Simulink UI component to your app, App Designer automatically configures the component to interface with the model associated with the app.
To further customize your app behavior, you can use a larger set of UI components to control elements in the model associated with your app by creating bindings. For example, you can create a binding to use a slider to tune a model variable or a time scope to display a signal.
Connect UI Components to Model Variables
To tune model variables from your app while you run a simulation, add bindings to connect UI components in your app to variables in your model. You can connect to variables in the model workspace or in the base workspace. For example, you can use a slider to interactively change the value of a model variable.
You can use UI components that allow a user to set numeric values, such as spinners, sliders, and numeric edit fields, to tune model variables. With your app open in App Designer, select the UI component. Add a new binding using any of these methods:
On the App Designer canvas, right-click the UI component and select Add Binding.
In the Component Browser, select the Bindings tab and click the
 button.
In the Simulink tab of the App Designer toolstrip, click the
 Add Binding button.
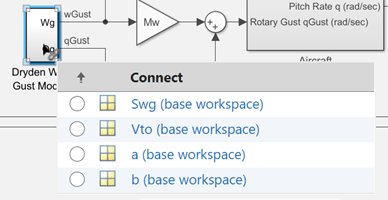
In all cases, the Simulink model opens in connect mode. Click a block that uses a variable, and select the variable from the connection options. You can add a binding to a variable in either the base workspace or the model workspace.
When you run the app and start the simulation, interactively changing the value of the UI component updates the value of the variable to match. If the data type of the component value is different than the data type of the variable, the binding attempts to convert the data.
Connect UI Components to Signals
To visualize signal data in your app while you run a simulation, add bindings to connect UI components in your app to logged signals in your model. For example, you can plot signal data on a time scope component in your app.
You can use UI components that display information, such as time scopes, gauges, and labels, to visualize signals. With your app open in App Designer, select the UI component. Add a new binding using any of these methods:
On the App Designer canvas, right-click the UI component and select Add Binding.
In the Component Browser, select the Bindings tab and click the
button.In the Simulink tab of the App Designer toolstrip, click the
Add Binding button.
In all cases, the Simulink model opens in connect mode. To choose a signal, use these steps:
Click a logged signal or a block with a logged signal output, and select the signal from the connection options.

Ensure that the Signal Logging check box in the Data Import/Export pane of the Model Settings is selected.
When you run the app and start the simulation, when the signal logs data, the UI component displays the data.
Note
App Designer creates a binding between a UI component and a signal using the fully specified block path and port index of the signal. Therefore, if the path or index changes, you must modify the binding.
View and Modify Bindings in App
You can use App Designer to view existing bindings and replace or delete bindings.
With your app open in App Designer, in the Component Browser, select a UI component with a binding or select the app node to view all bindings. Select the Bindings tab, and use the tab to:
View the list of bindings associated with the component or app.
Filter the list of bindings by the type of model element or whether the binding is valid by using the
 Filter menu.
Create a new binding by clicking the
button.Replace an existing binding by clicking
 and selecting
Replace.
and selecting
Replace.Delete a binding by clicking
and selecting
Delete.
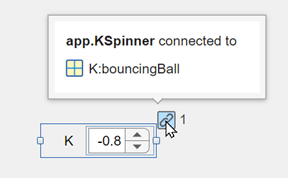
You can also view the bindings associated with a component in the App Designer canvas by selecting a component and pointing to the binding icon for the component.
Validate Bindings in App
After you create bindings, those bindings might become invalid if you delete or change
the name of variables or signals in the model associated with the app. To check whether the
bindings in your app are valid, in the Simulink tab of the App Designer
toolstrip, click the ![]() Validate Bindings button. You can view invalid bindings in the
Bindings tab of the Component Browser.
Components with an invalid binding also show a red binding icon on the App Designer
canvas.
Validate Bindings button. You can view invalid bindings in the
Bindings tab of the Component Browser.
Components with an invalid binding also show a red binding icon on the App Designer
canvas.

To fix an invalid binding, delete or replace the binding.