Main Content

FPGA Data Capture Component Generator

Configure and generate FPGA data capture components

Description

The FPGA Data Capture Component Generator tool configures and generates components for capturing data from a design running on an FPGA. The generated components capture a window of signal data from the FPGA and return the data to MATLAB® or Simulink®.
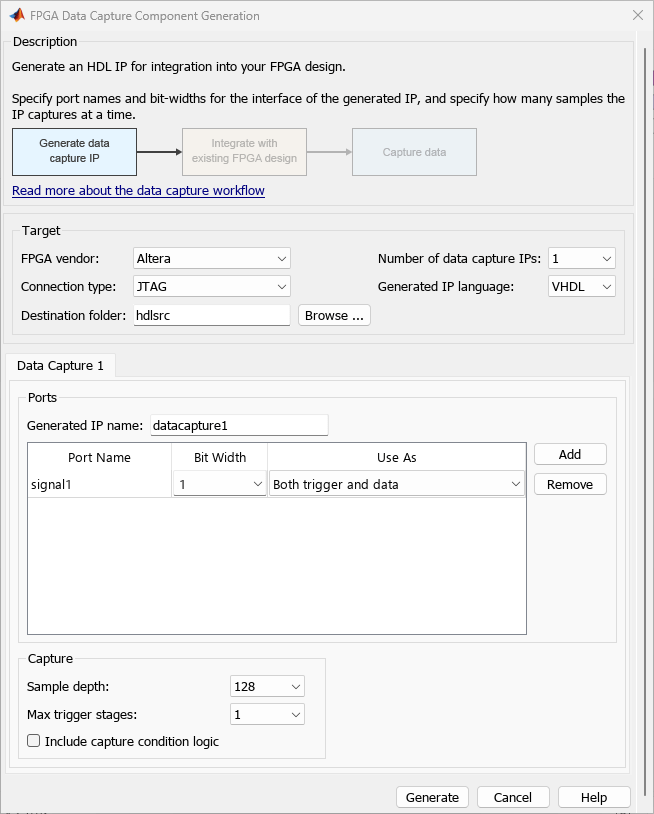
FPGA Data Capture Component Generator tool

To use this tool, you must have an existing HDL design and FPGA project. To capture the signals, HDL Verifier™ generates the IP core that you must integrate into your HDL project, and deploy to the FPGA along with the rest of your design.

The Generate button in this tool generates these components:

  • HDL IP core, for integration into your FPGA design. Connect the signals you want to capture and use as triggers, and connect a clock and clock enable.

  • Generation report, with list of generated files and instructions for next steps.

  • Tool to set capture parameters and capture data to the MATLAB workspace. See FPGA Data Capture.

  • Customized version of the hdlverifier.FPGADataReader System object™ that provides an alternative, programmatic, way to configure and capture data.

  • Simulink model that contains a customized FPGA Data Reader block. This model streams the captured signals into the Logic Analyzer waveform viewer. You can also use the Scope block to display the signals.

  • MAT file in the generatedIPName_gensettings.mat format, where generatedIPName is the name of the generated HDL IP core. This MAT file holds the data capture build parameters. To reload the same design in your next iteration, provide this MAT file as an input argument to the generateFPGADataCaptureIP function.

For a workflow overview, see Data Capture Workflow.

For an AMD® device over a JTAG connection, you can observe signals operating at different clock rates by using multiple data capture IPs. For more information about how to generate and integrate multiple data capture IPs into your FPGA design, see Capture Asynchronous Data.

Open the FPGA Data Capture Component Generator

  • Simulink toolstrip: Access the HDL Verifier tab by opening the HDL Verifier app from the Apps tab. On the HDL Verifier tab, on the HDL Verifier Mode pane, select FPGA Data Capture (FDC). Then, click Generate FDC Components.

  • MATLAB command prompt:

    • To open the tool, enter this command.

      generateFPGADataCaptureIP

    • To reload the parameters of the most recent design, use the restore argument.

      generateFPGADataCaptureIP('restore',true);

    • To reload the parameters of a design you already generated and saved in a MAT file, use the matFile argument.

      generateFPGADataCaptureIP('datacapture1_gensettings.mat');
      Where datacapture1 is the name of the generated HDL IP core that you specify in the Generated IP name parameter.

Parameters

expand all

Target

The available vendors depend on which HDL Verifier support package you have installed. There are separate support packages for Intel® (Altera®) and AMD boards.

Select the type of connection channel as JTAG, PL Ethernet, PS Ethernet, or USB Ethernet.

Note

PL Ethernet, PS Ethernet, and USB Ethernet connections are available for AMD devices only.

Location to save the generated files, specified as the name of a folder on the host computer.

Data Types: char | string

Select the number of data capture IPs that you want to generate.

Select the language used for the generated HDL IP core as Verilog or VHDL.

Ports

This name is used for the generated HDL IP core, the System object, and the Simulink model.

The name does not have to match the signal name in your HDL files. This name is used for:

  • Input port on the generated HDL IP core. Internal to the IP, this signal is routed to the capture buffer, or to use as part of trigger condition and capture condition, depending on your selection for Use As.

  • Structure field in the captured data returned to the MATLAB workspace

  • Port on the generated Simulink block

  • Table of signals in the trigger, capture condition, and data types parameters editor at capture time

Data Types: char | string

This number is used to generate the HDL IP port definition, and contributes to the total width of the capture buffer. You can specify the data type for the captured data at capture time.

Note

If you do not have Fixed-Point Designer™, data capture can only return built-in data types, such as uint8. You must specify ports for the generated IP that match the sizes of the built-in data types, that is 1, 8, 16, 32, or 64 bits. We recommend Fixed-Point Designer to enable fixed-point data types and captured signals of any size.

When you specify a signal as Data, the signal is captured to the sample buffer and returned to MATLAB, but it cannot contribute to a trigger condition and capture condition. When you specify a signal as Trigger, it is available for defining a trigger condition and capture condition at capture time, but is not captured and returned to MATLAB. You can also specify that the signal is used as Both trigger and data.

Capture

Use this parameter to specify the memory type for storing captured data as one of these options:

  • Internal memory — This memory type uses the internal BRAM resources of the FPGA to store captured data.

  • External memory — This memory type uses external DDR or any memory block connected to the data capture IP through an AXI4 interface to store captured data.

Note

Support for external memory is available for AMD devices over JTAG connections only.

Use this parameter to specify the size of the memory in the generated HDL IP core. The width of the memory is the total bit width of the data signals.

When you specify the sample depth, consider the number of windows you plan to configure when reading the data, because together they impact the window depth of each capture window. The window depth is the sample depth divided by the number of capture windows. Specify the number of capture windows by using the Number of capture windows parameter in the FPGA Data Capture tool or by using the property for an hdlverifier.FPGADataReader System object.

For example, if the sample depth is 4096 and the number of capture windows is 4, then each capture window has a window depth of 1024.

Use this parameter to enable a sequential trigger. To capture specified data from an FPGA, give a set of trigger conditions in multiple stages. For more information on sequential trigger, see Sequential Trigger.

When you specify the Max trigger stages, consider the maximum number of trigger stages in which you plan to configure the trigger conditions. Specify the number of trigger stages by using the Number of trigger stages parameter in the FPGA Data Capture tool or by using the NumTriggerStages property for an hdlverifier.FPGADataReader System object.

For example, if the maximum number of trigger stages is 4, then the number of trigger stages can be 1, 2, 3, or 4.

Select this parameter to include capture condition logic in the HDL IP core. Include capture condition logic to use a capture condition to control which data to capture from the FPGA. The HDL IP core evaluates the capture condition at each clock cycle and captures only the data that satisfies the capture condition. For more information on capture conditions, see Capture Conditions.

Set up a capture condition in the FPGA Data Capture tool or the hdlverifier.FPGADataReader System object.

Select this parameter to include trigger input ports (TRIG_IN and TRIG_IN_ACK) to the selected data capture HDL IP core. Include trigger input ports to enable cross-triggering between multiple data capture IPs and between a data capture IP and a processor. Use trigger input and output ports to pass the trigger signal from one data capture IP to another.

Dependencies

To enable this parameter, in the Target section, set FPGA vendor to AMD and Connection type to JTAG.

Select this parameter to include trigger output ports (TRIG_OUT and TRIG_OUT_ACK) to the selected data capture HDL IP core. Include trigger output ports to enable cross-triggering between multiple data capture IPs and between a data capture IP and a processor. Use trigger input and output ports to pass the trigger signal from one data capture IP to another.

Dependencies

To enable this parameter, in the Target section, set FPGA vendor to AMD and Connection type to JTAG.

Ethernet settings

Specify the internet protocol (IP) address of the Ethernet port on the target FPGA board as a dotted-quad value. The target IP address must be a set of four numbers consisting of integers in the range from 0 to 255 that are separated by three dots.

Dependencies

To enable this parameter, in the Target section, set FPGA vendor to AMD and Connection type to PL Ethernet.

Specify the user datagram protocol (UDP) port number of the target FPGA board as an integer from 255 to 65,535.

Dependencies

To enable this parameter, in the Target section, set FPGA vendor to AMD and Connection type to PL Ethernet.

Data Types: single | double | int8 | int16 | int32 | int64 | uint8 | uint16 | uint32 | uint64

Select the Ethernet interface type as GMII, MII, or SGMII based on the interface for your target FPGA board.

Dependencies

To enable this parameter, in the Target section, set FPGA vendor to AMD and Connection type to PL Ethernet.

Version History

Introduced in R2017a