importONNXLayers
(To be removed) Import layers from ONNX network
importONNXLayers will be removed in a future release. Use importNetworkFromONNX instead. (since R2023b) For more information about updating
your code, see Version History.
Description
Add-On Required: This feature requires the Deep Learning Toolbox Converter for ONNX Model Format add-on.
lgraph = importONNXLayers(modelfile)modelfile. The function returns lgraph as a
LayerGraph object compatible with a DAGNetwork or
dlnetwork object.
importONNXLayers requires the Deep Learning Toolbox™ Converter for ONNX Model Format support package. If this support package is not installed, then
importONNXLayers provides a download link.
Note
By default, importONNXLayers tries to generate a custom layer when
the software cannot convert an ONNX operator into an equivalent built-in MATLAB® layer. For a list of operators for which the software supports conversion,
see ONNX Operators Supported for Conversion into Built-In MATLAB Layers.
importONNXLayers saves the generated custom layers in the namespace
+.modelfile
importONNXLayers does not automatically generate a custom layer for
each ONNX operator that is not supported for conversion into a built-in MATLAB layer. For more information on how to handle unsupported layers, see Tips.
lgraph = importONNXLayers(modelfile,Name=Value)OutputLayerType="classification" imports a layer graph
compatible with a DAGNetwork object, with a classification output layer
appended to the end of the first output branch of the imported network architecture.
Examples
Download and install the Deep Learning Toolbox Converter for ONNX Model Format support package.
Type importONNXLayers at the command line.
importONNXLayers
If Deep Learning Toolbox Converter for ONNX Model Format is not installed, then the function provides a link to the required support package in the Add-On Explorer. To install the support package, click the link, and then click Install. Check that the installation is successful by importing the network from the model file "simplenet.onnx" at the command line. If the support package is installed, then the function returns a LayerGraph object.
modelfile = "simplenet.onnx";
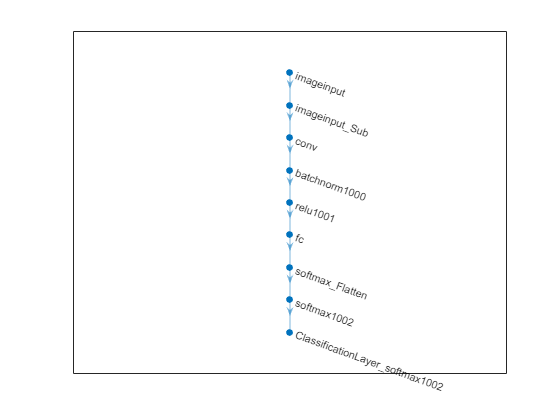
lgraph = importONNXLayers(modelfile)lgraph =
LayerGraph with properties:
Layers: [9×1 nnet.cnn.layer.Layer]
Connections: [8×2 table]
InputNames: {'imageinput'}
OutputNames: {'ClassificationLayer_softmax1002'}
Plot the network architecture.
plot(lgraph)
Import a pretrained ONNX network as a LayerGraph object. Then, assemble the imported layers into a DAGNetwork object, and use the assembled network to classify an image.
Generate an ONNX model of the squeezenet convolution neural network.
squeezeNet = squeezenet;
exportONNXNetwork(squeezeNet,"squeezeNet.onnx");
Specify the model file and the class names.
modelfile = "squeezenet.onnx";
ClassNames = squeezeNet.Layers(end).Classes;
Import the layers and weights of the ONNX network. By default, importONNXLayers imports the network as a LayerGraph object compatible with a DAGNetwork object.
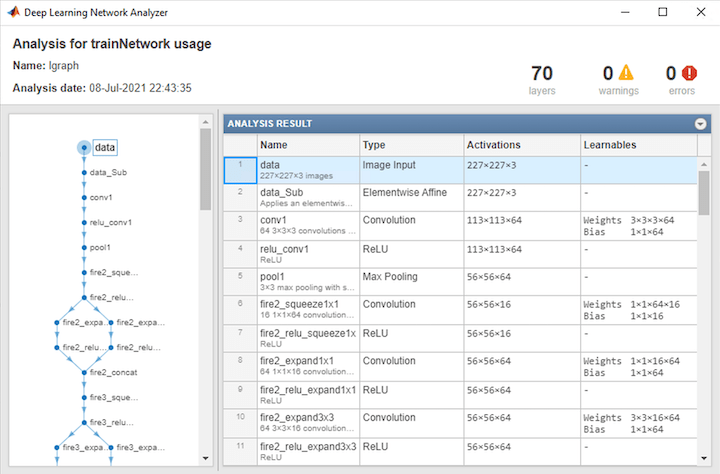
lgraph = importONNXLayers(modelfile)
lgraph =
  LayerGraph with properties:

         Layers: [70×1 nnet.cnn.layer.Layer]
    Connections: [77×2 table]
     InputNames: {'data'}
    OutputNames: {'ClassificationLayer_prob'}
Analyze the imported network architecture.
analyzeNetwork(lgraph)
Display the last layer of the imported network. The output shows that the layer graph has a ClassificationOutputLayer at the end of the network architecture.
lgraph.Layers(end)
ans =
  ClassificationOutputLayer with properties:

            Name: 'ClassificationLayer_prob'
         Classes: 'auto'
    ClassWeights: 'none'
      OutputSize: 'auto'

   Hyperparameters
    LossFunction: 'crossentropyex'
The classification layer does not contain the classes, so you must specify these before assembling the network. If you do not specify the classes, then the software automatically sets the classes to 1, 2, ..., N, where N is the number of classes.
The classification layer has the name 'ClassificationLayer_prob'. Set the classes to ClassNames, and then replace the imported classification layer with the new one.
cLayer = lgraph.Layers(end);
cLayer.Classes = ClassNames;
lgraph = replaceLayer(lgraph,'ClassificationLayer_prob',cLayer);
Assemble the layer graph using assembleNetwork to return a DAGNetwork object.
net = assembleNetwork(lgraph)
net =
  DAGNetwork with properties:

         Layers: [70×1 nnet.cnn.layer.Layer]
    Connections: [77×2 table]
     InputNames: {'data'}
    OutputNames: {'ClassificationLayer_prob'}
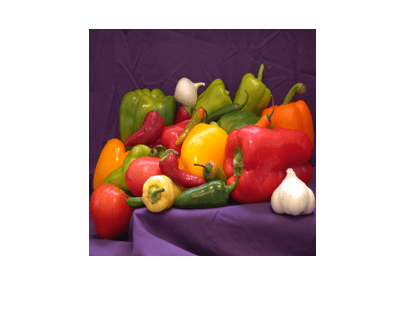
Read the image you want to classify and display the size of the image. The image is 384-by-512 pixels and has three color channels (RGB).
I = imread("peppers.png");
size(I)
ans = 1×3
384 512 3
Resize the image to the input size of the network. Show the image.
I = imresize(I,[227 227]);
imshow(I)

Classify the image using the imported network.
label = classify(net,I)
label = categorical
     bell pepper
Import a pretrained ONNX network as a LayerGraph object compatible with a dlnetwork object. Then, convert the layer graph to a dlnetwork to classify an image.
Generate an ONNX model of the squeezenet convolution neural network.
squeezeNet = squeezenet;
exportONNXNetwork(squeezeNet,"squeezeNet.onnx");
Specify the model file and the class names.
modelfile = "squeezenet.onnx";
ClassNames = squeezeNet.Layers(end).Classes;
Import the layers and weights of the ONNX network. Specify to import the network as a LayerGraph object compatible with a dlnetwork object.
lgraph = importONNXLayers(modelfile,TargetNetwork="dlnetwork")lgraph =
LayerGraph with properties:
Layers: [70×1 nnet.cnn.layer.Layer]
Connections: [77×2 table]
InputNames: {'data'}
OutputNames: {1×0 cell}
Read the image you want to classify and display the size of the image. The image is 384-by-512 pixels and has three color channels (RGB).
I = imread("peppers.png");
size(I)
ans = 1×3
384 512 3
Resize the image to the input size of the network. Show the image.
I = imresize(I,[227 227]);
imshow(I)
Convert the imported layer graph to a dlnetwork object.
dlnet = dlnetwork(lgraph);
Convert the image to a dlarray. Format the images with the dimensions "SSCB" (spatial, spatial, channel, batch). In this case, the batch size is 1 and you can omit it ("SSC").
I_dlarray = dlarray(single(I),"SSCB");Classify the sample image and find the predicted label.
prob = predict(dlnet,I_dlarray);
[~,label] = max(prob);
Display the classification result.
ClassNames(label)
ans = categorical
     bell pepper
Import an ONNX long short-term memory (LSTM) network as a layer graph, and then find and replace the placeholder layers. An LSTM network enables you to input sequence data into a network, and make predictions based on the individual time steps of the sequence data.
lstmNet has a similar architecture to the LSTM network created in Sequence Classification Using Deep Learning. lstmNet is trained to recognize the speaker given time series data representing two Japanese vowels spoken in succession.
Specify lstmNet as the model file.
modelfile = "lstmNet.onnx";Import the layers and weights of the ONNX network. By default, importONNXLayers imports the network as a LayerGraph object compatible with a DAGNetwork object.
lgraph = importONNXLayers("lstmNet.onnx")Warning: Unable to import some ONNX operators, because they are not supported. They have been replaced by placeholder layers. To find these layers, call the function findPlaceholderLayers on the returned object.
1 operators(s) : Unable to create an output layer for the ONNX network output 'softmax1001' because its data format is unknown or unsupported by MATLAB output layers.
If you know its format, pass it using the 'OutputDataFormats' argument.
To import the ONNX network as a function, use importONNXFunction.
lgraph =
  LayerGraph with properties:

         Layers: [6×1 nnet.cnn.layer.Layer]
    Connections: [5×2 table]
     InputNames: {'sequenceinput'}
    OutputNames: {1×0 cell}
importONNXLayers displays a warning and inserts a placeholder layer for the output layer.
You can check for placeholder layers by viewing the Layers property of lgraph or by using the findPlaceholderLayers function.
lgraph.Layers
ans =
  6×1 Layer array with layers:

     1   'sequenceinput'                 Sequence Input                        Sequence input with 12 dimensions
     2   'lstm1000'                      LSTM                                  LSTM with 100 hidden units
     3   'fc_MatMul'                     Fully Connected                       9 fully connected layer
     4   'fc_Add'                        Elementwise Affine                    Applies an elementwise scaling followed by an addition to the input.
     5   'Flatten_To_SoftmaxLayer1005'   lstmNet.Flatten_To_SoftmaxLayer1005   lstmNet.Flatten_To_SoftmaxLayer1005
     6   'OutputLayer_softmax1001'       PLACEHOLDER LAYER                     Placeholder for 'added_outputLayer' ONNX operator
placeholderLayers = findPlaceholderLayers(lgraph)
placeholderLayers =
  PlaceholderLayer with properties:

        Name: 'OutputLayer_softmax1001'
    ONNXNode: [1×1 struct]
     Weights: []

   Learnable Parameters
    No properties.

   State Parameters
    No properties.

  Show all properties
Create an output layer to replace the placeholder layer. First, create a classification layer with the name OutputLayer_softmax1001. If you do not specify the classes, then the software automatically sets them to 1, 2, ..., N, where N is the number of classes. In this case, the class data is a categorical vector of labels "1","2",..."9", which correspond to nine speakers.
outputLayer = classificationLayer('Name','OutputLayer_softmax1001');
Replace the placeholder layers with outputLayer by using the replaceLayer function.
lgraph = replaceLayer(lgraph,'OutputLayer_softmax1001',outputLayer);Display the Layers property of the layer graph to confirm the replacement.
lgraph.Layers
ans =
  6×1 Layer array with layers:

     1   'sequenceinput'                 Sequence Input                        Sequence input with 12 dimensions
     2   'lstm1000'                      LSTM                                  LSTM with 100 hidden units
     3   'fc_MatMul'                     Fully Connected                       9 fully connected layer
     4   'fc_Add'                        Elementwise Affine                    Applies an elementwise scaling followed by an addition to the input.
     5   'Flatten_To_SoftmaxLayer1005'   lstmNet.Flatten_To_SoftmaxLayer1005   lstmNet.Flatten_To_SoftmaxLayer1005
     6   'OutputLayer_softmax1001'       Classification Output                 crossentropyex
Alternatively, define the output layer when you import the layer graph by using the OutputLayerType or OutputDataFormats option. Check if the imported layer graphs have placeholder layers by using findPlaceholderLayers.
lgraph1 = importONNXLayers("lstmNet.onnx",OutputLayerType="classification");
findPlaceholderLayers(lgraph1)
ans =
  0×1 Layer array with properties:
lgraph2 = importONNXLayers("lstmNet.onnx",OutputDataFormats="BC");
findPlaceholderLayers(lgraph2)
ans =
  0×1 Layer array with properties:
The imported layer graphs lgraph1 and lgraph2 do not have placeholder layers.
Input Arguments
Name-Value Arguments
Output Arguments
Limitations
importONNXLayers supports these:
ONNX intermediate representation version 9
ONNX operator sets 6–20
Note
If you import an exported network, layers of the reimported network might differ from layers of the original network, and might not be supported.
More About
Tips
If the imported network contains an ONNX operator not supported for conversion into a built-in MATLAB layer (see ONNX Operators Supported for Conversion into Built-In MATLAB Layers) and
importONNXLayersdoes not generate a custom layer, thenimportONNXLayersinserts a placeholder layer in place of the unsupported layer. To find the names and indices of the unsupported layers in the network, use thefindPlaceholderLayersfunction. You then can replace a placeholder layer with a new layer that you define. To replace a layer, usereplaceLayer.To use a pretrained network for prediction or transfer learning on new images, you must preprocess your images in the same way as the images that you use to train the imported model. The most common preprocessing steps are resizing images, subtracting image average values, and converting the images from BGR format to RGB format.
For more information about preprocessing images for training and prediction, see Preprocess Images for Deep Learning.
MATLAB uses one-based indexing, whereas Python® uses zero-based indexing. In other words, the first element in an array has an index of 1 and 0 in MATLAB and Python, respectively. For more information about MATLAB indexing, see Array Indexing. In MATLAB, to use an array of indices (
ind) created in Python, convert the array toind+1.For more tips, see Tips on Importing Models from TensorFlow, PyTorch, and ONNX.
Alternative Functionality
Deep Learning Toolbox Converter for ONNX Model Format provides four functions to import a pretrained ONNX network: importONNXNetwork,
importONNXLayers, importONNXFunction,
and importNetworkFromONNX.